bjorne_again
Well-known member
So, I did this look a very long time ago in a very far away place and figured I'd post the tutorial here since it's definitely out of the ordinary. Hope you find it interesting or useful in some way!
Here's the crazy o' look we'll be doing!

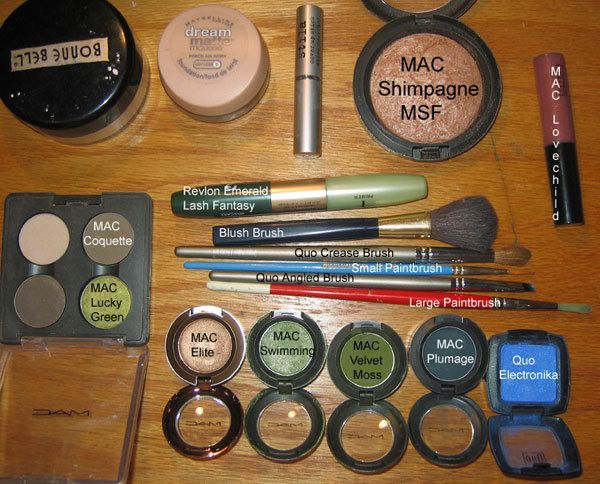
Ok! So here is all the stuff used! You can obviously deviate from the stuff here, and yes, i know, my brushes are nothing short of pathetic. Whenever i go to MAC though, i am drawn like a moth to a headlight to the colourful products - brushes look boring... and i'm too cheap to buy em.
Step 1: Wash, dry, moisturize your face. Apply a primer if you want. Foundation and concealer next. I use Stila Coverup Stick in light all over my lids and under them to cover all my veins and purple tones - it's a very thick concealer. powder your face, and then fill in the brows using an angled brush(I used MAC coquette), and you should be ready to go. I also dust a bunch of excess loose powder all under my eyes and inner eye area on the bridge of my nose to catch all the excess eyeshadow. I curl my lashes first before applying any colour to my lid so i won't smudge the lid colour later, and also because my lashes are stick straight naturally. I sometimes have to recurl them when i finish anyway =(

Step 2: Dip the small paintbrush (or any eyeliner brush, or the angled brush) into water, and shake off the excess. Dip it into MAC elite e/s and make sure to get a lot of pigment on there. Mentally draw a vertical line from the very inner corner of your eye up to your eyebrows. From that spot, move down a few mms and begin to draw a straight diagonal line from there to the top of the arch, staying a few mms (a little less than a quarter of an inch) from your brow. This is tricky because everyone has different eyelids and eyebrows. I actually have a funny little straight fold thing on my lid that i followed when i did this.
Next, re-dip the brush into water, shake, get more elite, and draw in that vertical line you originally imagined to determine where to start drawing the gold line in a line straight down from that inner edge of the line down beside your eye, ending a few mms above the inner corner. To keep this line straight down, I look straight into a mirror and I pull the brush down, following the contours of my face so it looks straight, even though it is not applied straight - straight lines drawn on a curved face appear curved, properly curved lines can look straight on a curvy face - this is really important to remember whenever you're working with line - it's something like making tiny optical illusions on your face...
Use your finger (or a brush if you prefer) to apply elite eyeshadow (dry) inside the line you've drawn, make sure to blend. It should resemble something like this:

Step 3: Use your fingers to pick up a bunch of MAC lucky green eyeshadow - don't be sparing. I used my finger to pack on as much colour as possible. Also, when you use your finger, you smooth down the flecks of the shadow flat so it looks more shimmery. Blend the lucky green into the elite - if you have some trouble getting it perfect, employ a brush (crease brush or large paintbrush or say a MAC 219, 222 or 224) with lucky green on it to blend the colours together. Make sure to use colour on whatever brush you use to blend - you don't want to pick up any of the colour you deposited on your eye on a brush - you want it looking as vibrant as possible.

Step 4: The colour should be applied in a diagonal shape, so that less colour is applied on the inner lid and more is applied in the crease under the arch and blended out. It should look like this.

Step 5: Use your fingers to pick up some MAC swimming and follow the same shape as the lucky green towards the outside of the lid, covering most of the lashline with it, and blending it out and up towards the outter part of your eyebrow. Unblended it looks like this:

Step 6: Pick up both lucky green and swimming with your finger (more lucky green than swimming) and apply it in the "blank" area between the lucky green and the swimming. then blend, Blend, BLEND!!!

Step 7: Next, use a the large paintbrush to pick up some MAC velvet moss - this stuff is so pigmented and it can get messy - and apply it to the outter 1/4 of your upper lash line, and follow the same line as the swimming and blend some velvet moss out from the lashline, concentrating a lot of colour at the outter corner of the eye, with a bit of an upward thrust, not going below the eye and blending like crazy. You may need to get some more swimming and apply it over the top edge of the velvet moss to help blend them together as the velvet moss is a really richly pigmented shadow. to make the outter edges of the velvet moss look really soft, i used the crease brush with no pigment on it and buffed the colour for a few minutes to get it to grade outward evenly towards the end of my eyebrow. It should look like this.

Step 8: Apply MAC plumage below the velvet moss on the lower lid at the outer corner of the eye with the large paintbrush (because it is SUCH a difficult colour to apply evenly) to create a horizontal shape to the colour(going back to applying colour in a curvy shape to make it look straight) so you end up with a lot of colour at the outter corner of the eye, and move towards the centre of your eye with the brush, tapering the shadow shape as you go so that the bottom, blended line of the plumage looks horizontal, stopping the plumage around the centre of the eye. It should overlap with the lucky green applied under the eye before. This looks pretty shoddy, my outter eyelid was getting irritated and the plumage was simply not behaving itself, so it's not as nicely blended as I would have liked:

Step 9: Wet the angled brush and dip it in plumage - wipe it gently on a kleenex to remove excess pigment - the goal is to get as thin a line as possible and start 3/4 of the way towards the outter edge of your lower lash line, and pull the angled brush across the lash line inward towards your nose, and as your lid starts to curve, continue going in a straight line with the brush so it diverges from the lash line, and once that extended line ends up about 1 cm long (almost 1/2 an inch) stop the line (Aside:Wow! Does that remind anyone else of tangent studies in elementary calculus? If it does, use that as an analogy to understand what I mean... a curve is made up of an infinitely large number of straight lines... so draw the line tangent to the curve of your lower lid at the point 3/4 of the way to the outter corner! YEAH!). Because my eye is wrinkly and there is lots of loose skin underneath, I had to alter the way I applied the line, to take into consideration how it would look when my lower lid skin folded. I dried off that brush and then use just a touch of plumage and blend it on the lower part of the line to soften it - but keep the top of the line as crisp as possible. anyway. It should look like this:

Step 10: Apply Revlon lash fantasy mascara in emerald fantasy to lashes - first the primer, then the main colour. I applied both in an atypical fashion - instead of starting at the base and going straight up and out to widen the eyes, I started at the base and pulled outward towards my ears, to keep with the whole diagonal thrust of the eye shape thing. No pic for this, you'll see it in the next shot =)
Step 11: Clean and FULLY DRY the angled brush, dip it in Quo electronika e/s and pack it on your inner rim/waterline - the entire lower rim, the inner corner, and the top 1/3 of the upper rim.I had to go over that 3 times to get as much colour as i got concentrated on the rim(MAC royal wink f/l is MUCH better for this!). As well, if you don't have a perfect line and the blue shadow extends out of the waterline, pick up more lucky green (on the inner part of the eye) or plumage (bottom, outter) and just apply it right over top on your lid skin - it should make a more clearly defined border between the colours.

Step 12: Apply MAC shimpagne MSF LIGHTLY to cheeks, nose, forehead, and a touch to chin with a blush brush. Then apply MAC lovechild l/g to lips. It should look like this!

And...we're done! It should somewhat resemble this when you're done. The plumage line under the eyes is more prominent in this verson, and the dark shadows aren't blended as well, nor are the outter areas of the light colours near the brow - I find it 384345739475943753x harder to blend perfectly at night.

Final product...


Here's the crazy o' look we'll be doing!
Ok! So here is all the stuff used! You can obviously deviate from the stuff here, and yes, i know, my brushes are nothing short of pathetic. Whenever i go to MAC though, i am drawn like a moth to a headlight to the colourful products - brushes look boring... and i'm too cheap to buy em.
Step 1: Wash, dry, moisturize your face. Apply a primer if you want. Foundation and concealer next. I use Stila Coverup Stick in light all over my lids and under them to cover all my veins and purple tones - it's a very thick concealer. powder your face, and then fill in the brows using an angled brush(I used MAC coquette), and you should be ready to go. I also dust a bunch of excess loose powder all under my eyes and inner eye area on the bridge of my nose to catch all the excess eyeshadow. I curl my lashes first before applying any colour to my lid so i won't smudge the lid colour later, and also because my lashes are stick straight naturally. I sometimes have to recurl them when i finish anyway =(
Step 2: Dip the small paintbrush (or any eyeliner brush, or the angled brush) into water, and shake off the excess. Dip it into MAC elite e/s and make sure to get a lot of pigment on there. Mentally draw a vertical line from the very inner corner of your eye up to your eyebrows. From that spot, move down a few mms and begin to draw a straight diagonal line from there to the top of the arch, staying a few mms (a little less than a quarter of an inch) from your brow. This is tricky because everyone has different eyelids and eyebrows. I actually have a funny little straight fold thing on my lid that i followed when i did this.
Next, re-dip the brush into water, shake, get more elite, and draw in that vertical line you originally imagined to determine where to start drawing the gold line in a line straight down from that inner edge of the line down beside your eye, ending a few mms above the inner corner. To keep this line straight down, I look straight into a mirror and I pull the brush down, following the contours of my face so it looks straight, even though it is not applied straight - straight lines drawn on a curved face appear curved, properly curved lines can look straight on a curvy face - this is really important to remember whenever you're working with line - it's something like making tiny optical illusions on your face...
Use your finger (or a brush if you prefer) to apply elite eyeshadow (dry) inside the line you've drawn, make sure to blend. It should resemble something like this:
Step 3: Use your fingers to pick up a bunch of MAC lucky green eyeshadow - don't be sparing. I used my finger to pack on as much colour as possible. Also, when you use your finger, you smooth down the flecks of the shadow flat so it looks more shimmery. Blend the lucky green into the elite - if you have some trouble getting it perfect, employ a brush (crease brush or large paintbrush or say a MAC 219, 222 or 224) with lucky green on it to blend the colours together. Make sure to use colour on whatever brush you use to blend - you don't want to pick up any of the colour you deposited on your eye on a brush - you want it looking as vibrant as possible.
Step 4: The colour should be applied in a diagonal shape, so that less colour is applied on the inner lid and more is applied in the crease under the arch and blended out. It should look like this.
Step 5: Use your fingers to pick up some MAC swimming and follow the same shape as the lucky green towards the outside of the lid, covering most of the lashline with it, and blending it out and up towards the outter part of your eyebrow. Unblended it looks like this:
Step 6: Pick up both lucky green and swimming with your finger (more lucky green than swimming) and apply it in the "blank" area between the lucky green and the swimming. then blend, Blend, BLEND!!!
Step 7: Next, use a the large paintbrush to pick up some MAC velvet moss - this stuff is so pigmented and it can get messy - and apply it to the outter 1/4 of your upper lash line, and follow the same line as the swimming and blend some velvet moss out from the lashline, concentrating a lot of colour at the outter corner of the eye, with a bit of an upward thrust, not going below the eye and blending like crazy. You may need to get some more swimming and apply it over the top edge of the velvet moss to help blend them together as the velvet moss is a really richly pigmented shadow. to make the outter edges of the velvet moss look really soft, i used the crease brush with no pigment on it and buffed the colour for a few minutes to get it to grade outward evenly towards the end of my eyebrow. It should look like this.
Step 8: Apply MAC plumage below the velvet moss on the lower lid at the outer corner of the eye with the large paintbrush (because it is SUCH a difficult colour to apply evenly) to create a horizontal shape to the colour(going back to applying colour in a curvy shape to make it look straight) so you end up with a lot of colour at the outter corner of the eye, and move towards the centre of your eye with the brush, tapering the shadow shape as you go so that the bottom, blended line of the plumage looks horizontal, stopping the plumage around the centre of the eye. It should overlap with the lucky green applied under the eye before. This looks pretty shoddy, my outter eyelid was getting irritated and the plumage was simply not behaving itself, so it's not as nicely blended as I would have liked:
Step 9: Wet the angled brush and dip it in plumage - wipe it gently on a kleenex to remove excess pigment - the goal is to get as thin a line as possible and start 3/4 of the way towards the outter edge of your lower lash line, and pull the angled brush across the lash line inward towards your nose, and as your lid starts to curve, continue going in a straight line with the brush so it diverges from the lash line, and once that extended line ends up about 1 cm long (almost 1/2 an inch) stop the line (Aside:Wow! Does that remind anyone else of tangent studies in elementary calculus? If it does, use that as an analogy to understand what I mean... a curve is made up of an infinitely large number of straight lines... so draw the line tangent to the curve of your lower lid at the point 3/4 of the way to the outter corner! YEAH!). Because my eye is wrinkly and there is lots of loose skin underneath, I had to alter the way I applied the line, to take into consideration how it would look when my lower lid skin folded. I dried off that brush and then use just a touch of plumage and blend it on the lower part of the line to soften it - but keep the top of the line as crisp as possible. anyway. It should look like this:
Step 10: Apply Revlon lash fantasy mascara in emerald fantasy to lashes - first the primer, then the main colour. I applied both in an atypical fashion - instead of starting at the base and going straight up and out to widen the eyes, I started at the base and pulled outward towards my ears, to keep with the whole diagonal thrust of the eye shape thing. No pic for this, you'll see it in the next shot =)
Step 11: Clean and FULLY DRY the angled brush, dip it in Quo electronika e/s and pack it on your inner rim/waterline - the entire lower rim, the inner corner, and the top 1/3 of the upper rim.I had to go over that 3 times to get as much colour as i got concentrated on the rim(MAC royal wink f/l is MUCH better for this!). As well, if you don't have a perfect line and the blue shadow extends out of the waterline, pick up more lucky green (on the inner part of the eye) or plumage (bottom, outter) and just apply it right over top on your lid skin - it should make a more clearly defined border between the colours.
Step 12: Apply MAC shimpagne MSF LIGHTLY to cheeks, nose, forehead, and a touch to chin with a blush brush. Then apply MAC lovechild l/g to lips. It should look like this!
And...we're done! It should somewhat resemble this when you're done. The plumage line under the eyes is more prominent in this verson, and the dark shadows aren't blended as well, nor are the outter areas of the light colours near the brow - I find it 384345739475943753x harder to blend perfectly at night.
Final product...


