Purity
Well-known member
I did this tutorial as a request on my blog, so I thought I'd post it here aswell
 It's been a while since I posted any tutorials but I'm really happy about how this one turned out! Sorry about the cursive lettering, I wrote this in both Swedish and English on my blog and the English version is in cursive and I couldn't get rid of it when I copy/pasted it over here...
Products used:
Face

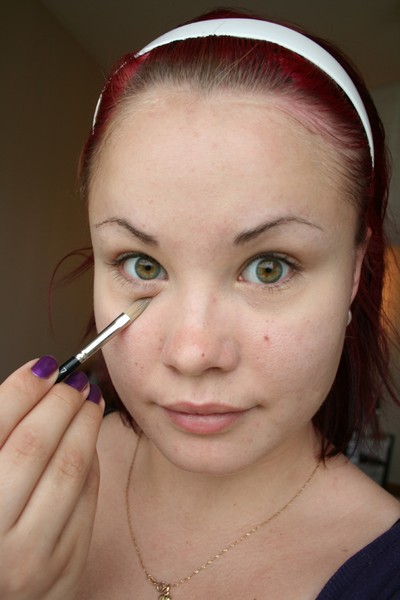
Step 2 - Apply your face primer, I use MAC prep + prime. Put on your concealer where you need extra coverage; i.e. under your eyes, around your nose and on red spots on your face. I apply my studio sculpt concealer from MAC with a concealer brush, MAC #194, and then I blend it into my skin with my fingers.

Step 3 - apply the foundation of your choice. I like studio sculpt foundation from MAC, it moisturises my skin and gives awesome coverage. I put on my foundation with a duo fibre brush, MAC #187, by stippling it on with the brush. It provides coverage while the application is still sheer.

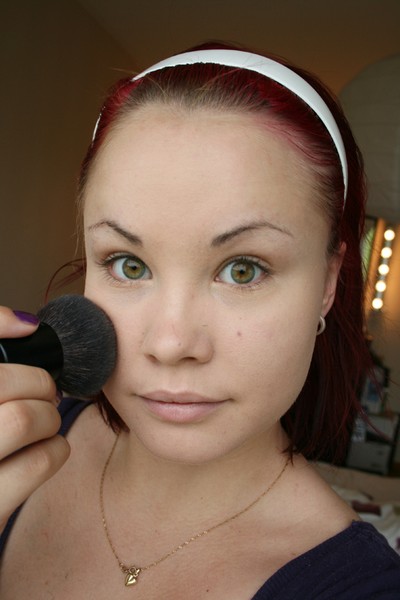
Step 4 - Powder time! It's important to use powder because it fixes your foundation and concealer in place, plus it keeps your face from going oily during the day. I start by applying a loose powder, MAC loose blot powder, over the entire face with a fluffy powder brush, MAC #150.Then I buff a mineral powder, MAC mineralize skinfinish/natural, into my face with a kabuki brush, MAC #182, beacuse MSFN gives such a nice and glowy finish.
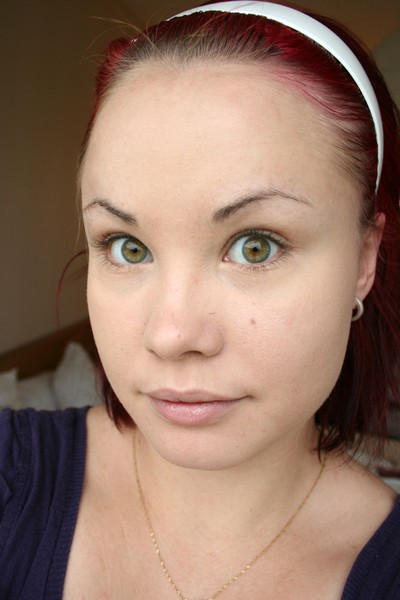
The base is done! A simple step that makes such a difference.
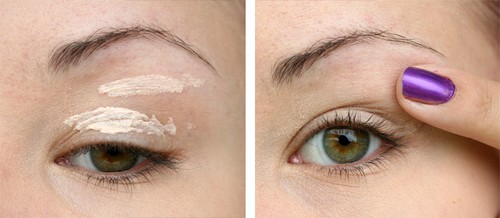
Step 5 - When the base for the face is done, it's important to apply a good eye primer so that your eyeshadow will stay in place the entire day and not crease on your lid. With a good primer, the shadows will stick much better, and the colours will be more vibrant than they would be on bare skin. My favourite eye primer is Primer Potion from Urban Decay. I apply 2-3 lines with primer on my lid using the applicator, and then I smudge the primer over the entire lid with my finger.
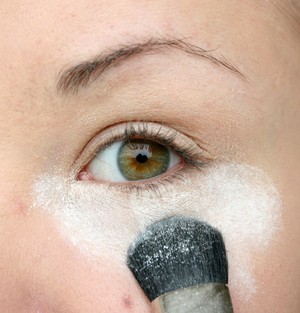
Step 6 - apply some loose powder underneath your eye, to catch up any fallout from the eyeshadow during application. The fallout will be easy to brush off later together with the loose powder.


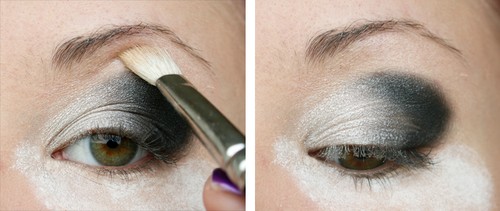
Step 7 - Start from the inner corner of your eye with the lightest eyeshadow. I've used the pigment silver fog from MAC. Pack the pigment on with a flat eyeshadow brush, MAC #239. On the outer half of the lid, apply a medium grey shade. I've used knight from MAC. Pack it on in the same way as you did with silver fog. In the crease and outer v, I applied a matte black eyeshadow, MAC carbon, with a crease brush, MAC #222. The last step is to put on a neutral highlighter eyeshadow, MAC shroom, on the browbone with a fluffy blending brush, MAC #217.
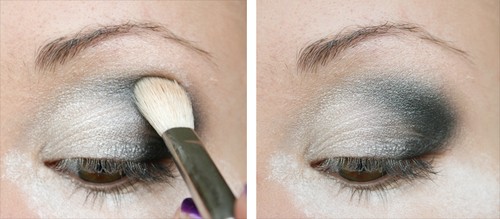
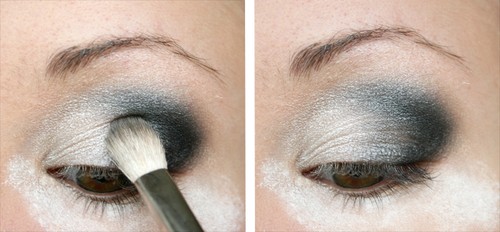
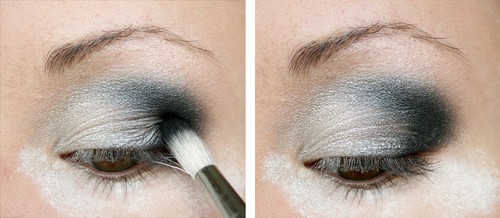

Step 8 - Blend, blend blend! This is the most important step when doing a smokey eye. Sharp edges are a big no no. I use MAC #217 to blend any harsh lines, between the different colours and up towards the brow bone. The shadows will often be a little duller after blending, so I usually put on more colour where it's needed with my blending brush. I put on more black in the outer v with my crease brush, and finished by applying a bit of black with the blending brush to get rid of the last harsh lines.

Step 9 - Now when you're done with the eyeshadow, you can brush off the loose powder underneath your eye =) I press my powder brush flat with my fingers to get really close to the eye.
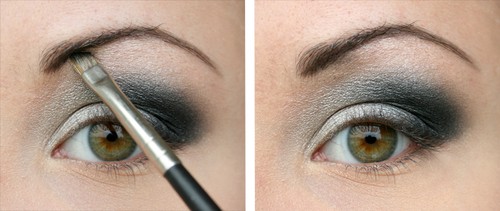

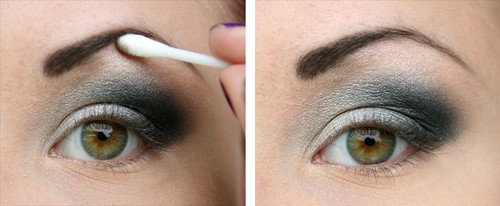
Step 10 - When I'm done with the eyeshadow, I always fill in my brows. This is an important step for me when doing my makeup, since well shaped brows make a big difference, because they frame your entire face. I use tri brow colour from Make up store to fill in my brows, a mix of the two darker colours. I start out by drawing a line with a flat angled brush, MAC #208, along the lower line of my brow. I then repeat the stroke along the upper line of the brow, and then i fill in the space between the lines. I finish the brows by blending harsh lines with a q-tip.

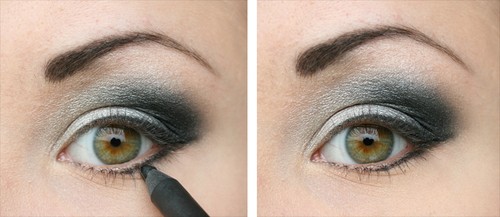


Step 11 - Apply eyeliner along your top lashline. I use MAC fluidline with the same brush I used for my brows. This combination gives a nice and even line. I draw the entire line with one stroke and then I go back to perfect it and to make the wing a bit thicker. Along the lower lashline, I apply a black pencil. I've used a powerpoint pencil from MAC here. In the inner corner of the eye, I highlight with silver fog to brighten the eyes a bit with a smudger brush, MAC #219. I use the same brush to apply some grey (knight) and black (carbon) over the black pencil to fixiate it and to make the line smokier.

Step 12 - Apply mascara and brow fix to finish off the eyes!
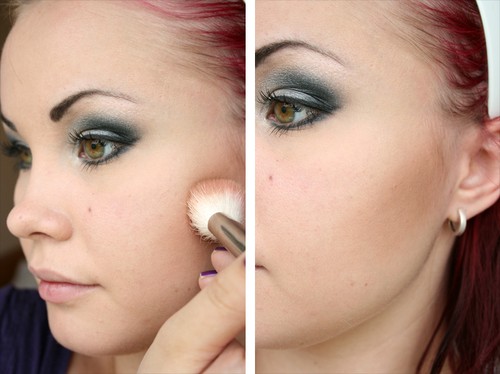
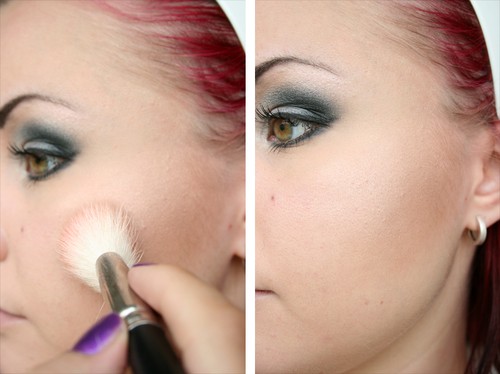

Step 13 - I like to skip blush and only contour and highlight my cheekbones when doing a smokey eye. With an angled contouring brush, MAC #168, I apply my matte, greybrown sculpting powder sculpt from MAC, right under the cheekbone. I start at my hairline and sweep the brush down towards my cheek. I then apply my highlight powder with the same brush, but when highlighting, I start out at the highest point of the cheekbone and sweep the brush up towards my hairline. I finish by buffing everything together with my kabuki brush to avoid sharp lines.
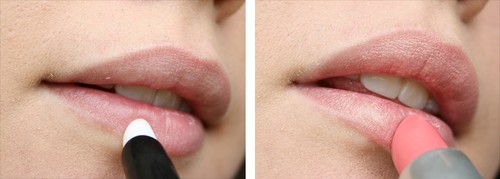
Step 14 - Lightly coloured lips looks nice with smokey eyes. I start out with applying a lip primer, MAC prep + prime lip, on my lips to even the surface of the lips and provide a good foundation for the lipstick. I then put on the lipstick. I've used MAC lollipop loving here.

Step 15 - Fix your makeup with a fixing spray. I use Face mist from Make up store.
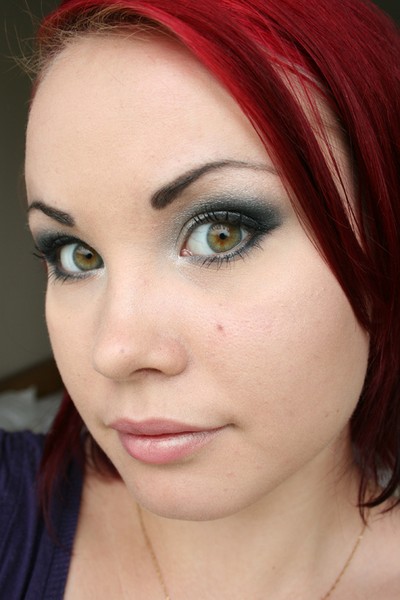
The finished result! Let me know what you think =)
Products used:
Face
- MAC prep + prime face
- MAC studio sculpt concealer - NW20
- MAC studio sculpt foundation - NW20
- MAC loose blot powder - medium
- MAC mineralize skinfinish/natural - light
- MAC sculpting powder - sculpt
- MAC mineralize skinfinish - perfect topping
- MUS face mist
- Urban Decay Primer potion
- MAC pigment - silver fog
- MAC eyeshadow - knight
- MAC eyeshadow - carbon
- MAC eyeshadow - shroom
- MAC fluidline - blacktrack
- MAC powerpoint pencil - engraved
- MAC plush lash mascara
- MUS tri brow colour
- H&M brow fix
- MAC prep + prime lip
- MAC lipstick - lollipop loving
- MAC #194
- MAC #187
- MAC #150
- MAC #182
- MAC #227
- MAC #239
- MAC #222
- MAC #217
- MAC #219
- MAC #208
Step 1 - Start with a clean and moisturised face.
Step 2 - Apply your face primer, I use MAC prep + prime. Put on your concealer where you need extra coverage; i.e. under your eyes, around your nose and on red spots on your face. I apply my studio sculpt concealer from MAC with a concealer brush, MAC #194, and then I blend it into my skin with my fingers.
Step 3 - apply the foundation of your choice. I like studio sculpt foundation from MAC, it moisturises my skin and gives awesome coverage. I put on my foundation with a duo fibre brush, MAC #187, by stippling it on with the brush. It provides coverage while the application is still sheer.
Step 4 - Powder time! It's important to use powder because it fixes your foundation and concealer in place, plus it keeps your face from going oily during the day. I start by applying a loose powder, MAC loose blot powder, over the entire face with a fluffy powder brush, MAC #150.Then I buff a mineral powder, MAC mineralize skinfinish/natural, into my face with a kabuki brush, MAC #182, beacuse MSFN gives such a nice and glowy finish.
The base is done! A simple step that makes such a difference.
Step 5 - When the base for the face is done, it's important to apply a good eye primer so that your eyeshadow will stay in place the entire day and not crease on your lid. With a good primer, the shadows will stick much better, and the colours will be more vibrant than they would be on bare skin. My favourite eye primer is Primer Potion from Urban Decay. I apply 2-3 lines with primer on my lid using the applicator, and then I smudge the primer over the entire lid with my finger.
Step 6 - apply some loose powder underneath your eye, to catch up any fallout from the eyeshadow during application. The fallout will be easy to brush off later together with the loose powder.
Step 7 - Start from the inner corner of your eye with the lightest eyeshadow. I've used the pigment silver fog from MAC. Pack the pigment on with a flat eyeshadow brush, MAC #239. On the outer half of the lid, apply a medium grey shade. I've used knight from MAC. Pack it on in the same way as you did with silver fog. In the crease and outer v, I applied a matte black eyeshadow, MAC carbon, with a crease brush, MAC #222. The last step is to put on a neutral highlighter eyeshadow, MAC shroom, on the browbone with a fluffy blending brush, MAC #217.
Step 8 - Blend, blend blend! This is the most important step when doing a smokey eye. Sharp edges are a big no no. I use MAC #217 to blend any harsh lines, between the different colours and up towards the brow bone. The shadows will often be a little duller after blending, so I usually put on more colour where it's needed with my blending brush. I put on more black in the outer v with my crease brush, and finished by applying a bit of black with the blending brush to get rid of the last harsh lines.
Step 9 - Now when you're done with the eyeshadow, you can brush off the loose powder underneath your eye =) I press my powder brush flat with my fingers to get really close to the eye.
Step 10 - When I'm done with the eyeshadow, I always fill in my brows. This is an important step for me when doing my makeup, since well shaped brows make a big difference, because they frame your entire face. I use tri brow colour from Make up store to fill in my brows, a mix of the two darker colours. I start out by drawing a line with a flat angled brush, MAC #208, along the lower line of my brow. I then repeat the stroke along the upper line of the brow, and then i fill in the space between the lines. I finish the brows by blending harsh lines with a q-tip.
Step 11 - Apply eyeliner along your top lashline. I use MAC fluidline with the same brush I used for my brows. This combination gives a nice and even line. I draw the entire line with one stroke and then I go back to perfect it and to make the wing a bit thicker. Along the lower lashline, I apply a black pencil. I've used a powerpoint pencil from MAC here. In the inner corner of the eye, I highlight with silver fog to brighten the eyes a bit with a smudger brush, MAC #219. I use the same brush to apply some grey (knight) and black (carbon) over the black pencil to fixiate it and to make the line smokier.
Step 12 - Apply mascara and brow fix to finish off the eyes!
Step 13 - I like to skip blush and only contour and highlight my cheekbones when doing a smokey eye. With an angled contouring brush, MAC #168, I apply my matte, greybrown sculpting powder sculpt from MAC, right under the cheekbone. I start at my hairline and sweep the brush down towards my cheek. I then apply my highlight powder with the same brush, but when highlighting, I start out at the highest point of the cheekbone and sweep the brush up towards my hairline. I finish by buffing everything together with my kabuki brush to avoid sharp lines.
Step 14 - Lightly coloured lips looks nice with smokey eyes. I start out with applying a lip primer, MAC prep + prime lip, on my lips to even the surface of the lips and provide a good foundation for the lipstick. I then put on the lipstick. I've used MAC lollipop loving here.
Step 15 - Fix your makeup with a fixing spray. I use Face mist from Make up store.
The finished result! Let me know what you think =)


 ), I will try to shape up! *runs away to the FOTD section to post a catch up-post*