mezzamy
Well-known member
ok folks, so i havent done a tutorial in a while. Brows are a big thing for me (ever since i saw photos of myself in high school where i had overplucked them to oblivion), and whilst i know i dont have the greatest brows in the world, I thought this tutorial would be helpful for people who want to fill in their brows without having them look fake
for starters, i feel that powder is the most natural looking product of all to use. it's light, easy to use, and gives the appearance of fuller brows without depositing huge amounts of colour. you can use a matte eyeshadow (please use matte shades - i dont know of anyone who has brows that are naturally frost or veluxe pearl) or powders that are designed specifically for the brows. I find brow powders to be a bit firmer and waxier than standard eyeshadows.
i use the MAC Brow Shader Duo in Maple/Soft Charcoal. I have very dark brown, practically black hair, so this shade works well for me. It doesnt have any red tones to it so it blends in with my existing brow hair easily. For a brush, any stiff, angled brow brush would work. I use a real cheapy - Cyber Colors Eyebrow Brush which i bought off sasa.com for a dollar or two.
ETA: i dont use the 'Maple' or highlighting shade unless i have eyeshadow on. it's pretty much the same thing as using Shroom as a highlight
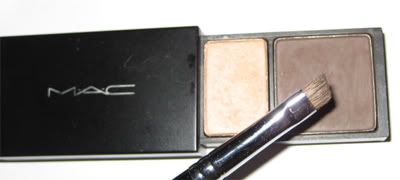
so here is our brow powder and my el cheapo brush. what you want to do is get a bit of the powder on the brush by sweeping it over the product, and tapping the excess off

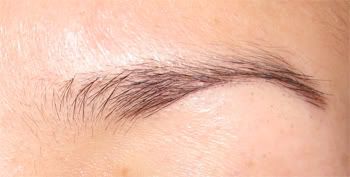
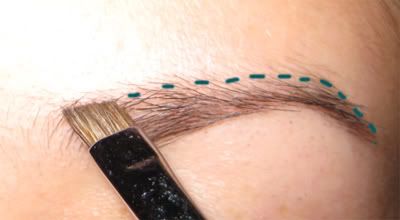
so this is one of my eyebrows. it has a bit of shape (please note ive never had them professionally shaped before so please dont give me too much crap about them
 ) and whilst i have eyebrow hair, there's lots of gaps in between which can make them look non-existant.
basically, we're going to start at the bottom of the brow
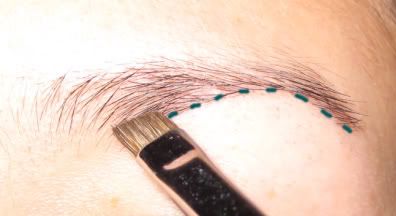
the dashes represent the line of my eyebrow which im going to follow. im going to start off doing short quick strokes, following the arch. once ive done the entire bottom of my brow, i will join the dashes together with more little strokes.
why all these little strokes? im trying to replicate little eyebrow hairs
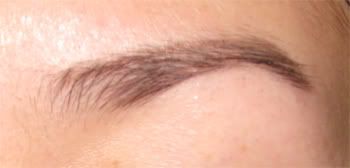
alright so here is the bottom outline of my brow done. you can see in the photo that ive filled it in but it doesnt look ridiculously obvious. next we're going to do the top outline of the brow.
now before i move on, i just want to say that i prefer the bottom outline of my brow to be ever so slightly darker than the top outline. i figure that when you get your brows waxed, the bottom outline of your brow is pretty much where the middle or bottom 1/3 of your eyebrow wouldve been, so it is the thickest section. i dont think that made any sense, but oh well. im sure someone out there is following me...........right? hellooooo?
ok so we're about to do the top outline of the brow. ive once again positioned my angled brush along my brow so i can draw hair-like strokes
not the most accurate dashes ever, but this is a rough guide of how im going to draw the top outline in. you can see from this picture that im actually going below some of the eyebrow hairs - im trying to keep my brows looking natural and i know that my brows will never be completely thick at the top, so im gonna start a bit further down and concentrate on a nice shape instead
re-fill your brush with a tiny bit of powder (less is more people!), tap off the excess and go to town...
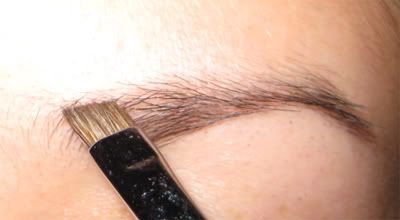
woohoo! the outline is complete! once again, you can see that ive done an outline but it is still fairly natural
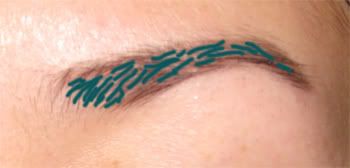
but now ive got all these gaps to fill in. once again, using a bit of powder (tap the excess off!), im going to do some hair like strokes. you can see in this picture that my dashes are going to be following the direction of my natural eyebrow hairs.
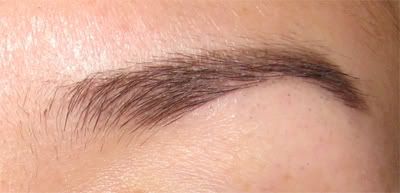
ahhh! finally! my brows have been filled in, but they arent screaming out "HEY YOU! DO YOU LIKE HOW IVE DRAWN MY EYEBROWS ON TODAY?". just so you know, i think many many people can rock darker, more 'obvious' looking brows, but unfortunately am not one of them
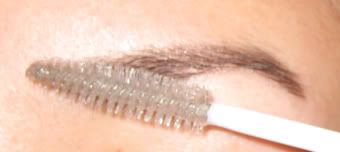
ok so this step is completely optional. sometimes, i like to go over my filled in brows with some clear mascara/brow gel. once again, im sweep this on by following the direction of my eyebrow hairs. why use mascara/brow gel? well....
a) it helps my brow hairs stay in place
b) the mascara/brow gel smooths down the powder, and the bristles on the brush help blend the powder into hair-like strokes
and now for the before/after shots...
please note i took this photo straight after i applied my clear mascara so my brows are looking a tad 'glossy'
but once the gel sets, it looks au naturale

see a difference? the filled brows are more defined, more full looking, but without looking like ive stuck someone elses brows to my face
hope you enjoyed this tut!
kirk van houten: "im sorry we're late, lou-anne had to put her face on. she doesnt want anyone to know she's got no eyebrows"
lou-anne van houten: *strange look, one eyebrow wonky and the other straight*
kirk: "what? you dont!"
for starters, i feel that powder is the most natural looking product of all to use. it's light, easy to use, and gives the appearance of fuller brows without depositing huge amounts of colour. you can use a matte eyeshadow (please use matte shades - i dont know of anyone who has brows that are naturally frost or veluxe pearl) or powders that are designed specifically for the brows. I find brow powders to be a bit firmer and waxier than standard eyeshadows.
i use the MAC Brow Shader Duo in Maple/Soft Charcoal. I have very dark brown, practically black hair, so this shade works well for me. It doesnt have any red tones to it so it blends in with my existing brow hair easily. For a brush, any stiff, angled brow brush would work. I use a real cheapy - Cyber Colors Eyebrow Brush which i bought off sasa.com for a dollar or two.
ETA: i dont use the 'Maple' or highlighting shade unless i have eyeshadow on. it's pretty much the same thing as using Shroom as a highlight
so here is our brow powder and my el cheapo brush. what you want to do is get a bit of the powder on the brush by sweeping it over the product, and tapping the excess off
so this is one of my eyebrows. it has a bit of shape (please note ive never had them professionally shaped before so please dont give me too much crap about them
basically, we're going to start at the bottom of the brow
the dashes represent the line of my eyebrow which im going to follow. im going to start off doing short quick strokes, following the arch. once ive done the entire bottom of my brow, i will join the dashes together with more little strokes.
why all these little strokes? im trying to replicate little eyebrow hairs
alright so here is the bottom outline of my brow done. you can see in the photo that ive filled it in but it doesnt look ridiculously obvious. next we're going to do the top outline of the brow.
now before i move on, i just want to say that i prefer the bottom outline of my brow to be ever so slightly darker than the top outline. i figure that when you get your brows waxed, the bottom outline of your brow is pretty much where the middle or bottom 1/3 of your eyebrow wouldve been, so it is the thickest section. i dont think that made any sense, but oh well. im sure someone out there is following me...........right? hellooooo?
ok so we're about to do the top outline of the brow. ive once again positioned my angled brush along my brow so i can draw hair-like strokes
not the most accurate dashes ever, but this is a rough guide of how im going to draw the top outline in. you can see from this picture that im actually going below some of the eyebrow hairs - im trying to keep my brows looking natural and i know that my brows will never be completely thick at the top, so im gonna start a bit further down and concentrate on a nice shape instead
re-fill your brush with a tiny bit of powder (less is more people!), tap off the excess and go to town...
woohoo! the outline is complete! once again, you can see that ive done an outline but it is still fairly natural
but now ive got all these gaps to fill in. once again, using a bit of powder (tap the excess off!), im going to do some hair like strokes. you can see in this picture that my dashes are going to be following the direction of my natural eyebrow hairs.
ahhh! finally! my brows have been filled in, but they arent screaming out "HEY YOU! DO YOU LIKE HOW IVE DRAWN MY EYEBROWS ON TODAY?". just so you know, i think many many people can rock darker, more 'obvious' looking brows, but unfortunately am not one of them
ok so this step is completely optional. sometimes, i like to go over my filled in brows with some clear mascara/brow gel. once again, im sweep this on by following the direction of my eyebrow hairs. why use mascara/brow gel? well....
a) it helps my brow hairs stay in place
b) the mascara/brow gel smooths down the powder, and the bristles on the brush help blend the powder into hair-like strokes
and now for the before/after shots...
please note i took this photo straight after i applied my clear mascara so my brows are looking a tad 'glossy'
see a difference? the filled brows are more defined, more full looking, but without looking like ive stuck someone elses brows to my face
hope you enjoyed this tut!
kirk van houten: "im sorry we're late, lou-anne had to put her face on. she doesnt want anyone to know she's got no eyebrows"
lou-anne van houten: *strange look, one eyebrow wonky and the other straight*
kirk: "what? you dont!"


