angelynv
Well-known member
[FONT=Georgia, "Times New Roman", serif]Hi all! I am very very nervous as this is my first ever photo tutorial, however I really need some feedback and/or constructive criticism (although be gentle with me LOL!). Here goes, hope you like it![/FONT]
[FONT=Georgia, "Times New Roman", serif]P.s. Please ignore the ugly brows - I am growing them out x[/FONT]
[FONT=Georgia, "Times New Roman", serif]I am already wearing foundation, concealer and powder.[/FONT]
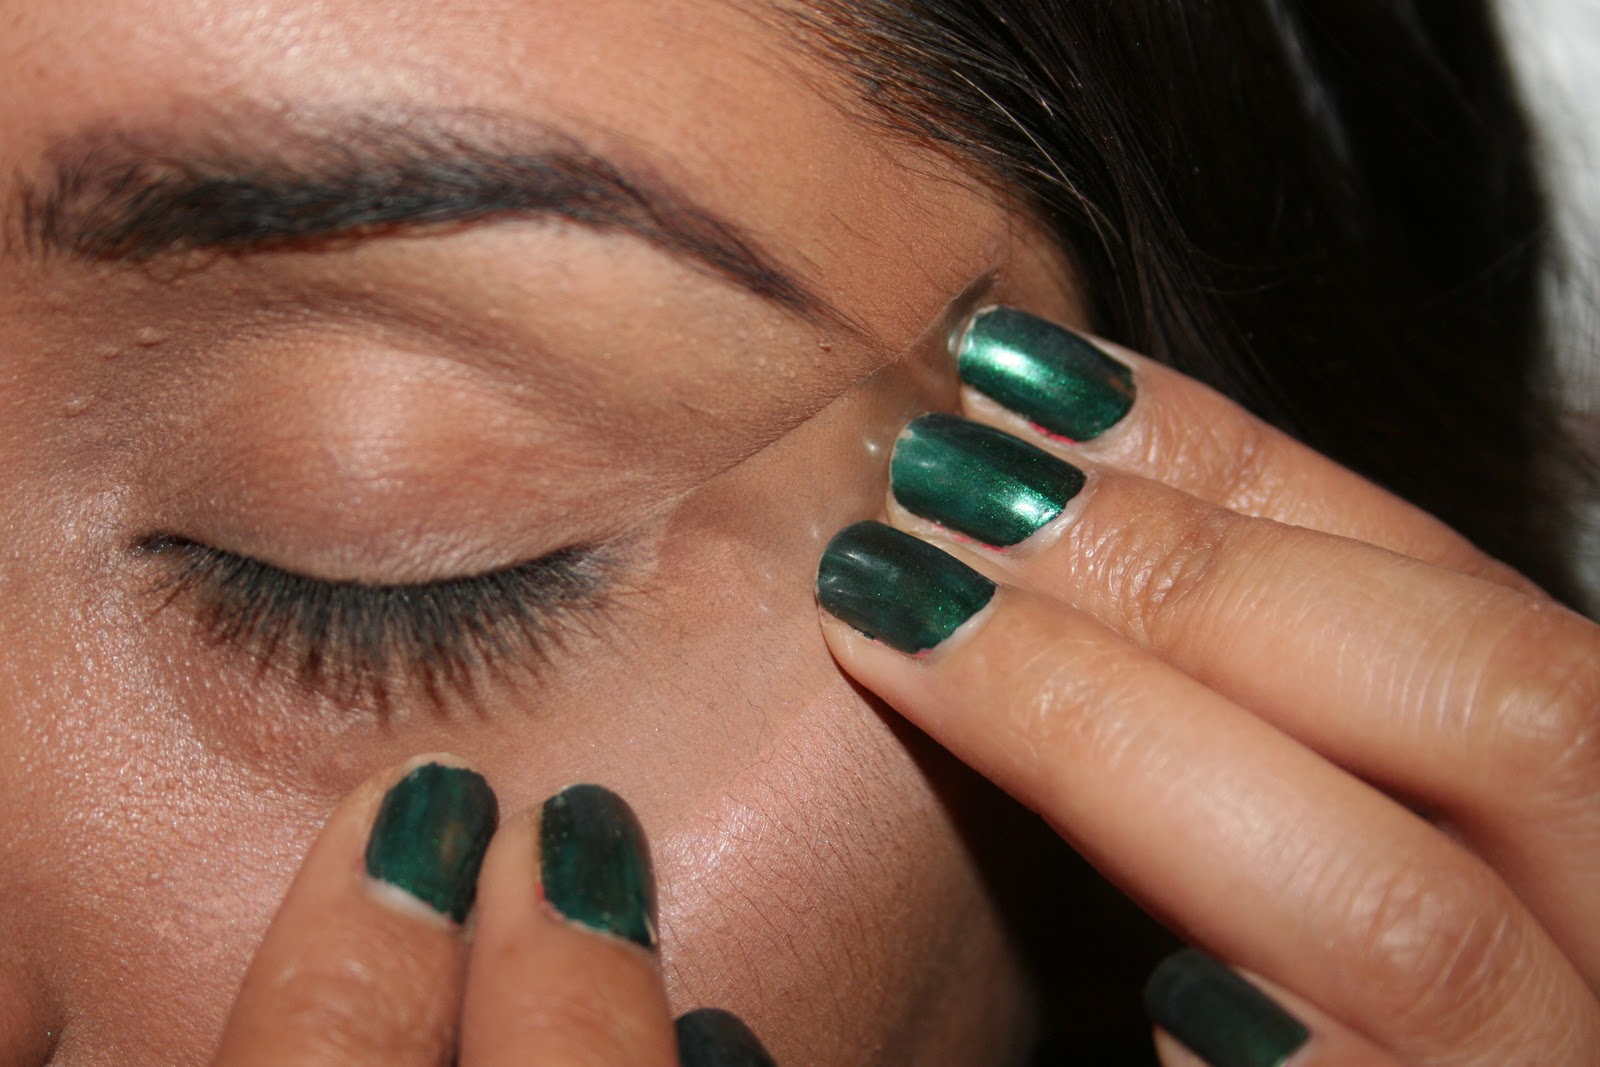
[FONT=Georgia, "Times New Roman", serif]Place a small piece of sellotape on to the back of your hand, peel off (this is to remove excess glue from the tape) and then stick the tape in a straight line diagonally out following the slant of your lower lashline like so.[/FONT]

[FONT=Georgia, "Times New Roman", serif]Using a creamy, chubby eyepencil in black - I love Barry M's Super Soft Eye Pencil in black - smudge this from the upper lash line all over the lid but make sure you stop UNDERNEATH the crease. (If you don't know what I mean by the crease, look straight into the mirror and slowly close your eyelid and open again and look out for where the first fold in the skin of your eyelid is - that is your crease.) You don't have to be neat at all just don't go too far up or too far in - you want to leave a little space near your tearduct.[/FONT]

[FONT=Georgia, "Times New Roman", serif]Next, using a flat shader brush - I am using my Stila No 15 brush, even out the black eye pencil and again make sure you go just up to but not beyond the crease.[/FONT]

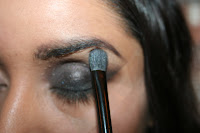
[FONT=Georgia, "Times New Roman", serif]Using the same brush, take a highly pigmented, black eyeshadow. I have found that most drustore black eyeshadows are just not black enough. MAC's carbon is fantastic, or in my case I am using the Coastal Scents 88 Palette black eyeshadow, another good one is Stila Makalu. Tap off the excess and PAT DONT SWEEP! the eyeshadow over the black eyeliner. Again, dont go too far up or too far in to the tearduct.[/FONT]


[FONT=Georgia, "Times New Roman", serif]Next take your fluffy dome shaped blending brush with NO eyeshadow on it and sweep back and forth over the top edge of the eyeshadow to blend out the edges.[/FONT]
 [FONT=Georgia, "Times New Roman", serif]Using that same blending brush, take a medium brown matte eyeshadow that is a shade or two darker than your skintone - I am using Buck from the Urban Decay Naked Palette and using the same sweeping motion, blend it half over and half above the same top edge of black eyeshadow, until the two colours blend seamlessly. Do NOT go up to the browbone! If there is one thing I hate it is coloured eyeshadow on the browbone - erm '80s much??[/FONT]

 [FONT=Georgia, "Times New Roman", serif]Finally, take a cream colour matte shadow which is a shade or two lighter than your skintone with a clean fluffy flat shader brush. I am using Bobbi Brown eyeshadow in Bone and a No. 7 eyeshadow brush. Tap and pull the shadow down from the skin on the browbone to meet and blend into the other shadow.[/FONT]

[FONT=Georgia, "Times New Roman", serif]Using a pencil eyeshadow brush - I am using the other end of the Stila brush - take a shimmery champagne neutral eyeshadow (Virgin from the UD Naked Palette) and place it into the tearduct area and blend into the black shadow slightly. This will really open up the eyes as using so much black can make your eyes appear closer together.[/FONT]

[FONT=Georgia, "Times New Roman", serif]Thats the shadow done! Remove the sellotape to reveal a nice clean line.[/FONT]
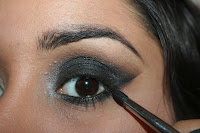
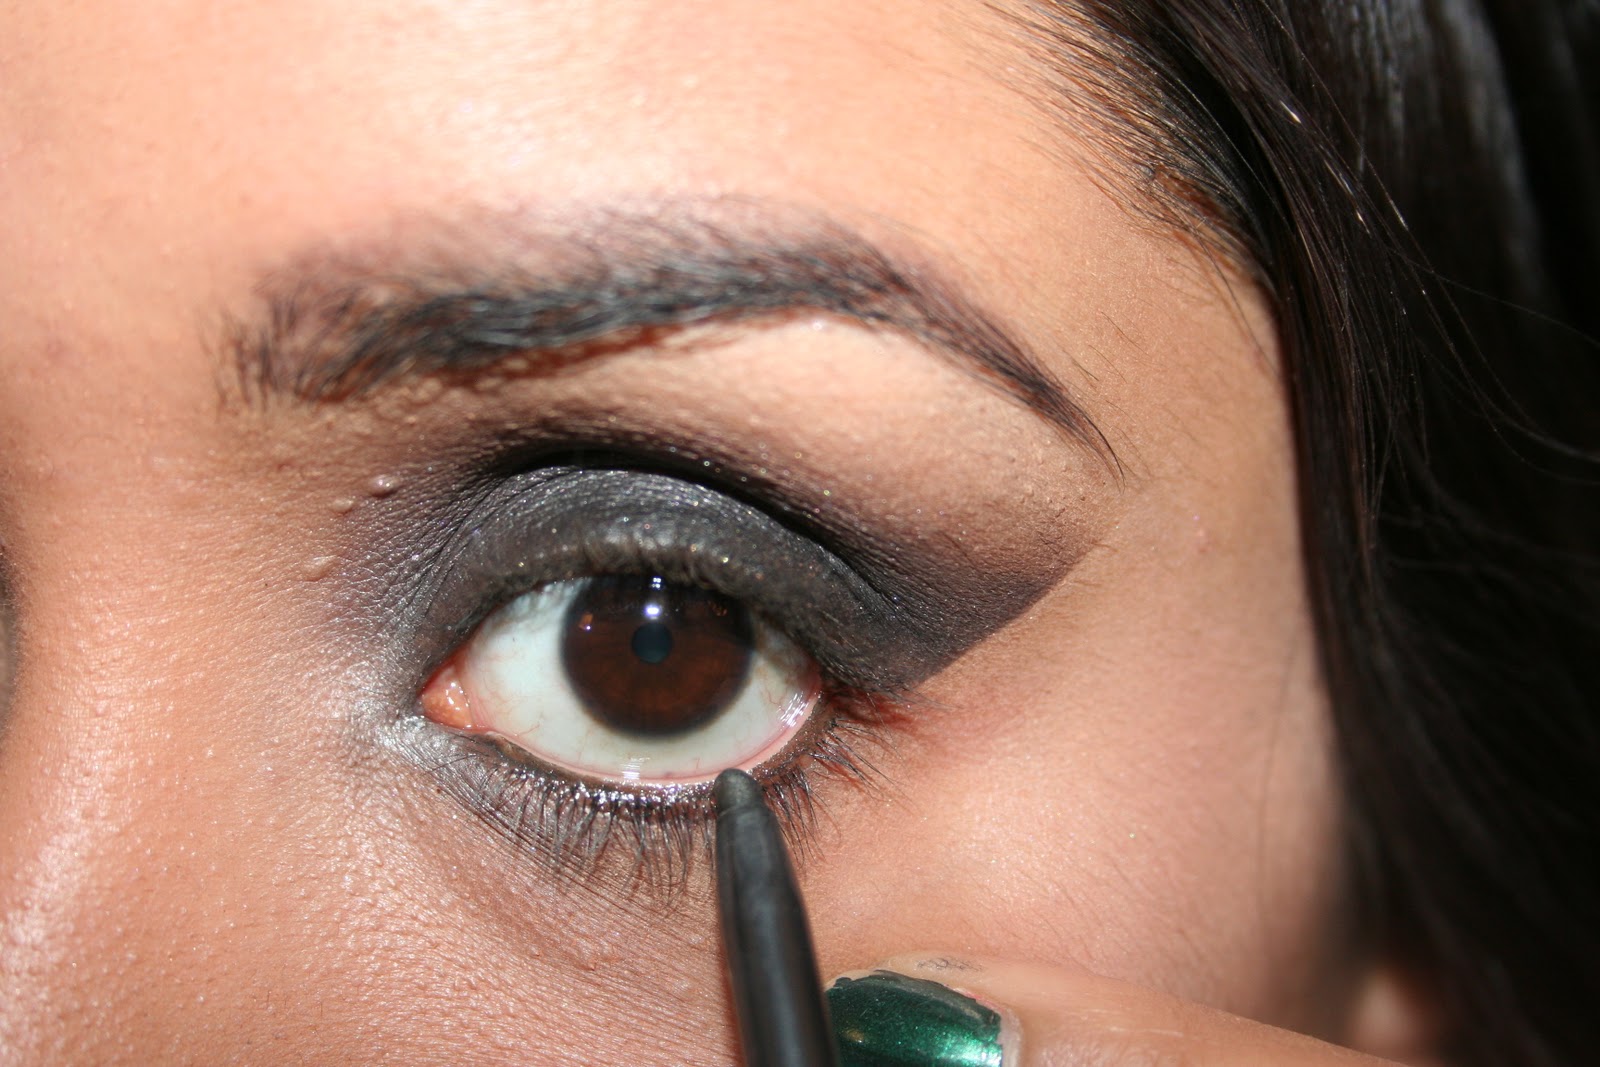
 [FONT=Georgia, "Times New Roman", serif]Now all you need to do is take a black kohl pencil which has good staying power - I am using MAC's Technakohl in Graphblack and line your waterline (the inner part of your lower lid) and your tightline (the upper inner part of your upper lid). [/FONT]

 [FONT=Georgia, "Times New Roman", serif]Also line your lower lashline with the kohl and smudge using a Q-Tip. Set the cream product using more of the black eyeshadow gently patting into the kohl - you can even use the Q-Tip to do this if you want. Join up the shadow from the lower lashline to the upper lashline.[/FONT]
[FONT=Georgia, "Times New Roman", serif]Now all you need to do is to curl your lashes and apply a tonne of mascara! This is because the black shadows can make your eyelashes disappear, so you need to get them looking extra long. If possible, I would advocate using some false lashes. I am using Primark lashes cut in half. [/FONT][FONT=Georgia, "Times New Roman", serif]Eyes DONE!![/FONT]
 [FONT=Georgia, "Times New Roman", serif]As your eyes are quite matte, I would try to get the rest of the face a little dewy and natural looking. Using a cream blusher in a peachy shade (I am using Illamasqua Cream Blusher in Rude) and either your fingers or a stippling brush, pat and swirl the blush into the apples of the cheeks and back towards your hairline. Then for a little extra lift, pat a pearlescent cream (I am using MAC's Strobe Cream) onto the tops of your cheekbones above the blusher.[/FONT]
 [FONT=Georgia, "Times New Roman", serif]Now for the lips, as the eyes are super dramatic, you want to go really natural on the lips. Using a neutral lipliner - I am using MAC's Stripdown liner, line your lips. Then take a peachy shade - I am using MAC's Freckletone lipstick and pat onto the lips. Top off with a creamy nude gloss - I am using NYX Georgia Peach Lip Laquer lightly over the top.[/FONT]

 [FONT=Georgia, "Times New Roman", serif]All done!! It seems like a lot of steps, but actually it is fairly simple and more importantly it is fool proof! It is difficult to go wrong with this smokey eye. [/FONT]

[FONT=Georgia, "Times New Roman", serif]P.s. Please ignore the ugly brows - I am growing them out x[/FONT]
[FONT=Georgia, "Times New Roman", serif]I am already wearing foundation, concealer and powder.[/FONT]
[FONT=Georgia, "Times New Roman", serif]Place a small piece of sellotape on to the back of your hand, peel off (this is to remove excess glue from the tape) and then stick the tape in a straight line diagonally out following the slant of your lower lashline like so.[/FONT]
[FONT=Georgia, "Times New Roman", serif]Using a creamy, chubby eyepencil in black - I love Barry M's Super Soft Eye Pencil in black - smudge this from the upper lash line all over the lid but make sure you stop UNDERNEATH the crease. (If you don't know what I mean by the crease, look straight into the mirror and slowly close your eyelid and open again and look out for where the first fold in the skin of your eyelid is - that is your crease.) You don't have to be neat at all just don't go too far up or too far in - you want to leave a little space near your tearduct.[/FONT]

[FONT=Georgia, "Times New Roman", serif]Next, using a flat shader brush - I am using my Stila No 15 brush, even out the black eye pencil and again make sure you go just up to but not beyond the crease.[/FONT]

[FONT=Georgia, "Times New Roman", serif]Using the same brush, take a highly pigmented, black eyeshadow. I have found that most drustore black eyeshadows are just not black enough. MAC's carbon is fantastic, or in my case I am using the Coastal Scents 88 Palette black eyeshadow, another good one is Stila Makalu. Tap off the excess and PAT DONT SWEEP! the eyeshadow over the black eyeliner. Again, dont go too far up or too far in to the tearduct.[/FONT]


[FONT=Georgia, "Times New Roman", serif]Next take your fluffy dome shaped blending brush with NO eyeshadow on it and sweep back and forth over the top edge of the eyeshadow to blend out the edges.[/FONT]


[FONT=Georgia, "Times New Roman", serif]Using a pencil eyeshadow brush - I am using the other end of the Stila brush - take a shimmery champagne neutral eyeshadow (Virgin from the UD Naked Palette) and place it into the tearduct area and blend into the black shadow slightly. This will really open up the eyes as using so much black can make your eyes appear closer together.[/FONT]

[FONT=Georgia, "Times New Roman", serif]Thats the shadow done! Remove the sellotape to reveal a nice clean line.[/FONT]


[FONT=Georgia, "Times New Roman", serif]Now all you need to do is to curl your lashes and apply a tonne of mascara! This is because the black shadows can make your eyelashes disappear, so you need to get them looking extra long. If possible, I would advocate using some false lashes. I am using Primark lashes cut in half. [/FONT][FONT=Georgia, "Times New Roman", serif]Eyes DONE!![/FONT]


My Blog http://frivolousbyangel5ace.blogspot.com/")