PomPoko
Well-known member
yay, hokay, well a couple of people asked for a tut when I posted my last FOTD, so I tried! This didnt come out as well as I'd hoped. But I figured I spent an age on it so I'd post it anyway! I have to add I've been ill for the last week, so that coupled with the fact that taking photos of oneself whilst trying to take pics/not make a mess/not smudge stuff/not poke yourself in the eye with a very mascara'd mascara wand made it a bit hard!

oh, and as for the pics, I will never understand why when I take them they are large (like the cam settings are on "Large" which is like...1240 x 900 or something (ok, I did actually make that bit up - but they are really big) and then when I upload them to my computer they are 240 x320 (that I'm not lying about!) oh, it makes cropping and resizing amazingly fun! as in, they look really un-clear and not crisp at all *headdesk repeatedly*
well, I'll get on with it rather than waffling!
doopy doo...
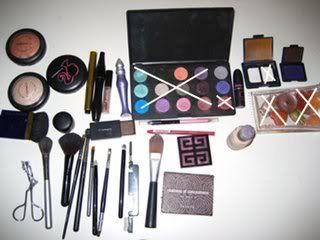
Those be the things you need, which is
Benefit non-fiction foundation #1
Givenchy facepoweder in chic white
YSL Touch Eclat
MAC Glissade MSF
MAC Pearl Sunshine Beauty Powder
MAC Lightscapade MSF
Urban Decay Primer Potion
A Pupa brownish/purple cream shadow
MACCrystal e/s
MAC Parfait Amour e/s
Nars Santorini e/s
Nars Iceland e/s
MAC Blacktrack f/l
MAC Hypnose mascara
MAC Walnut Eyebrow Shader
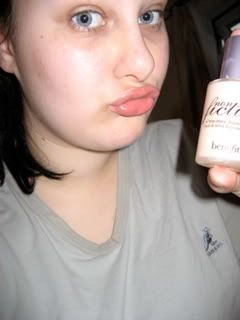
Too Faced Lip Injection - too faced
COllection 2000 pink lipliner
MAC real doll l/s
MAC flusterose l/g
Brushes:
MAC 224
MAC 219
MAC 211
MAC 129 (I think!)
Ruby and Millie iDefine brush (oh how I love theeeee)
Ruby and Millie double ended lash and brow groomer
Ruby and Millie Contour brush
Jemma Kidd Essential eyedefining brush
Bodyshop Foundation brush
Eyelash curlers
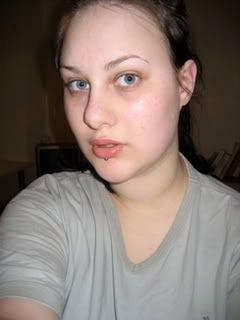
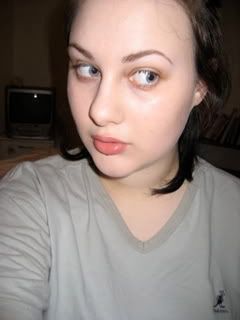
So, here I am with a moisturised, lip injectioned face, looking about7 and gormless!
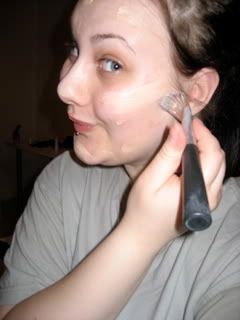
Yay, foundation - I shake this one, I'm not sure why, I think the box told me to. Clearly if the box told me to jump off a cliff I would...meh
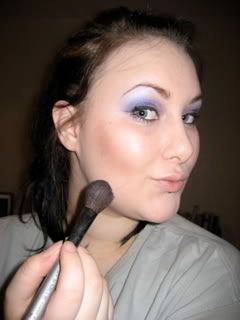
Putting that badboy to use using the foundation brush, natch...
Filled in brows - I'm not gonna elaborate on this, because this particular day I just smooshed it on in the vague shape of my brows. Then combed it through so it doesn't look as patchy (technical right? lol)
put on some UDPP and I rub/pat it in with my ring finger
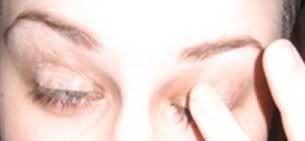
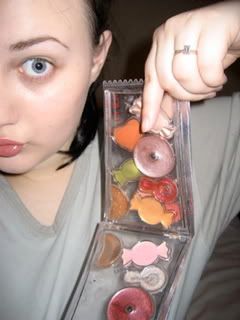
now get the cream eyeshadow...(the one my finger is pointing to...the browny purple thing! hehe)
...and put it on in the vague shape of your eyelids like so
Now it gets interesting. and possibly messy
Put the crystal eyeshadow in the inner v of your eye, using the 219...(I outlined it cos you can barely see it ggrrr)
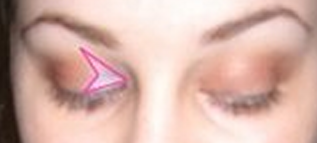
do the same for the other eye too...I forgot to get a pic of this bit...but i'm sure you can imagine what it looks like

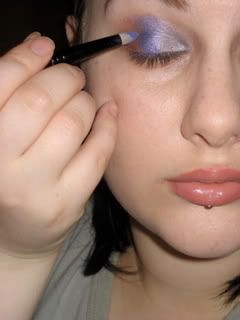
then get your parfait amour and put it on the middle of your lid, using the 219 again. I really had to pack it on, cos its a pain in the derriere. I made the v more flared as I went
Do the same on the other sideeee...you should have something that looks like so:
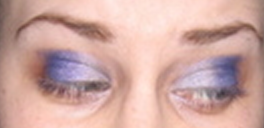
now, take the 224 and blend them gently...you can't see much difference, but I did blend between these 2 pics (in the pic up there you can see how unimpressed I look at myself by my wiggly eyebrow haha)
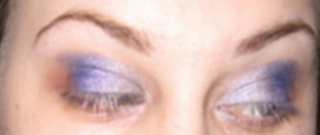
unfortunately this was the best pic I could get of this, and cropping it made it look worse...well, take the santorini on the 211 brush and make a shape like this
then get the trusty 224 and blend, making strokes inwards is probably the best for this bit...and then if needed put on some more parfait amour, cos it gets blended off easily.
then I did the lower lashline with some parfait amour and an angle brush
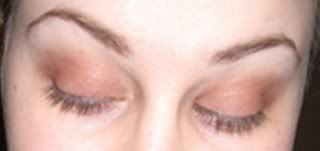
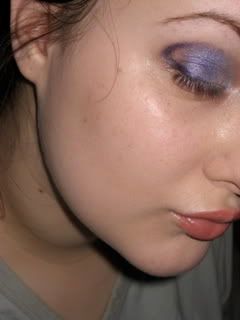
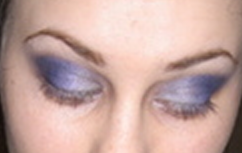
whew, shadow finished!
oh no, wait, not over yet! Highlight! this looks horrid, and really unblended. I promise it was in real life! I overlap the seam of the colour and the highlight a bit to soften it up some
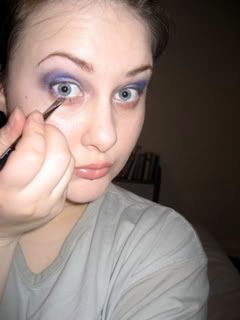
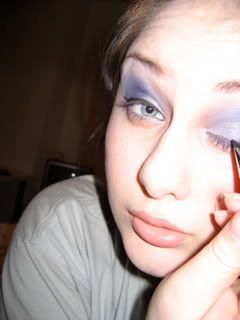
next is liner. I usually start from the middle and work out, then go back and do the inside. I couldnt get a good photo of me doing this. Partly because it was fiddly, and partly cos I'm such an eyeliner perfectionist freak I couln't risk the chance of messing it up. heres one done and one not, though
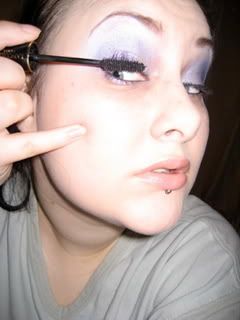
mmmm-mascara. I wanted really big lashes, so I went for a few coats, from the roots up. I wiggle the wand to get the best covarage I can manage.
now to cover up (well, attempt to) my horrid dark circles and discoloured bits of face.
I put it under my eyes, beside my nose, over the top lipline and in the little dip...is it called a philtrum? and beside the corners of my mouth and a little dab on the chin. Then pat gently with a ring finger to blend.
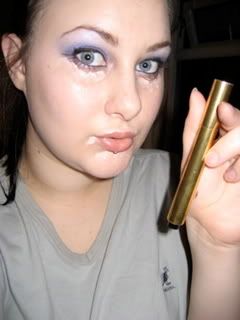
thats a bit better. still pulling a scary face though. sorry

AH HAH! now I'm getting technical (with diagrams)
my cheeks. Gotta make a FISH FACE
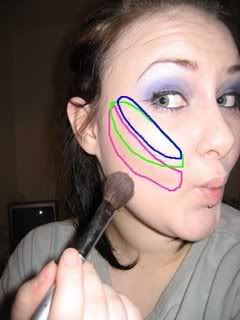
Pink shape is where glissade goes (in the hollows) with the contouring brush
Green is where the Pearl Sunshine goes (on the actual cheek) using the mac blusher brush
Blue is where the Lightscapade goes (the top of the cheek) using the flat estee lauder brush (no pic for this doh)
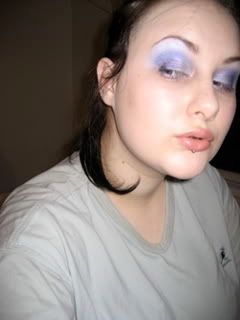
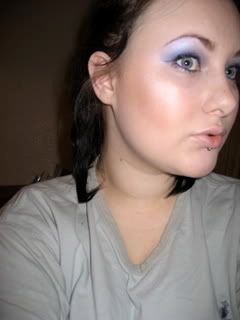
I end up looking a bit of a tangerine. and you can see the eyes properly. sort of*
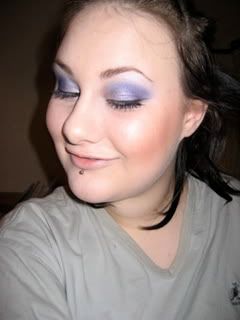
(this pic really doesn't showcase my orange-ness. my fiance came in at this point and goes "ah you look nice" to which I replied "nah, actually I look orange..." which he said "oh, i thought that was the point..." yes, honestly, I deliberately want to look a bit like some fruit. nice...)
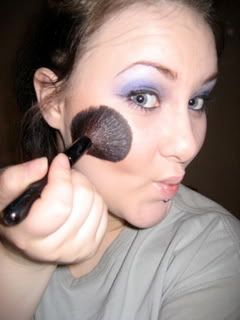
so's I took my cosmo blusher brush and buffed it all about and blended it a bit, trying to make the seams look less defined, but still with a bit of contouring.
now onto lips...
line them babies
then fill with the real doll, I had to blot cos I looked a bit...er...painted lady before I did. Then apply some flusterose l/g*
then I made a vague attempt at making my hair look neater (the same! but neater!) and put on a proper top, rather than an old teeshirt. ANd my glasses...woooo vision!
I also grabbed my nearest cuddly thing lol. I needed a hug after all that hard work *whew*
thanks for looking. I apologise if i have made any really daft mistakes, its really early here and I havent slept yet *yay insomnia*
hope this is ok!
*I appear not to have uploaded the other lip pics (along with a proper finished eyeshadow shot) but I'll edit this later with the others...not that you need to see really...but it feels a bit of an abrupt end without!
oh, and as for the pics, I will never understand why when I take them they are large (like the cam settings are on "Large" which is like...1240 x 900 or something (ok, I did actually make that bit up - but they are really big) and then when I upload them to my computer they are 240 x320 (that I'm not lying about!) oh, it makes cropping and resizing amazingly fun! as in, they look really un-clear and not crisp at all *headdesk repeatedly*
well, I'll get on with it rather than waffling!
doopy doo...
Those be the things you need, which is
Benefit non-fiction foundation #1
Givenchy facepoweder in chic white
YSL Touch Eclat
MAC Glissade MSF
MAC Pearl Sunshine Beauty Powder
MAC Lightscapade MSF
Urban Decay Primer Potion
A Pupa brownish/purple cream shadow
MACCrystal e/s
MAC Parfait Amour e/s
Nars Santorini e/s
Nars Iceland e/s
MAC Blacktrack f/l
MAC Hypnose mascara
MAC Walnut Eyebrow Shader
Too Faced Lip Injection - too faced
COllection 2000 pink lipliner
MAC real doll l/s
MAC flusterose l/g
Brushes:
MAC 224
MAC 219
MAC 211
MAC 129 (I think!)
Ruby and Millie iDefine brush (oh how I love theeeee)
Ruby and Millie double ended lash and brow groomer
Ruby and Millie Contour brush
Jemma Kidd Essential eyedefining brush
Bodyshop Foundation brush
Eyelash curlers
So, here I am with a moisturised, lip injectioned face, looking about7 and gormless!
Yay, foundation - I shake this one, I'm not sure why, I think the box told me to. Clearly if the box told me to jump off a cliff I would...meh
Putting that badboy to use using the foundation brush, natch...
Filled in brows - I'm not gonna elaborate on this, because this particular day I just smooshed it on in the vague shape of my brows. Then combed it through so it doesn't look as patchy (technical right? lol)
put on some UDPP and I rub/pat it in with my ring finger
now get the cream eyeshadow...(the one my finger is pointing to...the browny purple thing! hehe)
...and put it on in the vague shape of your eyelids like so
Now it gets interesting. and possibly messy
Put the crystal eyeshadow in the inner v of your eye, using the 219...(I outlined it cos you can barely see it ggrrr)
do the same for the other eye too...I forgot to get a pic of this bit...but i'm sure you can imagine what it looks like
then get your parfait amour and put it on the middle of your lid, using the 219 again. I really had to pack it on, cos its a pain in the derriere. I made the v more flared as I went
Do the same on the other sideeee...you should have something that looks like so:
now, take the 224 and blend them gently...you can't see much difference, but I did blend between these 2 pics (in the pic up there you can see how unimpressed I look at myself by my wiggly eyebrow haha)
unfortunately this was the best pic I could get of this, and cropping it made it look worse...well, take the santorini on the 211 brush and make a shape like this
then get the trusty 224 and blend, making strokes inwards is probably the best for this bit...and then if needed put on some more parfait amour, cos it gets blended off easily.
then I did the lower lashline with some parfait amour and an angle brush
whew, shadow finished!
oh no, wait, not over yet! Highlight! this looks horrid, and really unblended. I promise it was in real life! I overlap the seam of the colour and the highlight a bit to soften it up some
next is liner. I usually start from the middle and work out, then go back and do the inside. I couldnt get a good photo of me doing this. Partly because it was fiddly, and partly cos I'm such an eyeliner perfectionist freak I couln't risk the chance of messing it up. heres one done and one not, though
mmmm-mascara. I wanted really big lashes, so I went for a few coats, from the roots up. I wiggle the wand to get the best covarage I can manage.
now to cover up (well, attempt to) my horrid dark circles and discoloured bits of face.
I put it under my eyes, beside my nose, over the top lipline and in the little dip...is it called a philtrum? and beside the corners of my mouth and a little dab on the chin. Then pat gently with a ring finger to blend.
thats a bit better. still pulling a scary face though. sorry
AH HAH! now I'm getting technical (with diagrams)
my cheeks. Gotta make a FISH FACE
Pink shape is where glissade goes (in the hollows) with the contouring brush
Green is where the Pearl Sunshine goes (on the actual cheek) using the mac blusher brush
Blue is where the Lightscapade goes (the top of the cheek) using the flat estee lauder brush (no pic for this doh)
I end up looking a bit of a tangerine. and you can see the eyes properly. sort of*
(this pic really doesn't showcase my orange-ness. my fiance came in at this point and goes "ah you look nice" to which I replied "nah, actually I look orange..." which he said "oh, i thought that was the point..." yes, honestly, I deliberately want to look a bit like some fruit. nice...)
so's I took my cosmo blusher brush and buffed it all about and blended it a bit, trying to make the seams look less defined, but still with a bit of contouring.
now onto lips...
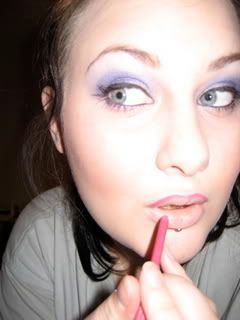
line them babies
then fill with the real doll, I had to blot cos I looked a bit...er...painted lady before I did. Then apply some flusterose l/g*
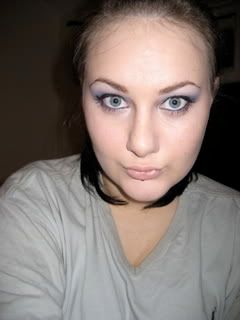
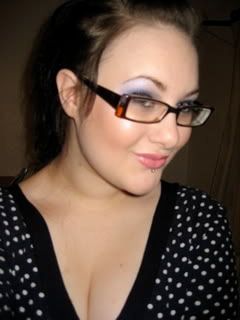
then I made a vague attempt at making my hair look neater (the same! but neater!) and put on a proper top, rather than an old teeshirt. ANd my glasses...woooo vision!
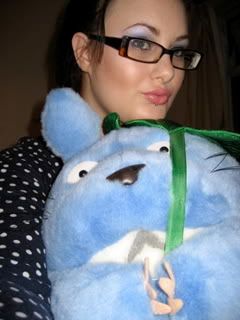
I also grabbed my nearest cuddly thing lol. I needed a hug after all that hard work *whew*
thanks for looking. I apologise if i have made any really daft mistakes, its really early here and I havent slept yet *yay insomnia*
hope this is ok!
*I appear not to have uploaded the other lip pics (along with a proper finished eyeshadow shot) but I'll edit this later with the others...not that you need to see really...but it feels a bit of an abrupt end without!


