mello
Well-known member
Okay! So. This is my first tutorial. I'd like to start by saying that any feedback and constructive criticism is welcome, I'd like to know if anything needs improving!
In this tutorial, the main focus is the eyes. However, I will be doing the entire face but it will not be with much detail. I will be showing you how to do a nice little bronze smokey eye, which is not too subtle but not too dramatic, either. It's a lovely look to use for going out for coffee, or even for a night on the town.
Alright, so here's what I used:
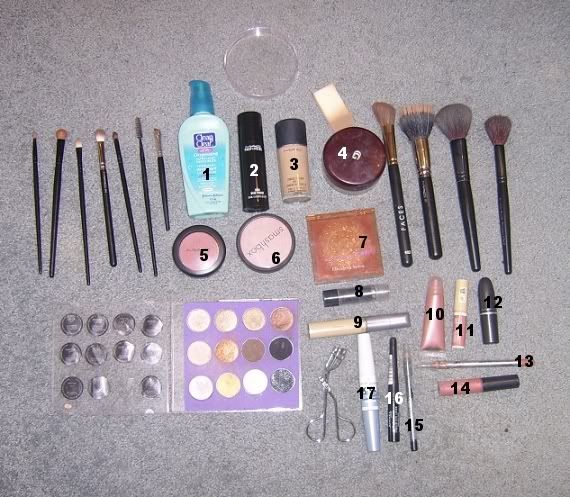
1. Clean and Clear Oil-Free Oxygenating Light Moisturizer w/ SPF 15
2. MAC Prep + Prime [face]
3. MAC studio fix fluid in NC30
4. Covergirl Professional Loose Powder in Translucent Medium
5. MAC blush in Plum Foolery
6. Smashbox softlights in shimmer
7. Elizabeth Arden Bronzer in Golden
8. Physician's Formula concealer stick in green [cancels out redness]
9. Physician's Formula concealer in yellow [cancels out blue, under eyes etc]
10. E.L.F lipgloss in Goddess
11. Bath & Body Works lipgloss w/ SPF 15 in Vanilla Sugar
12. MAC Lipstick in Blankety
13. Lipliner in a nude shade
14. MAC lustreglass in Love Nectar
15. Bonnebell eyeliner in black ink
16. Rimmel black liquid liner
17. XXL intense black mascara
EYE SHADOWS
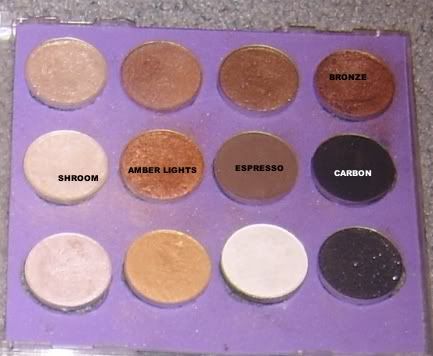
All are MAC.
- Shroom: Highlight, inner corners
- Amber lights: Entire lid, bottom lash line
- Bronze: crease, outer corners
- Espresso: brows, crease
- Carbon: outer V
TOOLS
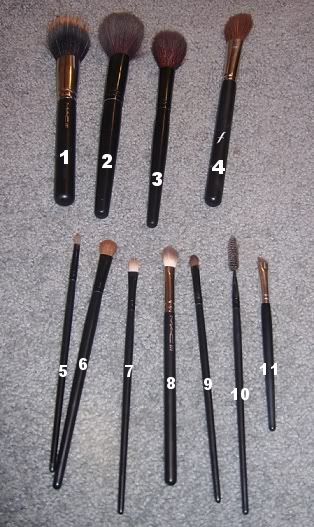
So most of the brushes I use are just some random no-name stuff I got about 2-3 years ago when I was first starting out. I took the liberty of referencing which MAC brushes they're similar to/you could use instead. I'm not incredibly familiar with the brushes or their sizes so bear with me.
1. MAC 187
2. Powder brush, similar to MAC 129 or 136
3. Small blush brush, maybe similar to MAC 109?
4. Angled brush, similar to MAC 168
5. Small e/s brush, similar to MAC 242
6. medium/large sized e/s brush, similar to MAC 252, 249
7. flat liner brush, similar to MAC 212
8. MAC 217
9. crease brush, similar to MAC 249, 242, 272
10. Spoolie, MAC 204
11. Angled shader, similar to MAC 263, 208
Other stuff
12. Eyelash curler
13. Petri dish
14. Blending wedge
15. Hair spray
Okay! So now that we've got that out of the way, on to the tutorial! Let me just warn you now though, some of the pictures aren't very flattering haha
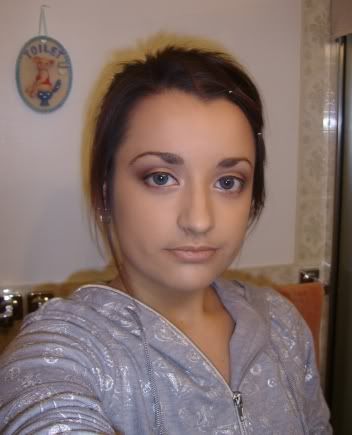
Step One: Prep Your Face
Start with a clean, moisturized and prepped face:
At this point I've already applied my moisturizer and then I put Prep + Prime on top.
Step Two: Concealers
Apply your concealers. I use green to cover up any redness, and yellow to cancel out blue [like under my eyes!]
Step Three:
Blend, blend, blend!
I normally just use my fingers. This should be the finished product:
Step Four: Foundation
This is when I apply my foundation.

I love this stuff!
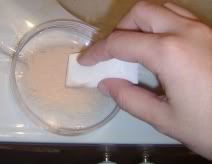
I take my petri dish and put a minimal amount of foundation in it, like so:
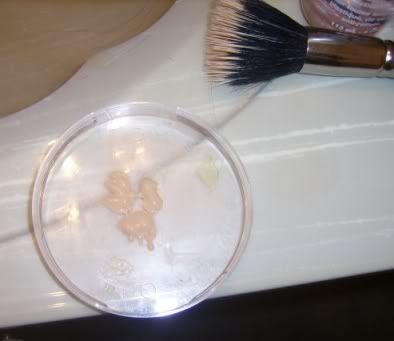
Then, taking my 187 brush, I swirl it around in a circle in the petri dish and pick up some foundation. Then, I proceed to buff it on my face with the brush. Which means I move it around my face in circular motions until it is well blended. Add more foundation as you need it.
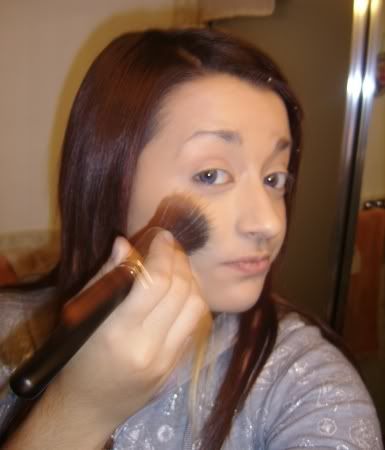
Make sure you blend really well on your jawline and near your hair line, so you don't have an obvious line of color.
Next I take my blending wedge and dab it into the remaining foundation on the dish.
I use this under my eyes to better blend the concealer and hide dark circles a bit better, and on my eye lids as sort of base. After I've used most of the product on the sponge, I use it to kind of buff my jawline and around my hairline, just to make sure it's really well blended.
Step Five: Loose Powder
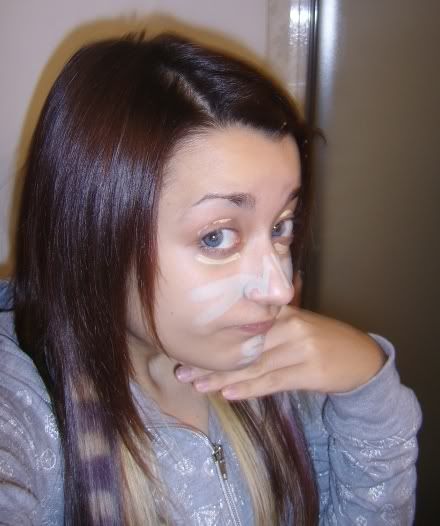
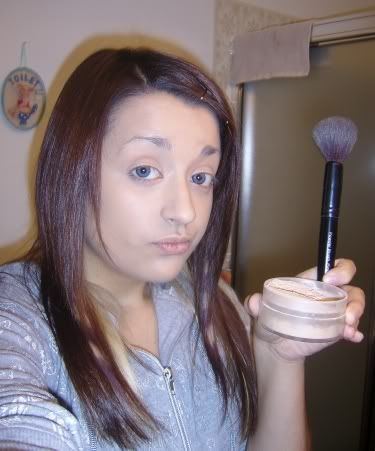
Take your loose powder and your powder brush and make a stupid face:
Then proceed to apply the powder to your face. What I do is dip the brush in a little, then tap off all the excess powder into the lid. That way if I need more I can just go to lid instead of wasting a bunch of powder. The key to not making this turn your face into a cakey mess is not using tons of powder. You don't really need it, you're just setting your foundation so it's less likely to come off. If it DOES turn out a little cakey, I just take a spray bottle full of water and give my face a few squirts of it, then let it dry. It should get rid of it!
Step Six: Eyeshadow
I know some people like to do eyes before foundation, but this is just the way I prefer to do it. Feel free to switch it up if you'd like, there's no right or wrong way. [I just wipe the excess shadow off, it really isn't that much of a hassle to me...sometimes I'll put tissue or a fluff under my eye to catch fall out]
I like to start out with my highlighter. [again, you can switch it up if you'd like and do it last, it doesn't matter]
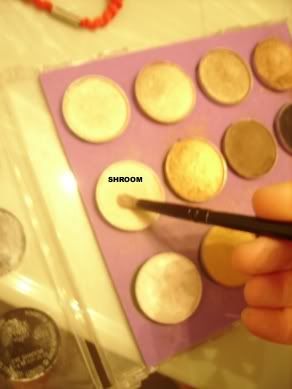
I take Shroom on my little eyeshadow brush, and apply it to
a. inner corners of the eyes
b. bottom lash line, not quite halfway
c. brow bone
Like so:
Next, take your medium/large sized e/s brush and pick up some amber lights.
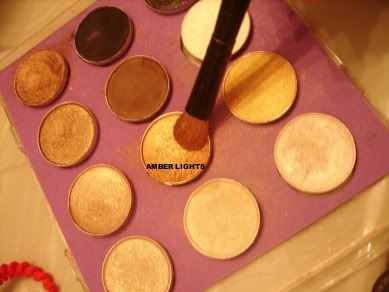
Apply amber lights to:
a. entire lid
b. bottom lash line, stopping where shroom ends [use your flat liner for this]
Like so:
At this point you could blend your colors together and blend the lid color into your highlight, but it really doesn't make much of a difference in the end.
That is amber lights and shroom on my lids, the two blended together and amber lights blended up-wards.
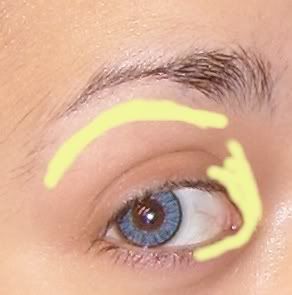
The next step is to take bronze on your crease brush, like shown below:

Apply bronze to:
a. crease
b. outer v
Like this:
[the arrows just show where you're supposed to blend]
On my eye:
Then it is necessary to blend the bronze up and into your highlight color. Also blend into amber lights. Take your 217, and go in little circles where the shadow meets the skin! [thus, you're blending it into the skin]
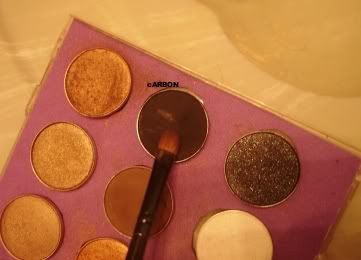
Next, using the same crease brush [or a different, doesn't matter!], pick up a bit of espresso. I don't have a pic but I'm sure it isn't that big of a deal. Haha.
Apply Espresso to the crease only.

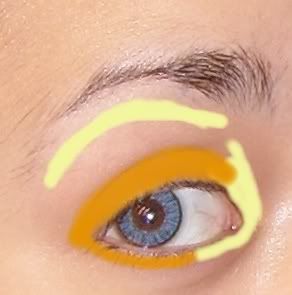
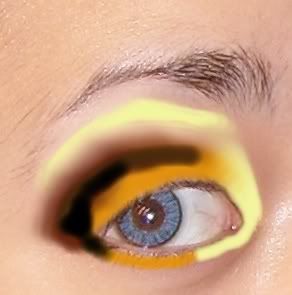
Incase you're lost, the color coding goes like this:
Light yellow: Shroom
Orange: Amber lights
Light brown: Bronze
Dark Brown: Espresso
Then you blend.
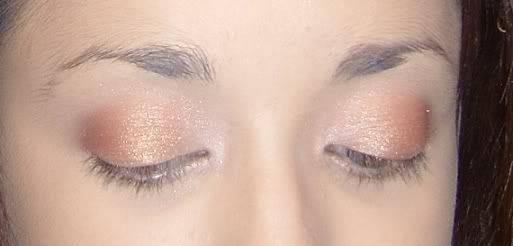
Should look like this:
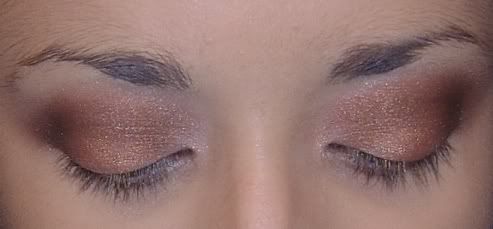
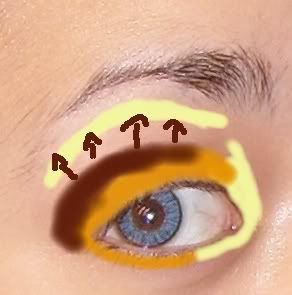
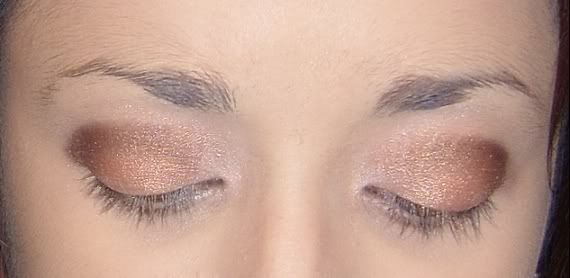
As far as eye shadows go, this is the last step. Take some carbon on your crease brush:
apply carbon to:
a. outer v
b. very outer part of lower lash line
Like below:
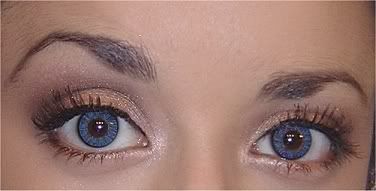
It should look like this, unblended.
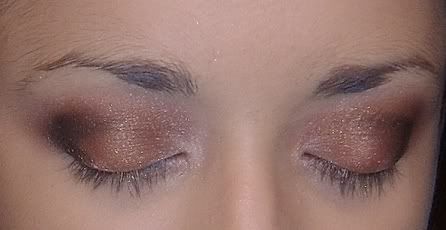
Lastly, you blend those suckers into each other so that there's no obvious separations. It should look like a smooth gradient!
Step Seven: Eyebrows
The next thing to do is fill in your eyebrows!
I use espresso and the angled shading brush pictured above. I stick with my shape and fill in areas that are lacking in hair, and I extend the length because mine are kind of short. Seeing as this isn't a tut for brows, I'll leave you to figure out how to do yours on your own

After filling them, I keep them in place by...
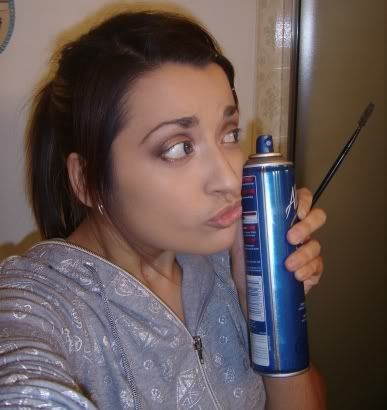
Using hair spray [which I forgot to show above] and a mascara spoolie. I spray the spoolie with hair spray and just groom my brows. It locks in the color and keeps the shape all day, works great.
Step Eight: Eyeliner
Okay, so for this step I use liquid liner and just line my eyes that way. I prefer the clean line.
BUT if you want the look to be more smokey, take black liner [pencil] and smudge it into your shadow. Then apply more near your lashes to darken it.
Add some liner to your bottom water line and voilà, smokey.
^^ only liquid liner.
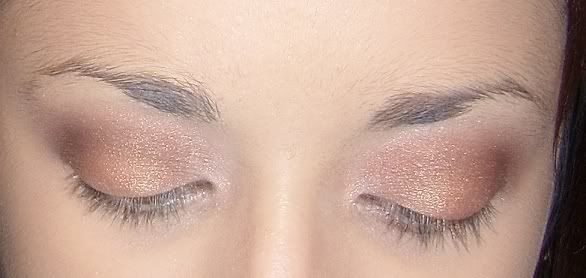
Step Nine: Mascara
Next you curl your lashes, and apply your favorite mascara!
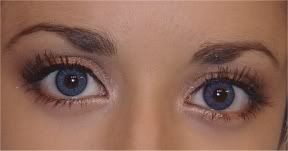
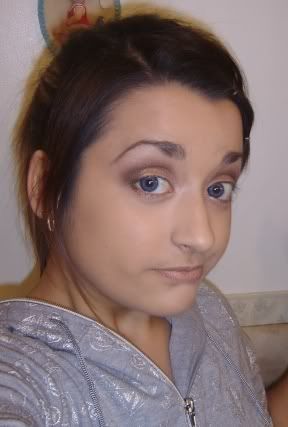
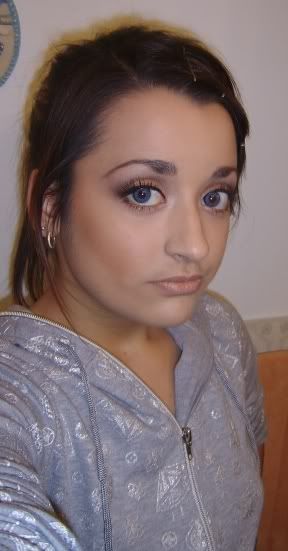
Finished eyes!
Step Ten: Contouring
Next step is contouring! You take your angled face brush, and get some bronzer on there.
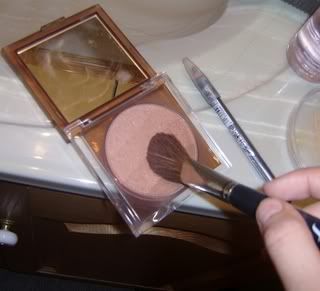
Then we apply the bronzer to the hollows of our cheeks. How do you find the hollows, you ask? Well, none of this fishy face stuff. What I used to do was feel around my cheeks for where the bones ended, and that's where I put my bronzer. It should be near the bottom of your apples. My bronzer line goes from about the middle of my ear, down wards.
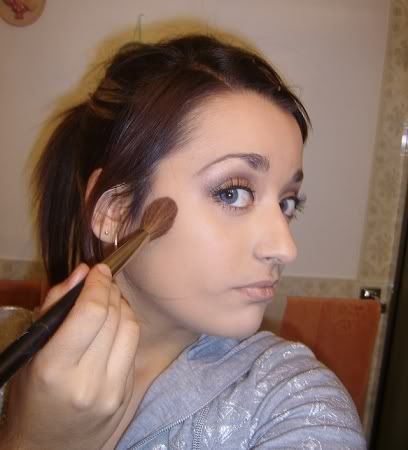
Whenever I'm contouring, I like to blend as I go. That way lines don't look as harsh. So, after I'm finished applying the bronzer, I blend it into my skin so it doesn't look like a random line.
Next I take my Plum Foolery blush and my 187 brush
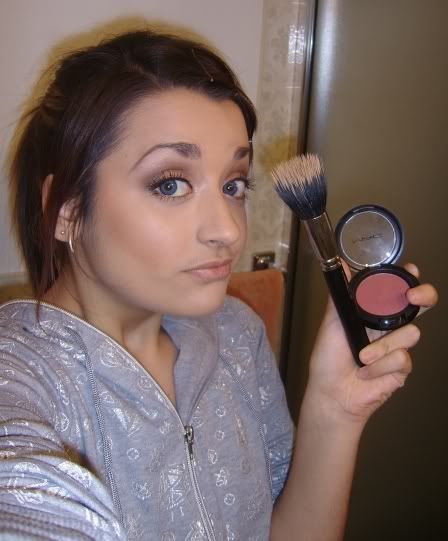
Then I apply the blush to the apples of my cheeks! EDIT: I totally forgot to mention. You need to blend your blush into the bronzer you used to contour, or else it looks like two seperate splashes of color on your face, which is probably not the look you're going for. I just buff the color onto the apples of my cheeks, then kind of blend it out towards where my contour is. I also bring some out towards my temples, to kind of bring my cheekbones upwards.
If you don't really get that, here's an illustration:
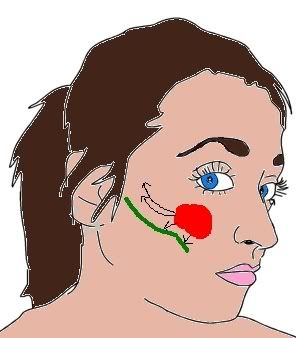
The green represents where I would place my bronzer.
The red represents where I would put my blush.
The arrows show where to blend and what direction.
I take my 187 again and my smashbox soft lights

and I apply along my cheek bones (where the light would naturally hit my cheeks, so that they look more prominent), a tiny bit in the middle of the forehead, and middle of the chin.
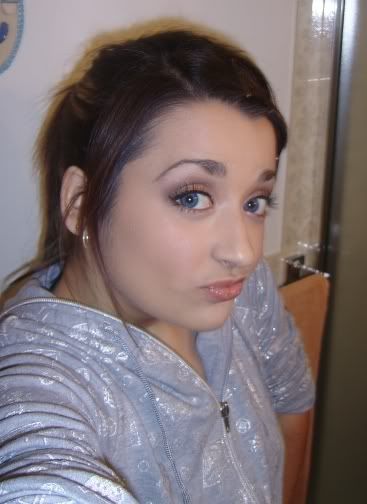
Yet another weird, random face.
Step Eleven: Lips
There aren't any pictures for this, mainly because I'm lazy. But it's fairly simple to do. First I prep my lips with my lip balm. Then I line my lips with my lip liner, being careful to follow the natural shape. I color in my lips a little with the pencil so that it blends. Then I use my Blankety lipstick and put it on my lips, blot with a tissue, then re apply and blot again. Blotting makes it last a lot longer. Lastly, I put on some E.L.F lipgloss, with some Love Nectar on top!
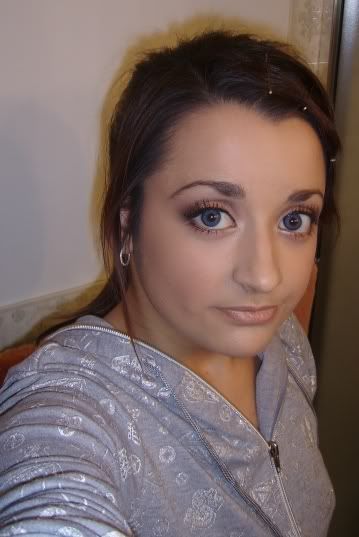
FINISHED PRODUCT:
WHEW. That took forever! Kudos to those that do these things on a regular basis, it takes a lot of time to put together! Hopefully it wasn't lacking near the end, as I got lazy...but I tried to be as thorough as possible.
As with any look, feel free to add steps, skip steps, or just customize it to fit your tastes.
Thanks for looking!
In this tutorial, the main focus is the eyes. However, I will be doing the entire face but it will not be with much detail. I will be showing you how to do a nice little bronze smokey eye, which is not too subtle but not too dramatic, either. It's a lovely look to use for going out for coffee, or even for a night on the town.
Alright, so here's what I used:
1. Clean and Clear Oil-Free Oxygenating Light Moisturizer w/ SPF 15
2. MAC Prep + Prime [face]
3. MAC studio fix fluid in NC30
4. Covergirl Professional Loose Powder in Translucent Medium
5. MAC blush in Plum Foolery
6. Smashbox softlights in shimmer
7. Elizabeth Arden Bronzer in Golden
8. Physician's Formula concealer stick in green [cancels out redness]
9. Physician's Formula concealer in yellow [cancels out blue, under eyes etc]
10. E.L.F lipgloss in Goddess
11. Bath & Body Works lipgloss w/ SPF 15 in Vanilla Sugar
12. MAC Lipstick in Blankety
13. Lipliner in a nude shade
14. MAC lustreglass in Love Nectar
15. Bonnebell eyeliner in black ink
16. Rimmel black liquid liner
17. XXL intense black mascara
EYE SHADOWS
All are MAC.
- Shroom: Highlight, inner corners
- Amber lights: Entire lid, bottom lash line
- Bronze: crease, outer corners
- Espresso: brows, crease
- Carbon: outer V
TOOLS
So most of the brushes I use are just some random no-name stuff I got about 2-3 years ago when I was first starting out. I took the liberty of referencing which MAC brushes they're similar to/you could use instead. I'm not incredibly familiar with the brushes or their sizes so bear with me.
1. MAC 187
2. Powder brush, similar to MAC 129 or 136
3. Small blush brush, maybe similar to MAC 109?
4. Angled brush, similar to MAC 168
5. Small e/s brush, similar to MAC 242
6. medium/large sized e/s brush, similar to MAC 252, 249
7. flat liner brush, similar to MAC 212
8. MAC 217
9. crease brush, similar to MAC 249, 242, 272
10. Spoolie, MAC 204
11. Angled shader, similar to MAC 263, 208
Other stuff
12. Eyelash curler
13. Petri dish
14. Blending wedge
15. Hair spray
Okay! So now that we've got that out of the way, on to the tutorial! Let me just warn you now though, some of the pictures aren't very flattering haha
Step One: Prep Your Face
Start with a clean, moisturized and prepped face:
At this point I've already applied my moisturizer and then I put Prep + Prime on top.
Step Two: Concealers
Apply your concealers. I use green to cover up any redness, and yellow to cancel out blue [like under my eyes!]
Step Three:
Blend, blend, blend!
I normally just use my fingers. This should be the finished product:
Step Four: Foundation
This is when I apply my foundation.
I love this stuff!
I take my petri dish and put a minimal amount of foundation in it, like so:
Then, taking my 187 brush, I swirl it around in a circle in the petri dish and pick up some foundation. Then, I proceed to buff it on my face with the brush. Which means I move it around my face in circular motions until it is well blended. Add more foundation as you need it.
Make sure you blend really well on your jawline and near your hair line, so you don't have an obvious line of color.
Next I take my blending wedge and dab it into the remaining foundation on the dish.
I use this under my eyes to better blend the concealer and hide dark circles a bit better, and on my eye lids as sort of base. After I've used most of the product on the sponge, I use it to kind of buff my jawline and around my hairline, just to make sure it's really well blended.
Step Five: Loose Powder
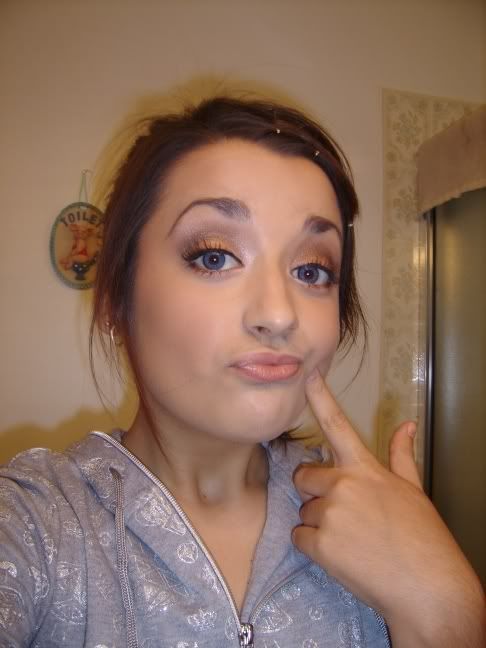
Take your loose powder and your powder brush and make a stupid face:
Then proceed to apply the powder to your face. What I do is dip the brush in a little, then tap off all the excess powder into the lid. That way if I need more I can just go to lid instead of wasting a bunch of powder. The key to not making this turn your face into a cakey mess is not using tons of powder. You don't really need it, you're just setting your foundation so it's less likely to come off. If it DOES turn out a little cakey, I just take a spray bottle full of water and give my face a few squirts of it, then let it dry. It should get rid of it!
Step Six: Eyeshadow
I know some people like to do eyes before foundation, but this is just the way I prefer to do it. Feel free to switch it up if you'd like, there's no right or wrong way. [I just wipe the excess shadow off, it really isn't that much of a hassle to me...sometimes I'll put tissue or a fluff under my eye to catch fall out]
I like to start out with my highlighter. [again, you can switch it up if you'd like and do it last, it doesn't matter]
I take Shroom on my little eyeshadow brush, and apply it to
a. inner corners of the eyes
b. bottom lash line, not quite halfway
c. brow bone
Like so:
Next, take your medium/large sized e/s brush and pick up some amber lights.
Apply amber lights to:
a. entire lid
b. bottom lash line, stopping where shroom ends [use your flat liner for this]
Like so:
At this point you could blend your colors together and blend the lid color into your highlight, but it really doesn't make much of a difference in the end.
That is amber lights and shroom on my lids, the two blended together and amber lights blended up-wards.
The next step is to take bronze on your crease brush, like shown below:
Apply bronze to:
a. crease
b. outer v
Like this:
[the arrows just show where you're supposed to blend]
On my eye:
Then it is necessary to blend the bronze up and into your highlight color. Also blend into amber lights. Take your 217, and go in little circles where the shadow meets the skin! [thus, you're blending it into the skin]
Next, using the same crease brush [or a different, doesn't matter!], pick up a bit of espresso. I don't have a pic but I'm sure it isn't that big of a deal. Haha.
Apply Espresso to the crease only.
Incase you're lost, the color coding goes like this:
Light yellow: Shroom
Orange: Amber lights
Light brown: Bronze
Dark Brown: Espresso
Then you blend.
Should look like this:
As far as eye shadows go, this is the last step. Take some carbon on your crease brush:
apply carbon to:
a. outer v
b. very outer part of lower lash line
Like below:
It should look like this, unblended.
Lastly, you blend those suckers into each other so that there's no obvious separations. It should look like a smooth gradient!
Step Seven: Eyebrows
The next thing to do is fill in your eyebrows!
I use espresso and the angled shading brush pictured above. I stick with my shape and fill in areas that are lacking in hair, and I extend the length because mine are kind of short. Seeing as this isn't a tut for brows, I'll leave you to figure out how to do yours on your own
After filling them, I keep them in place by...
Using hair spray [which I forgot to show above] and a mascara spoolie. I spray the spoolie with hair spray and just groom my brows. It locks in the color and keeps the shape all day, works great.
Step Eight: Eyeliner
Okay, so for this step I use liquid liner and just line my eyes that way. I prefer the clean line.
BUT if you want the look to be more smokey, take black liner [pencil] and smudge it into your shadow. Then apply more near your lashes to darken it.
Add some liner to your bottom water line and voilà, smokey.
^^ only liquid liner.
Step Nine: Mascara
Next you curl your lashes, and apply your favorite mascara!
Finished eyes!
Step Ten: Contouring
Next step is contouring! You take your angled face brush, and get some bronzer on there.
Then we apply the bronzer to the hollows of our cheeks. How do you find the hollows, you ask? Well, none of this fishy face stuff. What I used to do was feel around my cheeks for where the bones ended, and that's where I put my bronzer. It should be near the bottom of your apples. My bronzer line goes from about the middle of my ear, down wards.
Whenever I'm contouring, I like to blend as I go. That way lines don't look as harsh. So, after I'm finished applying the bronzer, I blend it into my skin so it doesn't look like a random line.
Next I take my Plum Foolery blush and my 187 brush
Then I apply the blush to the apples of my cheeks! EDIT: I totally forgot to mention. You need to blend your blush into the bronzer you used to contour, or else it looks like two seperate splashes of color on your face, which is probably not the look you're going for. I just buff the color onto the apples of my cheeks, then kind of blend it out towards where my contour is. I also bring some out towards my temples, to kind of bring my cheekbones upwards.
If you don't really get that, here's an illustration:
The green represents where I would place my bronzer.
The red represents where I would put my blush.
The arrows show where to blend and what direction.
I take my 187 again and my smashbox soft lights
and I apply along my cheek bones (where the light would naturally hit my cheeks, so that they look more prominent), a tiny bit in the middle of the forehead, and middle of the chin.
Yet another weird, random face.
Step Eleven: Lips
There aren't any pictures for this, mainly because I'm lazy. But it's fairly simple to do. First I prep my lips with my lip balm. Then I line my lips with my lip liner, being careful to follow the natural shape. I color in my lips a little with the pencil so that it blends. Then I use my Blankety lipstick and put it on my lips, blot with a tissue, then re apply and blot again. Blotting makes it last a lot longer. Lastly, I put on some E.L.F lipgloss, with some Love Nectar on top!
FINISHED PRODUCT:
WHEW. That took forever! Kudos to those that do these things on a regular basis, it takes a lot of time to put together! Hopefully it wasn't lacking near the end, as I got lazy...but I tried to be as thorough as possible.
As with any look, feel free to add steps, skip steps, or just customize it to fit your tastes.
Thanks for looking!


