user79
Well-known member
Update: This tutorial is also available as a live video version on my Youtube channel. You can check that out by following the link to my channel in my signature.

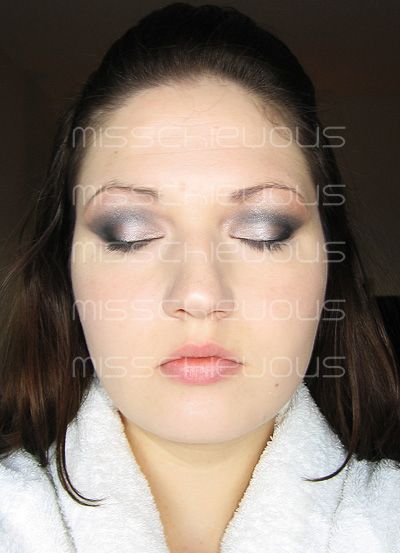
Due to the popularity of (this) FOTD, and due to being sick today with some kind of stomach virus, I've decided to make a tutorial for it.
A few things to note:
1) Sorry but I have to add a watermark to my tutorials and FOTDs. I've had people ripping them off, hosting them on other websites, and taking credit for my work.
2) This looks a bit different from the original FOTD because of the lighting. Unfortunately, it was late afternoon and the sky was overcast, so I couldn't get the pictures with the best light I was hoping for. I also had to use a flash so the colours don't show up as brightly as they looked in real life. But the end look did look like the original FOTD, I swear.
3) I don't actually have a pic of where I do blending on the eye, I just do it as I go with the 222, mainly focusing on blending the crease. Just don't overblend, it shouldn't look muddy.
So, let's get started!
Products you will need:
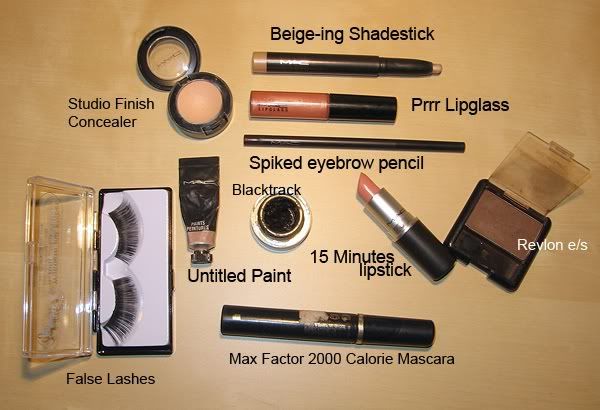
* forgot to picture the white kohl eyeliner in this pic, it's from Rimmel*

Step 1:
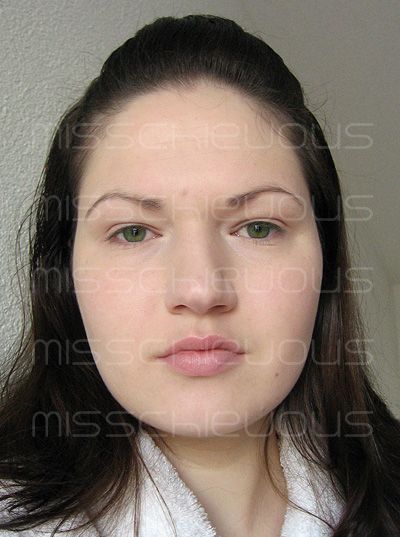
Here I've already primed my face with moisturizer, applied Alima mineral foundation with the 182 buffer brush, applied concealer and Untitled Paint to my eyelids. You can check out some of my other tutorials for these steps, I didn't see the point in doing that again as it's pretty much always the same for me.
Step2:
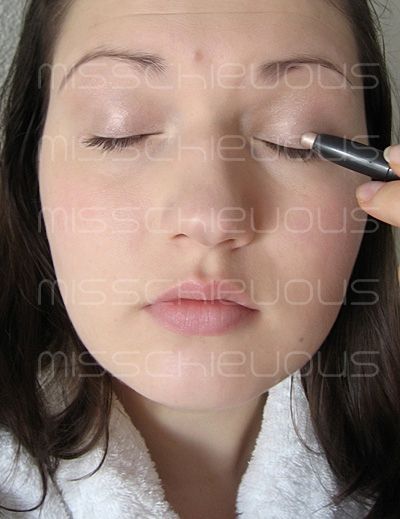
Apply a light coating of Beige-ing shadestick, and blended it out with my ring finger.
Step 3:
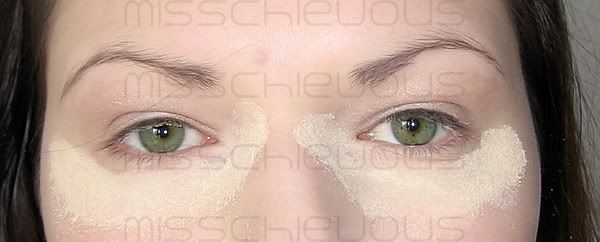
Used a wide eyeshadow brush (not pictured) to apply loose powder underneath my eyes, this is to catch fall-out from the shadows. This is some cheap CoverGirl powder I bought at the drugstore, I don't know the shade anymore.
Step 4:
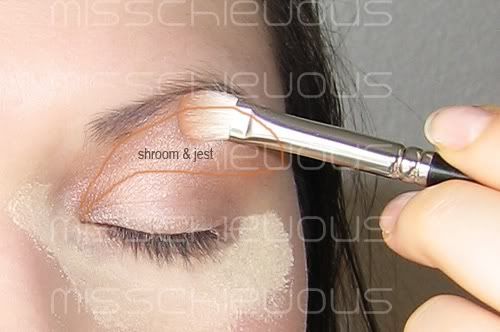
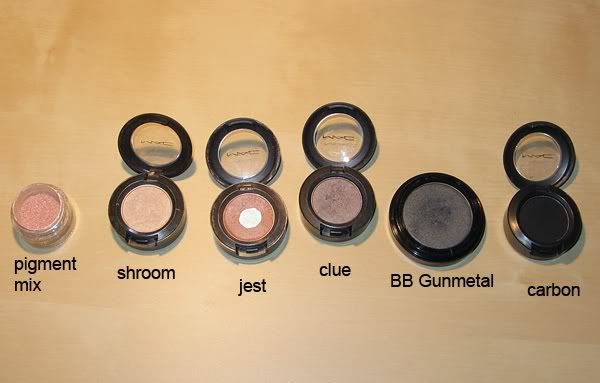
Use the 272 brush to apply a wash of Shroom from the browbone to the crease, then apply Jest over top in the area shown.
Step 5:
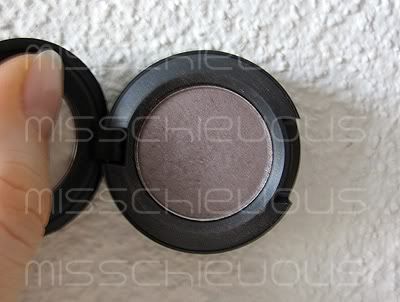
Next comes Clue e/s. This was the limited edition shade from the Originals collection.
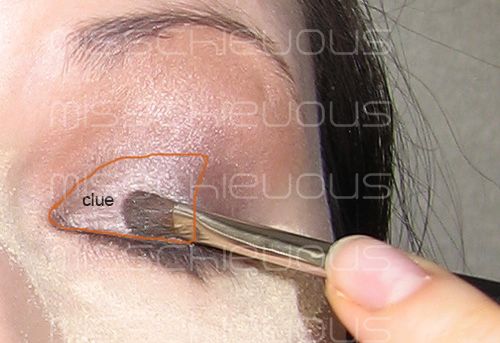
Apply Clue, this time with a smaller lid brush, to the inner 2/3 of the lid, blending up to the crease. This is the area shown in the pic.
Step 6:
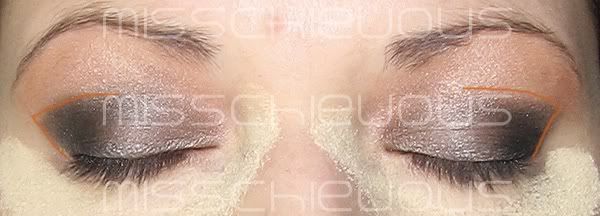
Using the small lid brush again, apply Bobbi Brown Gunmetal e/s to the outer third of the eyelid, up to the crease (area shown.) If you don't have Gunmetal, a metallic cool dark gray shadow may be used instead (eg. MAC Knight Divine.)
Step 7:

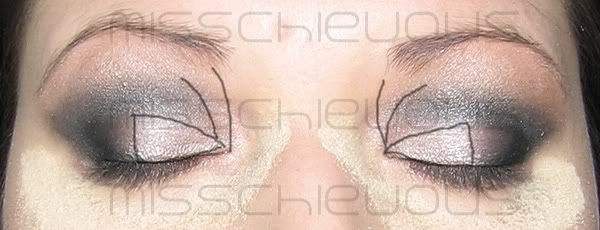
Using a small angle brush, apply Carbon to your V area (are shown), packing it on darkly. You could also use a pencil brush (219) to do this, however, I feel I have more control with the angle brush. You want to form a V shape, lying on its side.
Step 8:
Apply a light shimmery shadow to the very inner corner, and going up to the inner brow. I threw together a mix of pigments containing mostly White & Goldenaire & a bit of Tan.
***FALSE LASHES***
This is where you would apply the false lashes. I didn't add them in this Tutorial because I couldn't be bothered, but if you add the lashes, I would put them on now, and then put the Blacktrack liner after. With lashes, it would look like this: (click here for a pic)
Step 9:
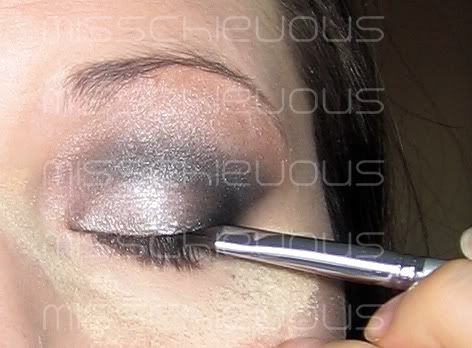
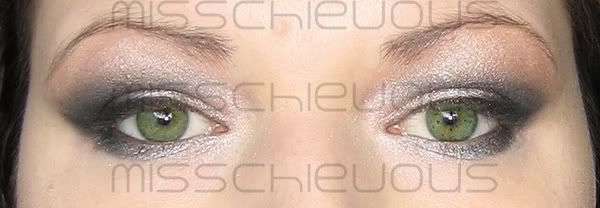
Use an angle brush, or whatever you feel comfortable with, to apply Blacktrack fluidliner, to the outer half of the lid only. Stick close to your lashline.
Dust away the loose powder and voila - you have finished the top half of your eyes!
Step 10:
Apply Beige-ing shadestick to the lower lash line.
Step 11:
Using a pencil brush like the MAC 219, apply the pigment mix or a light shadow to the inner corner, and the Gunmetal to the outer corner on the lower lashline. Blend together, but don't overblend. The outer corner shadows should connect to the cat eye V shape on the top lid.
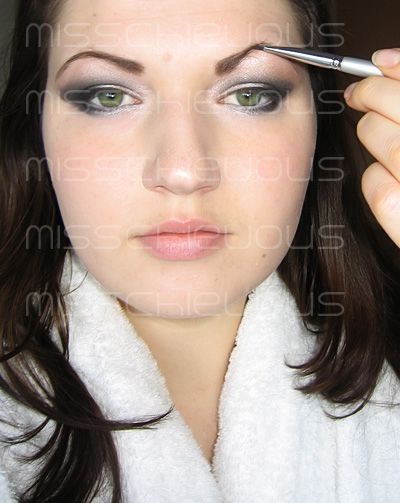
Step 12:
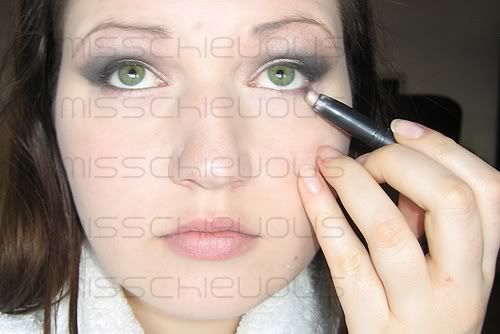
Apply white kohl eyeliner on your lower waterline. Also apply the brow pencil to your eyebrows, starting at the inner corners and working up to the arch. I found (this tutorial by Specktra member M) to be the most helpful for perfecting my brows, so if you want a more detailed look, I would suggest you check that one out. I adapted my technique off that tutorial.
Step 13:
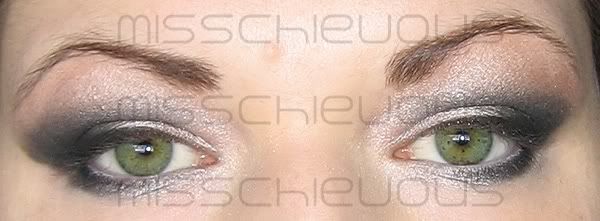
I use the small angled brush again to blend the harsh lines of the eyebrow pencil...
..and then add a bit of brown eyeshadow on top to make them more defined. Clean up the edges with a Q-tip cotton swab.
Step 14:
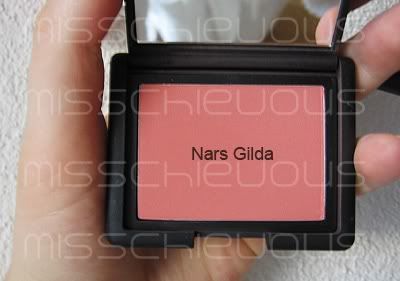
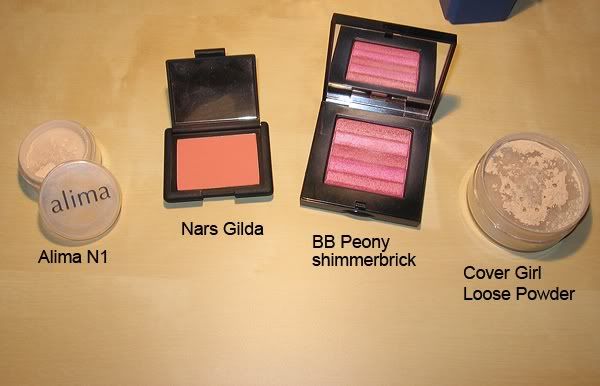
Time for blush! I like Nars Gilda for this...you could sub this colour with another peach blush.
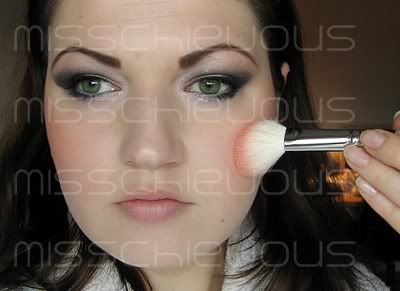
I use the 168 angle blush brush to apply this on my cheekbones and a bit on the apples.
Step 15:
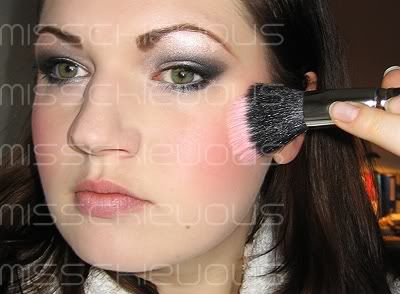
Use my skunk brush (187) to apply Bobbi Brown Shimmerbrick in Peony over top. This will give you a bit of a glow, but also deposits a bit of pink colour over top.
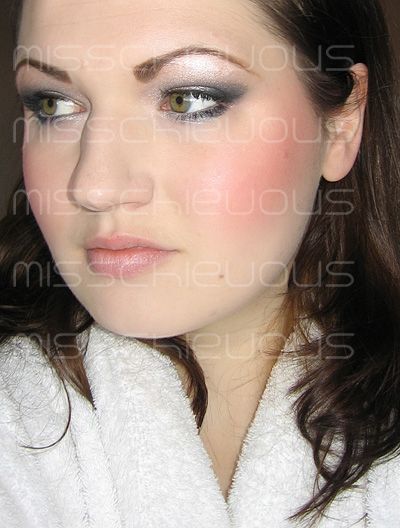
Blush is done! Use the 182 kabuki brush to blend everything to a flawless finish.
Step 16:
Applied a thin layer of MAC 15 Minutes lipstick to my lips. It's a nude pink lipstick that applies quite opaquely.
Step 17:
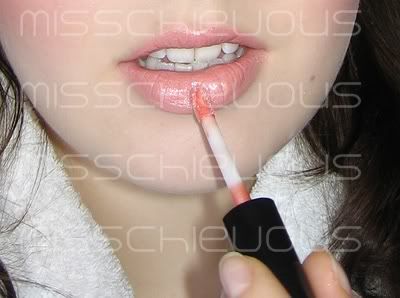
Prrr lipglass goes on top!
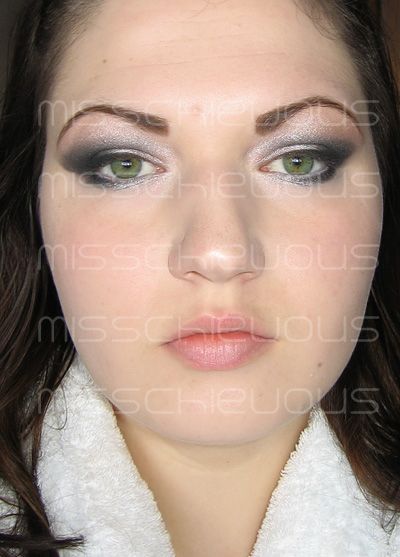
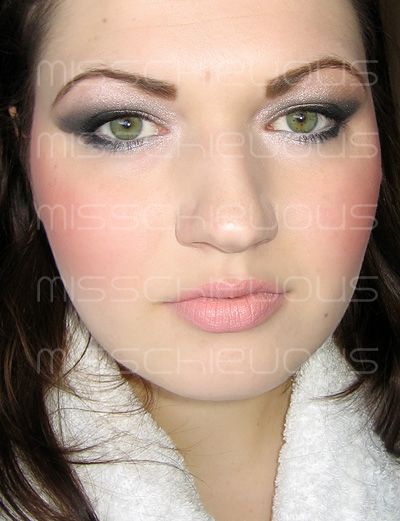
And omg, we're done!!
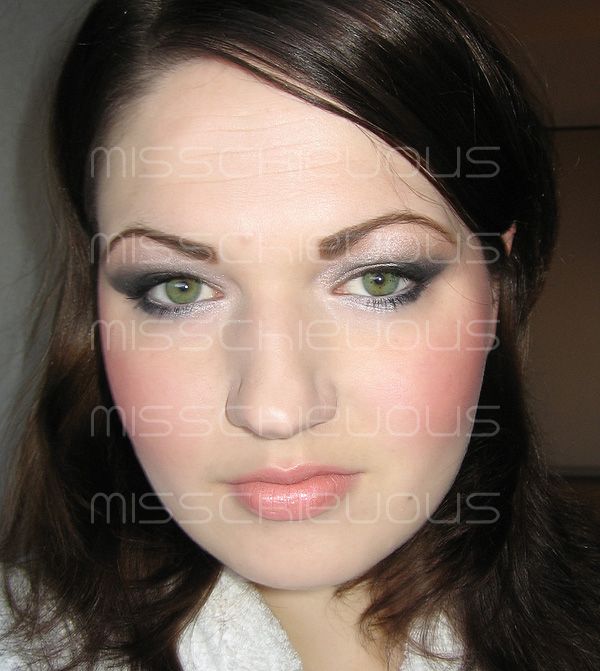
Hope this was helpful! Let me know what you think.
Due to the popularity of (this) FOTD, and due to being sick today with some kind of stomach virus, I've decided to make a tutorial for it.
A few things to note:
1) Sorry but I have to add a watermark to my tutorials and FOTDs. I've had people ripping them off, hosting them on other websites, and taking credit for my work.
2) This looks a bit different from the original FOTD because of the lighting. Unfortunately, it was late afternoon and the sky was overcast, so I couldn't get the pictures with the best light I was hoping for. I also had to use a flash so the colours don't show up as brightly as they looked in real life. But the end look did look like the original FOTD, I swear.
3) I don't actually have a pic of where I do blending on the eye, I just do it as I go with the 222, mainly focusing on blending the crease. Just don't overblend, it shouldn't look muddy.
So, let's get started!
Products you will need:
* forgot to picture the white kohl eyeliner in this pic, it's from Rimmel*
Step 1:
Here I've already primed my face with moisturizer, applied Alima mineral foundation with the 182 buffer brush, applied concealer and Untitled Paint to my eyelids. You can check out some of my other tutorials for these steps, I didn't see the point in doing that again as it's pretty much always the same for me.
Step2:
Apply a light coating of Beige-ing shadestick, and blended it out with my ring finger.
Step 3:
Used a wide eyeshadow brush (not pictured) to apply loose powder underneath my eyes, this is to catch fall-out from the shadows. This is some cheap CoverGirl powder I bought at the drugstore, I don't know the shade anymore.
Step 4:
Use the 272 brush to apply a wash of Shroom from the browbone to the crease, then apply Jest over top in the area shown.
Step 5:
Next comes Clue e/s. This was the limited edition shade from the Originals collection.
Apply Clue, this time with a smaller lid brush, to the inner 2/3 of the lid, blending up to the crease. This is the area shown in the pic.
Step 6:
Using the small lid brush again, apply Bobbi Brown Gunmetal e/s to the outer third of the eyelid, up to the crease (area shown.) If you don't have Gunmetal, a metallic cool dark gray shadow may be used instead (eg. MAC Knight Divine.)
Step 7:
Using a small angle brush, apply Carbon to your V area (are shown), packing it on darkly. You could also use a pencil brush (219) to do this, however, I feel I have more control with the angle brush. You want to form a V shape, lying on its side.
Step 8:
Apply a light shimmery shadow to the very inner corner, and going up to the inner brow. I threw together a mix of pigments containing mostly White & Goldenaire & a bit of Tan.
***FALSE LASHES***
This is where you would apply the false lashes. I didn't add them in this Tutorial because I couldn't be bothered, but if you add the lashes, I would put them on now, and then put the Blacktrack liner after. With lashes, it would look like this: (click here for a pic)
Step 9:
Use an angle brush, or whatever you feel comfortable with, to apply Blacktrack fluidliner, to the outer half of the lid only. Stick close to your lashline.
Dust away the loose powder and voila - you have finished the top half of your eyes!
Step 10:
Apply Beige-ing shadestick to the lower lash line.
Step 11:
Using a pencil brush like the MAC 219, apply the pigment mix or a light shadow to the inner corner, and the Gunmetal to the outer corner on the lower lashline. Blend together, but don't overblend. The outer corner shadows should connect to the cat eye V shape on the top lid.
Step 12:
Apply white kohl eyeliner on your lower waterline. Also apply the brow pencil to your eyebrows, starting at the inner corners and working up to the arch. I found (this tutorial by Specktra member M) to be the most helpful for perfecting my brows, so if you want a more detailed look, I would suggest you check that one out. I adapted my technique off that tutorial.
Step 13:
I use the small angled brush again to blend the harsh lines of the eyebrow pencil...
..and then add a bit of brown eyeshadow on top to make them more defined. Clean up the edges with a Q-tip cotton swab.
Step 14:
Time for blush! I like Nars Gilda for this...you could sub this colour with another peach blush.
I use the 168 angle blush brush to apply this on my cheekbones and a bit on the apples.
Step 15:
Use my skunk brush (187) to apply Bobbi Brown Shimmerbrick in Peony over top. This will give you a bit of a glow, but also deposits a bit of pink colour over top.
Blush is done! Use the 182 kabuki brush to blend everything to a flawless finish.
Step 16:
Applied a thin layer of MAC 15 Minutes lipstick to my lips. It's a nude pink lipstick that applies quite opaquely.
Step 17:
Prrr lipglass goes on top!
And omg, we're done!!
Hope this was helpful! Let me know what you think.


