I saw a great green smokey eye posted here, and I remembered I did a green smokey inspired by Beyonce a while back and that it would be great for my first post here. I hope you like it!
Here is the Beyonce look I did. I do have to say that I have a VERY DIFFERENT skin tone then Beyonce. But I created this eye:

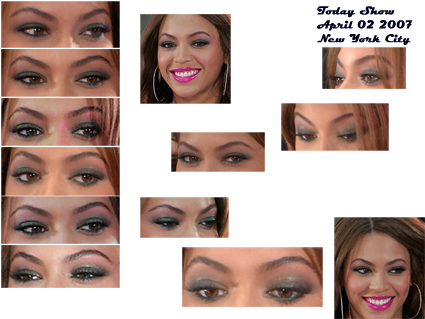
I remember this look and went in search for more pictures. I found that it was a look she had on the Today's Show on April 2007th. I also noticed that in some screens she had more pink on top of the green then on others, so I kept it noticeable, but not screaming PINK!!! I thought I'd show you all the eyes I found of this look:
It's Sunday, so that means I take extra good care of my skin.
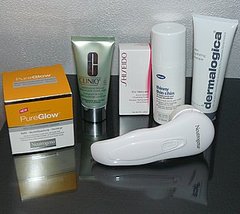
Products in this picture:
Before using the Microdermabrasion System I cleansed first using the Extra Gentle Cleansing Foam.
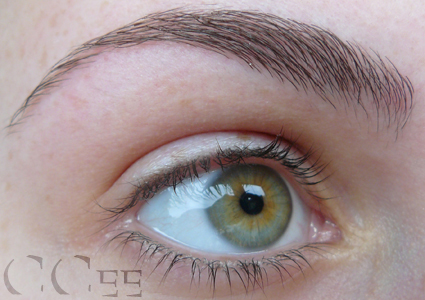
Now that the skin is clean and without dead skin cells I moisturised with Continuous Rescue Antioxidant Moisturiser on my face and Thinny Thin Chin on my chin and neck area. I had very dry skin around my eyes, I think it's because I was rubbing my eyes a lot yesterday (there was something under my lens and even though I took it out, cleansed it and put it back in, my eye kept feeling raw). To care for my eye area a little more I used the Dermalogica Skin Hydrating Mask there. Now you're not supposed to leave it on the skin, but I do because my skin eats this stuff. I did decide not to use a primer over this on my eyes though.
I don't know if it's noticeable in the picture, but my skin is already less tight and more plump.
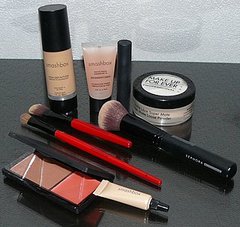
Products in this picture:
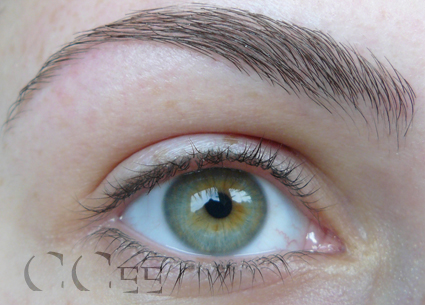
After being so nice to my skin, I had to stay nice with pea size amount of Photo Finish Foundation Primer SPF 15 & Dermaxyl™ all over my face (except on eyes). You may have noticed I don't use this very often, I have a little tube and I try to only use it on special occasions or when my skin feels like it needs a little extra even after foundation. This primer also has anti-aging ingredients and vitamins, peptides and UVA/UVB SPF 15 (to quote the big sales pitch), but I do feel like when I use this my skin is extra protected and I like knowing I'm caring for my skin with makeup. Maybe that's why I love the High Definition Healthy FX Foundation (applied with the Travel Foundation brush), the name makes me feel like I'm caring for my skin. It could have something to do with only the name, but I do remember after using my first expensive foundation (when I was 16 or something my mum gave me a Helena Rubenstein foundation), when I took of the foundation, my skin still felt soft and hydrated, that had never happened before. Anyway, here is my eye (foundation used everywhere but on the eyelid and crease), after primer and foundation:
As a concealer I think the Camera Ready Concealer in 3.0 fits my skin tone perfectly, I use it more then the Concealer palette (Sephora) I used before. It's easier as well, without the mixing and everything, but when my circles are dark I do go back to the palette. I applied the Concealer with the no. 4 concealer brush and blended this well with the surrounding skin.
I tend to use the Photo Op Under Eye Brightener over the concealer to not have the brightening effect hidden by the concealer, also I think this makes the skin shine though the concealer a little and that makes it more real. I pat this into the skin using my ring finger.
I used Super Matte Loose Powder to set the base of my face. Because the eye is to intense and the lips are very strong I needed my skin to look real but not shiney, so I used minimal powder just to kill any shine to do this I used a Mineral Powder Brush to buff a little into the skin. I used the same brush very lightly to add the Bronzer Contour on my jawline and under my cheekbones. I also used a little from my temple to the corner of the eye.
I kept the contouring very light, and it's almost unnoticeable on the picture, but you can see my face looks warmer in the second picture:
I thought a lot about creating the same shimmery green black and I know that MAC has a shadestick called sharkskin that (if it looks the way I think it does) should work very well as a colour base. I don't have the shadestick so I used a couple of other things that I think most women have.

Products in this picture:
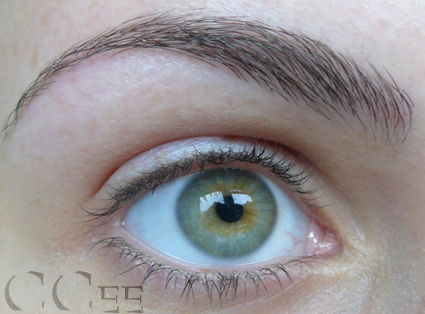
Beyonce doesn't have highlighted brows, so I left them like this and didn't use highbrow. The first colour on my eyelid was the Caviar Cream Eyeliner placing it with my fingers to create a sticky darker base that's blended well at the edges (up to the crease). You can use any black cream shadow for this, but I only had a cream liner.
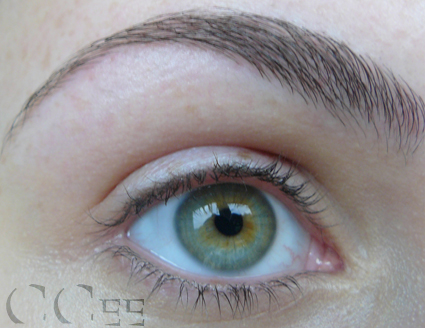
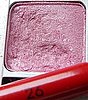
Because the pink on Beyonce's eyes could be lighting I didn't want to overdo the colour, but I did think it would look fun so I added Hotpants to the top of my crease at this point. By placing it now when blending the green up later the colour will be less noticeable but still there.
Hotpants is this colour:
Placement (with no. 26 Smashbox Shadow Brush):
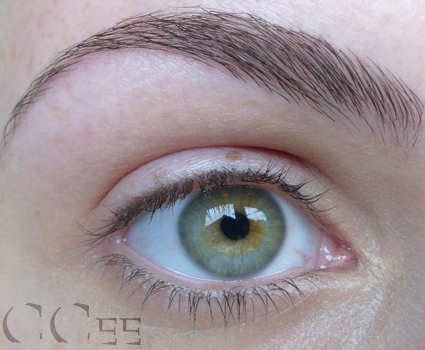
I have a matte black eyeshadow in the Sephora, Lesson 1 - Smokey eyes palette and used this, again you can use any matte black eyeshadow. The reason I'm using matte is because it's usually darker and I want only the green shimmer. I used the Shadow Brush no. 26 for this because it's fluffy and doesn't add a bulk of colour where you place the brush but also doesn't create fallout. Also you can use this brush for blending as well if you only add the colour to one side of the brush.
Here is the shape of the brush close up:
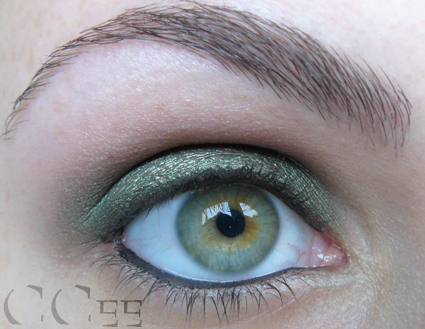
And the eye after blending the black into the pink a little:
Using the Arced Liner Brush I lined both my waterlines using JetSet in Midnight Black, I went a little over the waterline at the outer corner making the eye look a little more almond shaped.
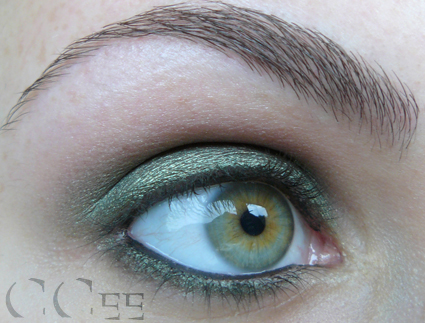
Next I packed the No. 26 bush (cleaned on a dry towel) with Mildew. I then patted the colour into the skin on my eyelid and I then used a quick horizontal brushing motion to make the shadow look more metallic. I then turned the brush (that the clean side is on the side of the eyebrow, and pushed the brush into the crease while looking normal), now I used a windscreen wiper motion and went slowly upward blending the colour out but keeping it from going to much into the pink. If this way scares you, use a normal crease brush for blending in the crease, but be careful not to make the pink vanish. I chose this way because now you have more control over the blending.
At this point I used the Slanted Brush to push the matte black I used before into the lash line, make sure you don't go to low with this, this is a smokey eye, but she's not going down as much. I then used the same brush to add the Mildew to the bottom lash line too. If you do go to low, take a Q-tip and erase the hard line and place some concealer on the tip/top of your finger and using a (downward) windscreen wiper motion blend the concealer up, making the bottom colours less low.
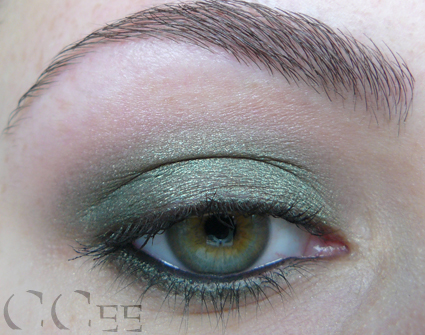
When I look down you see how short the blending is:

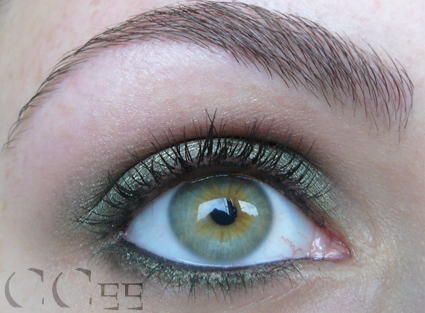
Now it was time for curling the lashes and adding two coats of normal Diorshow:
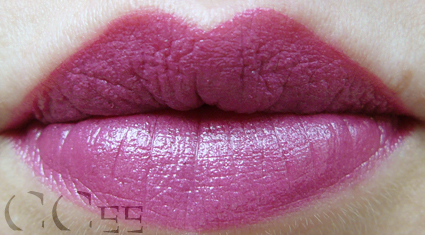
Lips
On my lips I used LipPlump as a base, to keep the colours looking bright longer. I then used Lip Envy in Greedy, which is a lip stain that actually stains your lips for a longer period of time. I love this colour, but because it's matte I had to add a little 625 on top using a retractable lip brush.
CeeMe.Onsugar.com
Here is the Beyonce look I did. I do have to say that I have a VERY DIFFERENT skin tone then Beyonce. But I created this eye:
I remember this look and went in search for more pictures. I found that it was a look she had on the Today's Show on April 2007th. I also noticed that in some screens she had more pink on top of the green then on others, so I kept it noticeable, but not screaming PINK!!! I thought I'd show you all the eyes I found of this look:
It's Sunday, so that means I take extra good care of my skin.
Products in this picture:
- Neutrogena, PureGlow - Microdermabrasion System
- Clinique, Continuous Resque Antioxidant Moisturiser
- Shiseido, The Skincare - Extra Gentle Cleansing Foam
- Bliss, Thinny Thin Chin
- Dermalogica, Skin Hydrating Masque
Before using the Microdermabrasion System I cleansed first using the Extra Gentle Cleansing Foam.
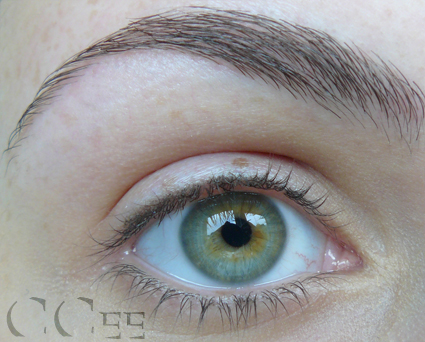
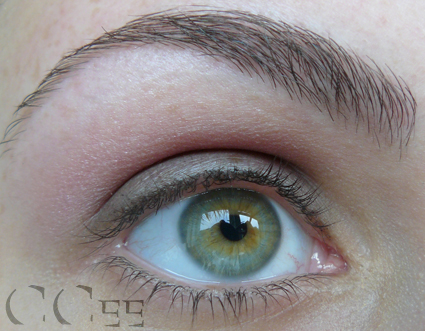
Now that the skin is clean and without dead skin cells I moisturised with Continuous Rescue Antioxidant Moisturiser on my face and Thinny Thin Chin on my chin and neck area. I had very dry skin around my eyes, I think it's because I was rubbing my eyes a lot yesterday (there was something under my lens and even though I took it out, cleansed it and put it back in, my eye kept feeling raw). To care for my eye area a little more I used the Dermalogica Skin Hydrating Mask there. Now you're not supposed to leave it on the skin, but I do because my skin eats this stuff. I did decide not to use a primer over this on my eyes though.
I don't know if it's noticeable in the picture, but my skin is already less tight and more plump.
Products in this picture:
- Smashbox, Photo Finish Foundation Primer SPF 15 & Dermaxyl™
- Smashbox, High Definition Healthy FX Foundation in Light L3
- Smashbox, Travel Foundation Brush
- Smashbox, Camera Ready Concealer in 3.0
- Smashbox, Concealer Brush no. 4
- Smashbox, Photo Op Under Eye Brightener
- Make Up For Ever, Super Matte Loose Powder in no. 12
- Sephora Professionnel, Minderal Powder Brush no. 45
- Smashbox, Bronzer/Blush Duo in Contour/Pop
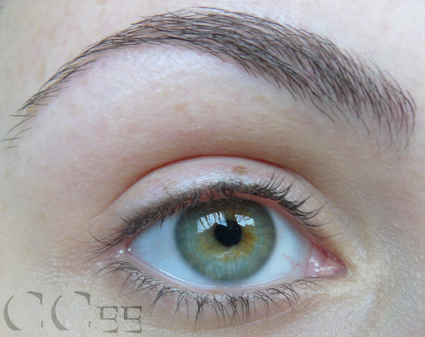
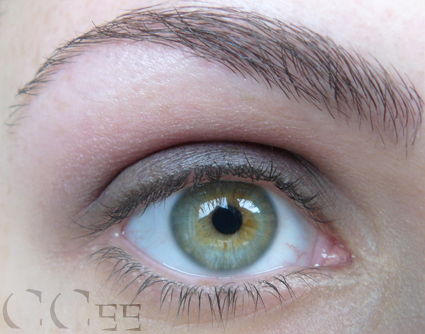
After being so nice to my skin, I had to stay nice with pea size amount of Photo Finish Foundation Primer SPF 15 & Dermaxyl™ all over my face (except on eyes). You may have noticed I don't use this very often, I have a little tube and I try to only use it on special occasions or when my skin feels like it needs a little extra even after foundation. This primer also has anti-aging ingredients and vitamins, peptides and UVA/UVB SPF 15 (to quote the big sales pitch), but I do feel like when I use this my skin is extra protected and I like knowing I'm caring for my skin with makeup. Maybe that's why I love the High Definition Healthy FX Foundation (applied with the Travel Foundation brush), the name makes me feel like I'm caring for my skin. It could have something to do with only the name, but I do remember after using my first expensive foundation (when I was 16 or something my mum gave me a Helena Rubenstein foundation), when I took of the foundation, my skin still felt soft and hydrated, that had never happened before. Anyway, here is my eye (foundation used everywhere but on the eyelid and crease), after primer and foundation:
As a concealer I think the Camera Ready Concealer in 3.0 fits my skin tone perfectly, I use it more then the Concealer palette (Sephora) I used before. It's easier as well, without the mixing and everything, but when my circles are dark I do go back to the palette. I applied the Concealer with the no. 4 concealer brush and blended this well with the surrounding skin.
I tend to use the Photo Op Under Eye Brightener over the concealer to not have the brightening effect hidden by the concealer, also I think this makes the skin shine though the concealer a little and that makes it more real. I pat this into the skin using my ring finger.
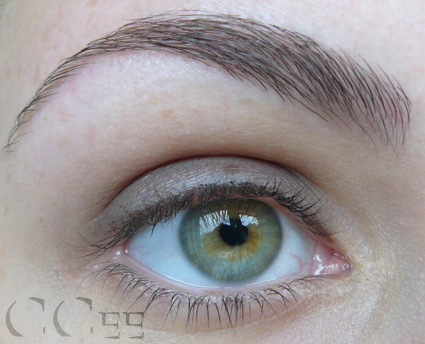
I used Super Matte Loose Powder to set the base of my face. Because the eye is to intense and the lips are very strong I needed my skin to look real but not shiney, so I used minimal powder just to kill any shine to do this I used a Mineral Powder Brush to buff a little into the skin. I used the same brush very lightly to add the Bronzer Contour on my jawline and under my cheekbones. I also used a little from my temple to the corner of the eye.
I kept the contouring very light, and it's almost unnoticeable on the picture, but you can see my face looks warmer in the second picture:
I thought a lot about creating the same shimmery green black and I know that MAC has a shadestick called sharkskin that (if it looks the way I think it does) should work very well as a colour base. I don't have the shadestick so I used a couple of other things that I think most women have.
Products in this picture:
- Bliss, LipPlump
- Smashbox, Cream Eyeliner Palette (using Caviar only)
- Urban Decay, Lip Envy in Greedy (deep berry Item # 26530)
- Smashbox, JetSet in Mignight Black
- Smashbox, Arced Liner Brush no. 21
- Smashbox, Shadow Brush no. 26
- The Body Shop, Slanted Brush
- The Body Shop, retractable lip brush
- Urban Decay, Eyeshadow, Mildew (deep green Item # 31300)
- Urban Decay, Rockstar Palette (not sold anymore) using the colour Hotpants (medium pink Item # 36300)
- Christian Dior, Diorshow in black
- L'Oreal Lipstick (no longer sold) in 625
- Sephora, Lesson 1 - Smokey eyes (using the matte black only)
- Sephora, Eyelash Curler
Beyonce doesn't have highlighted brows, so I left them like this and didn't use highbrow. The first colour on my eyelid was the Caviar Cream Eyeliner placing it with my fingers to create a sticky darker base that's blended well at the edges (up to the crease). You can use any black cream shadow for this, but I only had a cream liner.
Because the pink on Beyonce's eyes could be lighting I didn't want to overdo the colour, but I did think it would look fun so I added Hotpants to the top of my crease at this point. By placing it now when blending the green up later the colour will be less noticeable but still there.
Hotpants is this colour:
Placement (with no. 26 Smashbox Shadow Brush):
I have a matte black eyeshadow in the Sephora, Lesson 1 - Smokey eyes palette and used this, again you can use any matte black eyeshadow. The reason I'm using matte is because it's usually darker and I want only the green shimmer. I used the Shadow Brush no. 26 for this because it's fluffy and doesn't add a bulk of colour where you place the brush but also doesn't create fallout. Also you can use this brush for blending as well if you only add the colour to one side of the brush.
Here is the shape of the brush close up:
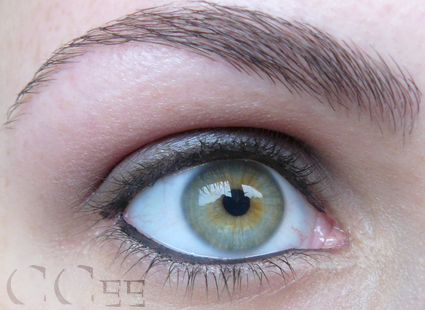
And the eye after blending the black into the pink a little:
Using the Arced Liner Brush I lined both my waterlines using JetSet in Midnight Black, I went a little over the waterline at the outer corner making the eye look a little more almond shaped.
Next I packed the No. 26 bush (cleaned on a dry towel) with Mildew. I then patted the colour into the skin on my eyelid and I then used a quick horizontal brushing motion to make the shadow look more metallic. I then turned the brush (that the clean side is on the side of the eyebrow, and pushed the brush into the crease while looking normal), now I used a windscreen wiper motion and went slowly upward blending the colour out but keeping it from going to much into the pink. If this way scares you, use a normal crease brush for blending in the crease, but be careful not to make the pink vanish. I chose this way because now you have more control over the blending.
At this point I used the Slanted Brush to push the matte black I used before into the lash line, make sure you don't go to low with this, this is a smokey eye, but she's not going down as much. I then used the same brush to add the Mildew to the bottom lash line too. If you do go to low, take a Q-tip and erase the hard line and place some concealer on the tip/top of your finger and using a (downward) windscreen wiper motion blend the concealer up, making the bottom colours less low.
When I look down you see how short the blending is:
Now it was time for curling the lashes and adding two coats of normal Diorshow:
Lips
On my lips I used LipPlump as a base, to keep the colours looking bright longer. I then used Lip Envy in Greedy, which is a lip stain that actually stains your lips for a longer period of time. I love this colour, but because it's matte I had to add a little 625 on top using a retractable lip brush.
CeeMe.Onsugar.com


