MAC 2009 Halloween Face Charts

YSLGuy

Well-known member
Ive seen them, but they are not up on the site yet. Wonder when they will post them.

I really like the Zebra and the Zombie ones.
9032_286488220553_16126780553_9167352_6590476_n.jpg


YouTube - MACcosmetics's Channel

video up now on the Youtube channel
 

erine1881

Well-known member
they should be up any day now. i keep checking so i can print them off and have them instore for customers to check out.

i'm sooo doing the zebra and butterfly ones this year!
 

MissCrystal

Well-known member
9032_286590105553_16126780553_91690.jpg


STEP-BY-STEP
1. Prep and hydrate skin with Prep + Prime Skin and Studio Moisture Fix.
2. Perfect skin with Studio Fix Fluid Foundation and a light dusting of Studio Fix Powder Foundation. Apply Mineralize Skinfinsh in Soft and Gentle over the high planes of the face for a soft highlight.
3. Use PowerPoint Liner in Engraved to draw linear and rectangle details over the forehead, eye and cheek.
4. Shade in rectangle and squares with Carbon Eye Shadow, and fill in negative space with White Frost Eye Shadow, using Brush #208.
5. Create the singular smokey eye by lining through the upper and lower lashline with Smolder Eye Kohl, and smudging over with Carbon Eye Shadow and Brush #239.
6. Continue to blend smokey effect over the eyelid, through the crease, and lower lashline with Print Eye Shadow.
7. Apply Lipmix White over lips, and shade through the center with Black Knight Lipstick to finish.

FACE
Cleanse Off Oil
Studio Moisture Fix
Prep+Prime Skin
Studio Fix Fluid SPF 15 Foundation
Studio Fix Fluid SPF 35 Concealer
Studio Fix powder
Mineralize Skinfinish - Soft and Gentle

EYES
Eye Kohl - Smolder
Eye Shadow - Carbon, White Frost, Print
Powerpoint Eye Liner - Engraved
Zoomlash - Zoomblack

LIPS
Lipmix – White Frost (PRO)
Lipstick – Black Knight (Style Black Collection)


credit Mac cosmetics on facebook
 

MissCrystal

Well-known member
9032_286590130553_16126780553_91690.jpg


STEP-BY-STEP
1. Prep and hydrate skin with Prep + Prime Skin and Studio Moisture Fix.
2. Perfect skin with Studio Fix Fluid SPF 15, and lightly dust with Silver Iridescent Powder.
3. For the mask, use Brush #191 with Prep + Prime Skin to prep the area of face over the eyes and forehead.
4. Use Lingering Eye Brow to sketch triangle details.
5. Shade in a number of triangles with Print Eye Shadow, using Brush #208.
6. Fill in the majority of triangles with Fascinating Eye Kohl and set with Gesso Eye Shadow.
7. Shade in the remaining triangles with Boot Black Liner, and finish the mask by outlining all triangles with Rapidblack Penultimate Liner.
8. Define and shade the lip with Nightmoth Lip Pencil, and follow with a glossy coat of Clear Lipglass.

FACE
Wipes
Studio Moisture Fix
Prep+Prime Skin
Studio Fix Fluid
Select Cover up
Select Sheer Pressed powder
Iridescent Powder/Loose - Silver Dusk
Eye Kohl - Fascinating
Penultimate Liner - Rapid Black

EYES
Brow Set - Clear
Eye Shadow - Gesso, Print
Liquid Eye Liner - Boot black
Dazzlelash mascara - Dazzleblack

LIPS
Prep+Prime Lip
Lip Pencil - Nightmoth
Lipstick - Black Knight (Style Black Collection)
Lipglass - Clear

credit Mac cosmetics on facebook
 

MissCrystal

Well-known member
9032_286590655553_16126780553_91690.jpg


STEP-BY-STEP
1. Moisturize with M.A.C Studio Moisture Fix. Hiding your brows is not necessary but it will make a difference in the end result of this look. Cover your brows with Nw15 Studio Sculpt Concealer and blend out. Then apply Nc15 Studio Sculpt Concealer all over your face. Highlight your cheek bone, forehead and chin with “Luna” Cream Colour Base. Set with Prep + Prime Finishing powder.
2. Use Black Knight Lipstick to map out the contours and redraw your mouth and teeth.
3. Define the cheek and forehead contours with “Carbon” and “Scene” eyeshadow. For me it’s easier to use a small fluffy brush (brush # 217) to blend out the shadows slowly because it gives me more control.
4. Re-enforce the highlights that you created with Luna Cream Colour Base with “Gesso” Eye Shadow. Brush #242 works well for that because it’s firm and will allow you to achieve a strong pay off very quickly.
5. Add color to the lips and teeth that you have created. You can use brush #316 to define the lips and teeth.
6. To define the eye color “Chrome Yellow” eyeshadow works really well because it’s very intense it will add drama to your look. Use fluidline in “Blacktrack” to add intensity and definition to your eyes. You can also use “Gesso” Eye Shadow to add highlights to the iris that you have drawn on your lids it will give them a more “wet” look.
7. Removal tip: The whole make-up can easily be removed with M.A.C wipes or Cleanse Off Oil.

FACE
Wipes
Studio Moisture fix
Studio Fix Fluid - NC15
Studio Sculpt Concealer - NW15
Prep+Prime Transparent Finishing Powder
Cream Colour Base - Luna
Studio Fix Powder Foundation
Fluidline - Blacktrack
Eye Shadow - Carbon, Scene

EYES
Penultimate Liner - Rapid black
Eye Shadow - Chrome Yellow, Scene,
Passionate, Post Haste, Carbon, Gesso
Fluidline - Blacktrack
Eye Pencil - Ebony

LIPS
Lipstick - Russian Red, Black Knight (Style Black Collection)
Powerpoint Eye Pencil - Gilded White
Pigment - Deep Blue Green


credit Mac cosmetics on facebook
 

MissCrystal

Well-known member
9032_286592620553_16126780553_91690.jpg


STEP-BY-STEP
1. Prime and hydrate skin with an application of Prep + Prime Skin, followed with Studio Moisture Fix.
2. Use Brush #209 with Dipdown Fluidline to draw the detail texture of nose and forehead.
3. Create a shading effect by smudging Dipdown Fluidline details with Eye Shadows in Handwritten or Espresso.
4. Using Brushes #209 or #311 with Blacktrack Fluidline, carefully draw the thick eyeliner and parallel line detail that surrounds the eye.
5. Create the under eye wrinkles with Brush #219 and Espresso Eye Shadow.
6. Add a rough texture to skin by stippling with Espresso Eye Shadow and Brush #188.
7. Set with Prep and Prime Transparent Powder.
8. Red contact lenses will add to the lizard effect.

FACE
Wipes
Studio Moisture fix
Prep+Prime Skin
Studio Tech Foundation
Prep+Prime Transparent Finishing Powder
Studio Finish Concealer
Bronzing Powder
Fluidline - Dipdown
Eye Shadow - Espresso

EYES
Brow Set - Clear
Fluidline - Blacktrack
Eye Kohl - Smolder

LIPS
Prep+Prime Lip
Lip Pencil - Oak, Subculture


credit mac cosmetics on facebook
 

MissCrystal

Well-known member
9032_286592635553_16126780553_91690.jpg


STEP-BY-STEP
1. Cover the whole face with Luna Ceam Colour Base with Brush #249.
2. Outline the butterfly design with Fascinating Eye Kohl and sketch detail of wings.
3. Begin with using Brush #242 to shade Juxt Eye Shadow under the eyes, and then follow by blending the following Eye Shadows outward to create an airbrushed effect that moves from green, to blue, to purple: Swimming, Aquadisiac, Moon’s Reflection, and Stars and Rockets.
4. Use Brush #242 to apply Gorgeous Gold Eye Shadow along the inner corner of the eye and blend upward with Expensive Pink, Coppering, and Sushi Flower to finish the upper portion of the butterfly with an airbrushed finesse.
5. Use Brush #209 with Boot Black Liquid Liner to outline the butterfly and detail pattern inside of the wings.
6. Use Brush #252 with Carbon Eye Shadow to shade over the entire face.
7. Use Duo to apply Lash #42 to the upper lashline and finish with two to three coats with Zoomblack Mascara.
8. Define the lip with Velvetella Cremestick Liner. Apply Cyber Lipstick with Brush #311 and Girl About Town Lipstick along the inner lip for a strong highlight. Finish with a glossy coat of Dazzleglass in Date Night.

FACE
Green Gel Cleanser
Studio Moisture fix
Prep+Prime Face
Cream Colour Base - Luna
Eye Kohl - Fascinating
Eye Shadow - Carbon, Juxt, Swimming, Aquadisiac, Sushi Flower, Moons Reflection, Stars N Rockets

EYES
Liquid Eye Liner - Boot black
Eye Shadow - Sushi Flower, Coppering, Expensive Pink, Gorgeous Gold
Zoomlash - Zoomblack

LIPS
Prep+Prime Lip
Cremestick Liner - Velvetella
Lipstick - Cyber, Girl about Town
Dazzleglass - Date Night


credit mac cosmetics on facebook
 

YSLGuy

Well-known member
They just put them up on the Facebook page. They were not there a while ago. Too funny.
9032_286590670553_16126780553_9169023_8290907_n.jpg


I want to do the Zombie one.

STEP-BY-STEP
1. Hydrate and prepare skin with Prep + Prime Skin and a light layer of Studio Moisture Fix.
2. Use Brush #190 to apply Painterly Paint Pot over the entire face, stippling more coverage over the high planes for a prominent highlight.
3. Use Brush #109 to buff Fluidline in Waveline over the contours of the face, creating a blended ombre between Painterly and the indigo shade of Waveline for an airbrushed effect.
4. Create deeper contours along the temples, nose, eyes, cheek, and chin by applying Carbon Eye Shadow with Brush #217.
5. Use Brush #208 with Blacktrack Fluidline to line the eyes and create the deep wrinkles above the brow, around eyes, under cheekbone, and chin.
6. Create dotted texture on the skin and details of eyebrow with Rapidblack Penultimate Liner.
7. Finish the eyes by applying Lash #8 on the upper lashes and Lash #4 on the lower lashline, following with one to two coats of Zoomblack Zoomlash Mascara.
8. For the lip, use Brushes #209 and #311 to apply smudges of M.A.C Red Lipstick blended with Clear Lipglass over the mouth into the distorted smears of blood.

FACE
Wipes
Paint Pot - Painterly
Fluidline - Waveline
Prep+Prime Skin
Studio Moisture Fix
Penultimate Liner - Rapid Black

EYES
Zoomlash - Zoomblack
Eye Shadow - Carbon
Fluidline - Waveline, Blacktrack
PaintPot - Painterly

LIPS
Lipstick - M·A·C Redd
Lipglass - Clear
 

YSLGuy

Well-known member
Day of the Dead
9032_286592630553_16126780553_9169077_3004183_n.jpg


STEP-BY-STEP
1. Hydrate and create a luminous finish on skin with a spritz of Fix + and Strobe Cream.
2. Use a powder brush to dust White Frost Eye Shadow all over the face, concentrating the strength over the high planes.
3. Draw the outline of the skull design with Blacktrack Fluidline and Brush #228.
4. Use Brush #109 to shade Electric Eel Eye Shadow over the contours of the face within the skull design.
5. Use Brush #228 to apply Blacktrack Fluidline to outline and shade the eye sockets, and switch to Brush #210 to continue with Blacktrack to create the details over the forehead, browbone, nose, cheek, mouth, and chin.
6. Use Brushes #219 and #311 to fill in details with correlating Eye Shadows in Passionate, Chrome Yellow, Purple Haze, Juxt, and Orange.
7. Use Powerpoint in Industry and Scene Eye Shadow to shade in teeth. Outline with Black Knight Lipstick
8. Finish finessing details with Boot Black Liner.

FACE
Green Gel Cleanser
Strobe Cream
Prep+Prime Skin
Eye Shadow - White Frost, Orange Juxt, Electric Eel, Passionate, Carbon, Chrome Yellow, Purple Haze
Liquid Last Liner - Inkspill
Fix +

EYES
Liquid Eye Liner - Bootblack
Eye Shadow - White Frost, Juxt, Carbon, Electric Eel
Fluidline - Blacktrack

LIPS
Powerpoint - Industry, Gilded White
Lipstick - Black Knight (Style Black Collection)

From MAC's Facebook Page
 

YSLGuy

Well-known member
9032_286594690553_16126780553_9169090_5603848_n.jpg


STEP-BY-STEP
1. Perfect the skin using skincare, Prep+Prime Skin and Face and Body Foundation, for specific skintone and texture.
2. “Pow” and “Bang” Sections: Use Brushes #210, #231, and #219 to apply Blacktrack Fluidline for the animation outline and text. Fill in “Pow” with Passionate Eye Shadow and “BAM with Electric Eel Eye Shadow. Use Fluidline in Waveline to create animated dots.
3. Create smokey eye by applying Paint Pot in Blackground along the eyelid and diffuse into the crease for a graphite contour. Blend Carbon Eye Shadow over Blackground to deep and set.
4. Line the inner rim of the lower lashline with Technakohl in Graphblack, and blend through the lower lashline.
5. Blend Copperplate Eye Shadow through the crease and lower lashline for a seamless smokey effect.
6. Use Espresso Eye Shadow to create a fuller, 1950’s inspired brow. Use Eye Brows in Spiked to create a crisp, clean look of precision. Apply Vanilla Eye Shadow under brows for a strong highlight.
7. Blend Lashes #2 and #3 on the upper lashline for more volume and density. To perfect the look, add Lash #30 in different lengths along the lower lashline.
8. Define the lip with a blend of Cherry and Vino Lip Pencils, and then follow with Brush #316 to apply Lady Danger Lipstick. Finish the lip with a generous coat of Clear Lipglass.

FACE
Wipes
Strobe Cream
Fast Response Eye Cream
Prep+Prime Skin
Face and Body Foundation
Select Moisturecover
Mineralize SkinFinish Natural
Eye Shadow - Vanilla
Bronzing Powder - Bronze
Green Gel Cleanser
Eye Shadow - Electric Eel
Eye Shadow - Passionate
Fluidline - Waveline, Fluidline

EYES
Eye pencil - Coffee
Eye Brows - Spiked
Eye Shadow - Vanilla , Carbon, Copperplate, Passionate
Paint Pot - Blackground
Technakohl Liner - Graphblack
Zoomlash - Zoomblack

LIPS
Prep+Prime Lip
Lip Pencil - Cherry, Vino
Lipstick - Lady Danger
Lipglass - clear

From MAC's Facebook Page
 

YSLGuy

Well-known member
Ace of Hearts

9032_286594710553_16126780553_9169091_5350132_n.jpg


STEP-BY-STEP
1. Block out the eyebrows with MAC Studio Sculpt Concealer.
2. Sketch out the card shape around the eye…use an actual playing card to get the right shape and trace it with Fascinating Eye Kohl.
3. Fill in the card with Luna Cream Colour Base and cover with White Frost Eye Shadow.
4. Add card details with Blacktrack fluidline.
5. Cover face with Studio Sculpt Foundation.
6. Use Blacktrack Fluidline and Mystery Eye Shadow to create the ultimate smoky eye.
7. Add lashes to top and bottom of eye with Duo Adhesive.
8. Using Lasting Lust Pro Long Wear create a heart shape on the lips!

FACE
Wipes
Studio Moisture Fix
Prep+Prime Skin
Studio Sculpt Foundation
Studio Sculpt Concealer
Blot Powder/Pressed - Medium Dark
Powder Blush - Dolly Mix, Desert Rose

EYES
Studio Finish Concealer
Fluidline - Blacktrack
Eye Shadow - Carbon, Soft Brown, Mystery, Bamboo, White Frost, Passionate
Eye Kohl - Fascinating
Cream Colour Base - Luna
Penultimate Liner - Rapid black
Cremestick Liner - Red Enriched
Zoomlash - Zoomblack
Fibrerich - All Black

LIPS
Lip Erase - Pale (PRO)
Cremestick Liner - Red Enriched
PRO Longwear Lip Colour - Lasting Lust
Dazzleglass - Extra Amps

From MAC's Facebook Page
 

YSLGuy

Well-known member
The Zebra

9032_286590090553_16126780553_9169012_5649731_n.jpg


STEP-BY-STEP
1. By crushing Gesso eye shadow mixed in with Eye Liner Mixing Medium, you can paint your face white. Another option is to use white Paintstick from the M·A·C PRO line.
2. It is important to have references of zebra stripes handy to study the pattern. I used Blacktrack Fluidline with a #210 brush to create the pattern of zebra on my models face.
3. Doubling up on #37 lashes can create a dow eyed animalistic eye.
4. Prep+Prime Transparent Finishing powder will seal the deal.

FACE
Green Gel Cleanser
Studio Moisture Cream
Prep+Prime Skin
Face & Body
Select Moistureblend
Studio Sculpt Concealer
Eye Shadow - Gesso & Eye Liner
Mixing Medium
Prep+Prime Transparent Finishing powder

EYES
Fluidline - Blacktrack
Eye Kohl - Fascinating
Penultimate Liner
Eye Shadow - Carbon, Vanilla
Plushlash - Plushblack

LIPS
Lip conditioner mix with Powerpoint Eye Pencil - Guilded White
Lipstick - Pretty Please, Black Knight (Style Black Collection)

From MAC's Facebook Page
 

TISH1124

Well-known member
Ace of Hearts is about all my skill level will allow me to attempt...I think they are all fabulous!!
 

aziajs

Well-known member
I'm so proud.
greengrin.gif
One of the MAC artists I have known for YEARS did this look. I called to tell her that she was in the MAC video as one of the top 5. She was so excited. She had no idea!


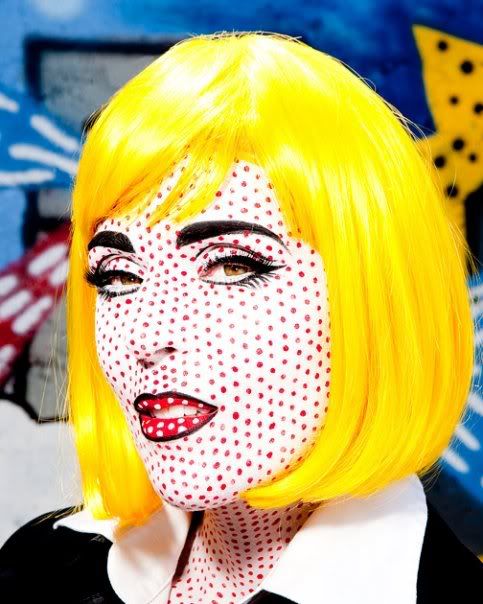
9032_286594670553_16126780553_9169089_3879489_n.jpg


She Goes Pop! (look featured in the video)
Look created by M·A·C Artist: Karin Stone
Location: Chicago, IL, USA

Follow the step-by-step and M·A·C products listed below to achieve that look.

Click here for a printable version of this look to bring to a M·A·C Artist in a store near you; links to the products used are also included: http://www.maccosmetics.com/halloween16

Or visit M·A·C Cosmetics | Offering a large selection of makeup, skin care products, and nail care items. Also offering cosmetic accessories to purchase these products online or find a store near you.

STEP-BY-STEP
1. Start out on your clean face. Lightly buff a thin layer of Luna Cream Colour Base all over your skin with a #187 brush. Set it with Gesso Eye Shadow and a #116 brush - pressing the Eye Shadow in rather than buffing it.
2. Using Blacktrack Fluid Line and a #266 brush - paint in your eyeliner and brows - don’t be afraid to experiment with painting an expression on.
3. Sculpt your cheek bones with a bit of Concrete or Omega Eye Shadow and paint your lips a daring red.
4. Finally, find a chopstick or something in your house with a small round shape that you can use as a stamp. Scrape some Passionate Eye Shadow onto a small kitchen plate. Mix some Fix+ into the scraped shadow - make it not too watery and then dip your stamping tool into it and go to town with your dots.

FACE
Studio Moisture Fix
Cream Colour Base - Luna
Eye Shadow - Gesso
Lipstick - Russian Red
Fix+

EYES
Fluidline - Blacktrack
Eye Shadow - Gesso, Passionate, Omega
Eye Kohl - Fascinating
Zoomlash - Zoomblack

LIPS
Prep + Prime Lip
Lip Pencil - Cherry
Lipstick - Russian Red, Black Knight (Style Black Collection)

Here is the look Karen completed on a model:
4812_1189891865301_1168477699_30564.jpg


Here is the look as completed by the Pro Team:
9032_286585390553_16126780553_9168942_5487283_n.jpg
 

pcsocake

Well-known member
OMG!!! That pop chart is so out of this world! I love it!!! Other than the card chart, I'd say the rest are way way way beyond what I could muster to do.
 
Top