Purity
Well-known member
Here's a tutorial for the Queen Mab-look I did a while ago, as by request
 I hope you like it!
A quick word about the eyeshadows: If you're not used to use matte colours, choose some shimmer colours instead of the matte ones because shimmers are wayy more easy to blend than mattes. Mattes need a bit of practice to not look blotchy and to blend properly.
Products used:
Face
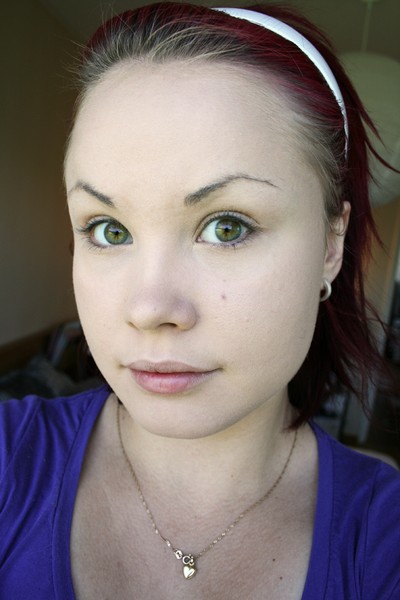
Step 1 - Start with a clean and moisturized face. Apply your base and fix with powder. I explain more in detail how I do my base here.

Step 2 - When the base for the face is done, it's important to apply a good eye primer so that your eyeshadow will stay in place the entire day and not crease on your lid. With a good primer, the shadows will stick much better, and the colours will be more vibrant than they would be on bare skin. My favourite eye primer is Primer Potion from Urban Decay. I apply 2-3 lines with primer on my lid using the applicator, and then I smudge the primer over the entire lid with my finger.
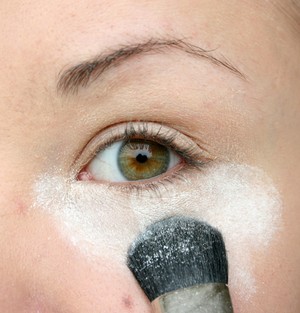
Step 3 - apply some loose powder underneath your eye, to catch up any fallout from the eyeshadow during application. The fallout will be easy to brush off later together with the loose powder.
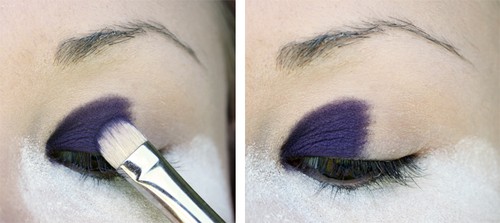
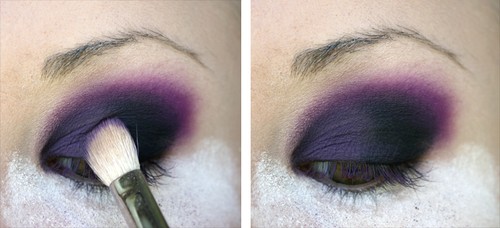
Step 4 - Pack on a dark, matte purple eyeshadow on the inner half of the lid with a flat eyeshadow brush. I use the eyeshadow Indian Ink from MAC and pack it on with the MAC #239 brush. Packing the eyeshadow means to dab on the eyeshadow instead of brushing it on.
Step 5 - Pack on a matte, black eyeshadow on the outer half of the lid with the same technique as above. I use the eyeshadow Carbon from MAC with the MAC #239 brush.
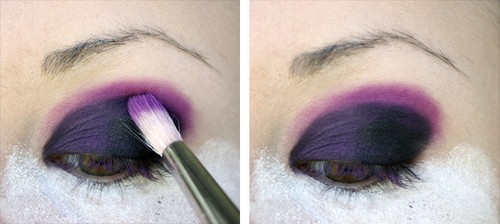
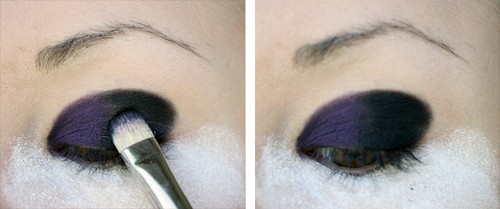
Step 6 - Apply a matte, medium purple shade just above the other colours you've just applied with a soft blending brush. I use the eyeshadow vibrant grape from MAC and apply it with a soft, sweeping motion with MAC brush #222.
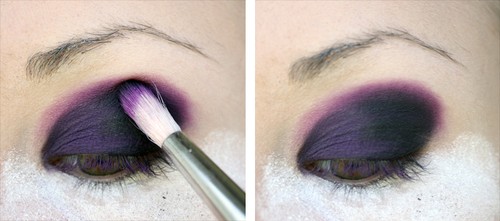
Step 7 - Time to blend that sharp border between the purple and black. Pick up some black eyeshadow on the same brush as you used to apply the purple with and blend carefully right at the sharp edge with short, soft sweeping motions.
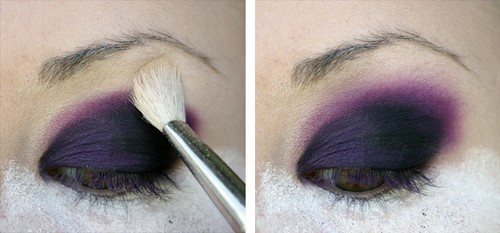
Step 8 - I like to use a shimmery highlight with matte eyeshadows to add a bit of depth. I chose a neutral, gold-ish highlighter eyeshadow, Femme Fi from MAC. I applied it with a fluffy blending brush, MAC #217, at the entire brow bone.
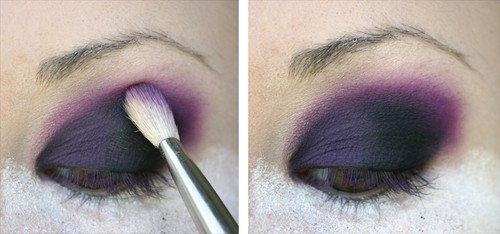
Step 9 - Time to blend the shadow on the lid with the highlighter! Take a tiny bit of the medium purple shade (vibrant grape) on your fluffy blending brush and blend carefully in the crease and upwards.
Step 10 - I felt there was a need for touching up and even out the colour on the lid a bit, so I took some of the dark purple eyeshadow (indian ink) on my blending brush and blended carefully on the lid.
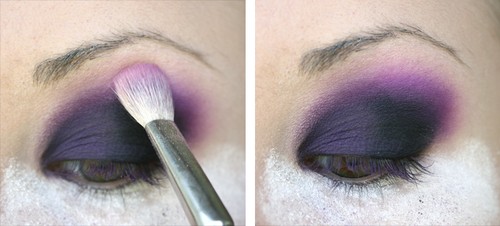
Step 11 - To make the border between the purple and the highlighter even more diffuse, I applied a matte, cold toned pink shadow, MAC pink vivid pigment, with my blending brush right above the purple in the crease.

Step 12 - Add some finishing touches by picking up a tiny bit of black eyeshadow on your blending brush (MAC #217) and blend where needed. I usually go back several times to touch up and add eyeshadow when working with shades this dark. It's easier to add more than to remove it =)
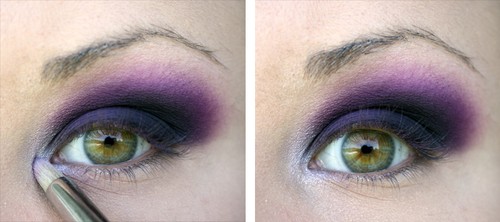
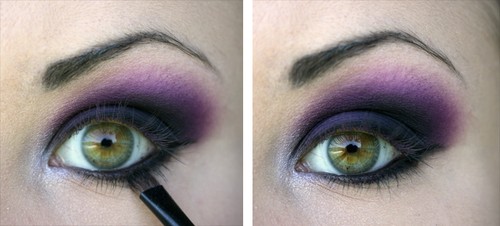
Step 13 - Brush off the loose powder underneath the eye. Apply a white, shimmery eyeshadow in the inner corner of the eye to brighten things up a bit. I used crystal avalanche from MAC and applied it with a pencil brush, MAC #219. Blend well.
Step 14 - Fill in your brows and apply eyeliner along the upper lash line. I explain more in detail how I do this here.
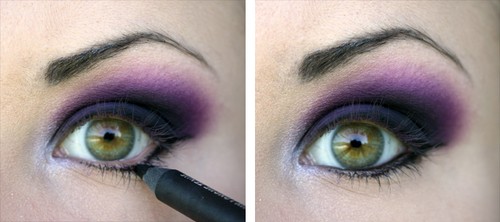
Step 15 - Line your lower lashline and waterline with a black eye pencil. I use a powerpoint eye pencil from MAC in the shade engraved.
Step 16 - Fix the black pencil with black eyeshadow. This makes the pencil stay put, and you also get to smudge black in between the lower eyelashes. I use the eyeshadow Carbon from MAC with a small smudger brush from Crown Brush.
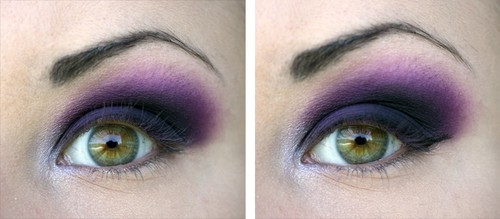
Step 17 - Apply mascara and brow fix. Feel free to use fake lashes, I suck at applying them so I used three layers of plush lash mascara from MAC on my lashes.
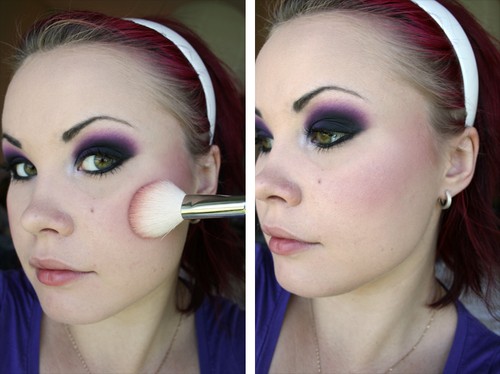
Step 18 - Blush and accent your cheeks with a matte, fleshy pink blush. I used best friends from everyday minerals. Start by putting the brush on the apple of your cheek, and gently sweep the brush upwards and outwards. I use a contouring brush for blush, MAC #168. I then applied a bit of highlighting powder, accentuate shaping powder from MAC, on the cheekbones, at the upper line of where I just applied the blush.
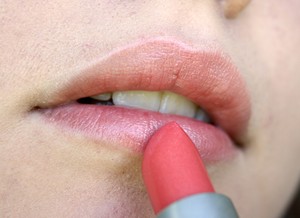
Step 19 - Apply a lip colour that almost matches your own. I used the light coral lipstick blow dry from MAC.
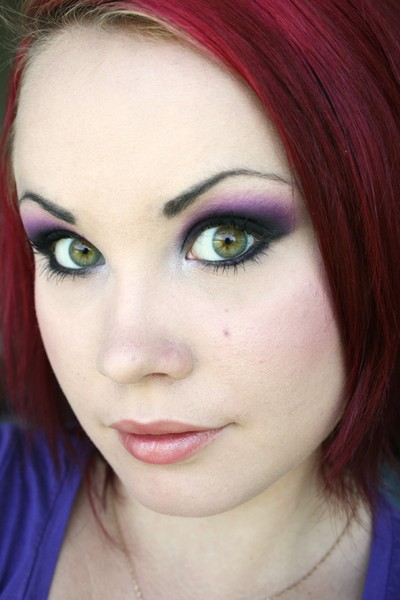
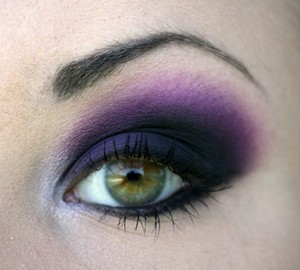
The finished look!
A quick word about the eyeshadows: If you're not used to use matte colours, choose some shimmer colours instead of the matte ones because shimmers are wayy more easy to blend than mattes. Mattes need a bit of practice to not look blotchy and to blend properly.
Products used:
Face
- MAC prep + prime face
- MAC studio sculpt concealer - NW20
- MAC studio sculpt foundation - NW20
- MAC loose blot powder - medium
- MAC mineralize skinfinish/natural - light
- Everyday Minerals blush - best friends
- MAC shaping powder - accentuate
- MUS face mist
- UDPP
- MAC eyeshadow - indian ink
- MAC eyeshadow - carbon
- MAC eyeshadow - vibrant grape
- MAC pigment - pink vivid
- MAC eyeshadow - femme fi
- MAC eyeshadow - crystal avalanche
- MAC powerpoint pencil - engraved
- MUS tri brow colour
- MAC fluidline - blacktrack
- MAC plush lash mascara
- H&M brow fix
- MAC prep + prime lip
- MAC lipstick - blow dry
- MAC #194
- MAC #187
- MAC #150
- MAC #182
- MAC #227
- MAC #239
- MAC #222
- MAC #217
- MAC #219
- MAC #208
- Crown brush mini smudger
Step 1 - Start with a clean and moisturized face. Apply your base and fix with powder. I explain more in detail how I do my base here.
Step 2 - When the base for the face is done, it's important to apply a good eye primer so that your eyeshadow will stay in place the entire day and not crease on your lid. With a good primer, the shadows will stick much better, and the colours will be more vibrant than they would be on bare skin. My favourite eye primer is Primer Potion from Urban Decay. I apply 2-3 lines with primer on my lid using the applicator, and then I smudge the primer over the entire lid with my finger.
Step 3 - apply some loose powder underneath your eye, to catch up any fallout from the eyeshadow during application. The fallout will be easy to brush off later together with the loose powder.
Step 4 - Pack on a dark, matte purple eyeshadow on the inner half of the lid with a flat eyeshadow brush. I use the eyeshadow Indian Ink from MAC and pack it on with the MAC #239 brush. Packing the eyeshadow means to dab on the eyeshadow instead of brushing it on.
Step 5 - Pack on a matte, black eyeshadow on the outer half of the lid with the same technique as above. I use the eyeshadow Carbon from MAC with the MAC #239 brush.
Step 6 - Apply a matte, medium purple shade just above the other colours you've just applied with a soft blending brush. I use the eyeshadow vibrant grape from MAC and apply it with a soft, sweeping motion with MAC brush #222.
Step 7 - Time to blend that sharp border between the purple and black. Pick up some black eyeshadow on the same brush as you used to apply the purple with and blend carefully right at the sharp edge with short, soft sweeping motions.
Step 8 - I like to use a shimmery highlight with matte eyeshadows to add a bit of depth. I chose a neutral, gold-ish highlighter eyeshadow, Femme Fi from MAC. I applied it with a fluffy blending brush, MAC #217, at the entire brow bone.
Step 9 - Time to blend the shadow on the lid with the highlighter! Take a tiny bit of the medium purple shade (vibrant grape) on your fluffy blending brush and blend carefully in the crease and upwards.
Step 10 - I felt there was a need for touching up and even out the colour on the lid a bit, so I took some of the dark purple eyeshadow (indian ink) on my blending brush and blended carefully on the lid.
Step 11 - To make the border between the purple and the highlighter even more diffuse, I applied a matte, cold toned pink shadow, MAC pink vivid pigment, with my blending brush right above the purple in the crease.
Step 12 - Add some finishing touches by picking up a tiny bit of black eyeshadow on your blending brush (MAC #217) and blend where needed. I usually go back several times to touch up and add eyeshadow when working with shades this dark. It's easier to add more than to remove it =)
Step 13 - Brush off the loose powder underneath the eye. Apply a white, shimmery eyeshadow in the inner corner of the eye to brighten things up a bit. I used crystal avalanche from MAC and applied it with a pencil brush, MAC #219. Blend well.
Step 14 - Fill in your brows and apply eyeliner along the upper lash line. I explain more in detail how I do this here.
Step 15 - Line your lower lashline and waterline with a black eye pencil. I use a powerpoint eye pencil from MAC in the shade engraved.
Step 16 - Fix the black pencil with black eyeshadow. This makes the pencil stay put, and you also get to smudge black in between the lower eyelashes. I use the eyeshadow Carbon from MAC with a small smudger brush from Crown Brush.
Step 17 - Apply mascara and brow fix. Feel free to use fake lashes, I suck at applying them so I used three layers of plush lash mascara from MAC on my lashes.
Step 18 - Blush and accent your cheeks with a matte, fleshy pink blush. I used best friends from everyday minerals. Start by putting the brush on the apple of your cheek, and gently sweep the brush upwards and outwards. I use a contouring brush for blush, MAC #168. I then applied a bit of highlighting powder, accentuate shaping powder from MAC, on the cheekbones, at the upper line of where I just applied the blush.
Step 19 - Apply a lip colour that almost matches your own. I used the light coral lipstick blow dry from MAC.
The finished look!


