Shimmer
Well-known member
This request.
Take your picture, choose one with a good cropping of the face, and not a whole lot of other distracting detail. For sake of the fact that if you're using this, you're likely a beginner, use a pic with good lighting, so you don't have to correct a whole lot in regard to exposure, levels, etc.
I am using Photoshop CS2, but the basic elements of the tools used are available in other versions as well...I believe.
Ok.
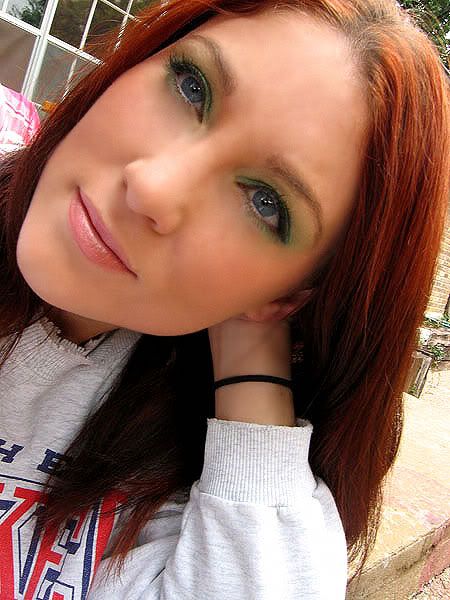
Pic. I chose this one...

Notice the fine lines etc.? (How rude of you
 ) That's what we're getting rid of.
Sharpen the image. You get this:
 Not very sexy, IMO, but eh. I'll live.
Sharpen is located under the "filters" tab on the toolbar. Just use regular "sharpen"...not "smart sharpen" or whatever other crazy feature it offers. Just "sharpen".
After you've sharpened, look to your left at the tool palette running down the side of the screen. There should be a bandaid tab. If you hover over it, it says "healing brush tool". If it's NOT there, there will be the "spot healing brush tool" which looks like a bandaid also, the "patch" tool, or the "red eye" tool. Right click on the tab with whatever of those three is on it, and a little menu pops out. Healing brush should be one of those options. Click on it. Again, it's the regular bandaid tool.
Once you've got that, look at the brush options. I used a 19 px brush, w/about 49% hardness. You can change it as you like, but that's what suited me for this image.
Use that tool over the blemishes you want erased. Lines, pimples, moles, bags, circles, whatever.

You can see if you look at the first pic, what I've done and not done here.
After you're through with that, go to the Image>Adjustments>brightness/contrast menu and adjust the contrast slightly, I put mine at +6. This will show you any areas you inadvertantly missed with your retouching. Fix those.

Now we're going to get to the nitty gritty.
On the tool palette is the teardrop shaped blur icon. Use this and blur at 100% with about 50% hardness for the brush, using about 19px size.
Start blurring the areas of skin. Pretty much all of the skin showing needs to be blurred. Be neat about it because if you blur lines at the edges it'll look messy.
After everything is blurred, go to your filters again, and sharpen the picture again. It's going to be oversharpened, and that's not bueno, so once that's done, go to your edit tab>fade and fade it out until it's sharpened just enough. I faded mine out by 50%. Basically you're sharpening a half a step up.
Once the sharpen is faded, use the blur tool again, and keep retouching.
When you're blurring over your eyeshadow or lips, drop the strength of the tool to about 30%, maybe 40%, because you really don't want to lose all of that detail.
You'll get this.

Now you look like plastic. Um. I'm not made of plastic, are you? If you grab a nearby Glamour or Cosmo and look at the ads you'll see that while the models look perrrrrrrfect there is still detail to their skin. This is done by going to Filter>Noise>add noise.
Make sure "monochromatic" and "Uniform" are checked. You're not going to want a whole LOT of noise added...so set it at like .75 or so. That's what I used here. Use the preview option to set it so you've got the right detail.
After that's done, grab the lasso tool. You can use the Polygonal Lasso or the Magnetic Lasso tool as well. I use the Magnetic Lasso as it's easier, faster and CS2 has it. If your version doesn't, I'd recommend the Polygonal Lasso, because it lets you set anchor points (everytime you click is an anchor point). You're going to lasso around your face. Don't get your hair, don't get anything else, just around your face, maybe your neck (if you have a whole lot of neck showing, I don't...so...*shrug*).
Once that's lasso'd, hit ctrl+j.
WHOA! NEW LAYER WHAT??? Yeah, that's supposed to happen. Now lasso around the whites of your eyes. (You'll want to leave the lashes and eyeshadow etc., you just want to take out the whites and iris of your eyes.) Delete them.
Go back up to Filter>Noise>add noise and repeat the adding noise step. This will give the appearance of smooth skin, with pores. NO MORE PLASTIC YAY!
Now, hit CTRL+E and merge the layers and save the image.
You're done.
Like I said, this is a ROUGH tutorial, and there are certainly other ways of doing this. This is just the most beginner friendly way, as other ways require the high pass filters, gaussian blurring, etc.
I hope y'all find this helpful.
And finally,
NO photoshop is better than BAD photoshop.
Take your picture, choose one with a good cropping of the face, and not a whole lot of other distracting detail. For sake of the fact that if you're using this, you're likely a beginner, use a pic with good lighting, so you don't have to correct a whole lot in regard to exposure, levels, etc.
I am using Photoshop CS2, but the basic elements of the tools used are available in other versions as well...I believe.
Ok.
Pic. I chose this one...
Notice the fine lines etc.? (How rude of you
Sharpen the image. You get this:
Sharpen is located under the "filters" tab on the toolbar. Just use regular "sharpen"...not "smart sharpen" or whatever other crazy feature it offers. Just "sharpen".
After you've sharpened, look to your left at the tool palette running down the side of the screen. There should be a bandaid tab. If you hover over it, it says "healing brush tool". If it's NOT there, there will be the "spot healing brush tool" which looks like a bandaid also, the "patch" tool, or the "red eye" tool. Right click on the tab with whatever of those three is on it, and a little menu pops out. Healing brush should be one of those options. Click on it. Again, it's the regular bandaid tool.
Once you've got that, look at the brush options. I used a 19 px brush, w/about 49% hardness. You can change it as you like, but that's what suited me for this image.
Use that tool over the blemishes you want erased. Lines, pimples, moles, bags, circles, whatever.
You can see if you look at the first pic, what I've done and not done here.
After you're through with that, go to the Image>Adjustments>brightness/contrast menu and adjust the contrast slightly, I put mine at +6. This will show you any areas you inadvertantly missed with your retouching. Fix those.
Now we're going to get to the nitty gritty.
On the tool palette is the teardrop shaped blur icon. Use this and blur at 100% with about 50% hardness for the brush, using about 19px size.
Start blurring the areas of skin. Pretty much all of the skin showing needs to be blurred. Be neat about it because if you blur lines at the edges it'll look messy.
After everything is blurred, go to your filters again, and sharpen the picture again. It's going to be oversharpened, and that's not bueno, so once that's done, go to your edit tab>fade and fade it out until it's sharpened just enough. I faded mine out by 50%. Basically you're sharpening a half a step up.
Once the sharpen is faded, use the blur tool again, and keep retouching.
When you're blurring over your eyeshadow or lips, drop the strength of the tool to about 30%, maybe 40%, because you really don't want to lose all of that detail.
You'll get this.
Now you look like plastic. Um. I'm not made of plastic, are you? If you grab a nearby Glamour or Cosmo and look at the ads you'll see that while the models look perrrrrrrfect there is still detail to their skin. This is done by going to Filter>Noise>add noise.
Make sure "monochromatic" and "Uniform" are checked. You're not going to want a whole LOT of noise added...so set it at like .75 or so. That's what I used here. Use the preview option to set it so you've got the right detail.
After that's done, grab the lasso tool. You can use the Polygonal Lasso or the Magnetic Lasso tool as well. I use the Magnetic Lasso as it's easier, faster and CS2 has it. If your version doesn't, I'd recommend the Polygonal Lasso, because it lets you set anchor points (everytime you click is an anchor point). You're going to lasso around your face. Don't get your hair, don't get anything else, just around your face, maybe your neck (if you have a whole lot of neck showing, I don't...so...*shrug*).
Once that's lasso'd, hit ctrl+j.
WHOA! NEW LAYER WHAT??? Yeah, that's supposed to happen. Now lasso around the whites of your eyes. (You'll want to leave the lashes and eyeshadow etc., you just want to take out the whites and iris of your eyes.) Delete them.
Go back up to Filter>Noise>add noise and repeat the adding noise step. This will give the appearance of smooth skin, with pores. NO MORE PLASTIC YAY!
Now, hit CTRL+E and merge the layers and save the image.
You're done.
Like I said, this is a ROUGH tutorial, and there are certainly other ways of doing this. This is just the most beginner friendly way, as other ways require the high pass filters, gaussian blurring, etc.
I hope y'all find this helpful.
And finally,
NO photoshop is better than BAD photoshop.


