~LadyLocks~
Well-known member
Hi guys, sorry I lagged but I finally had time to get it done. Damn!! No one told me it was an all day thing

This is my very first tut so please bear with me. There are tons of steps with tons of pics so this is NOT dial-up friendly! Oh, and excuse some of the blurry pix, I kept getting a lot of those for some reason.
 .
.
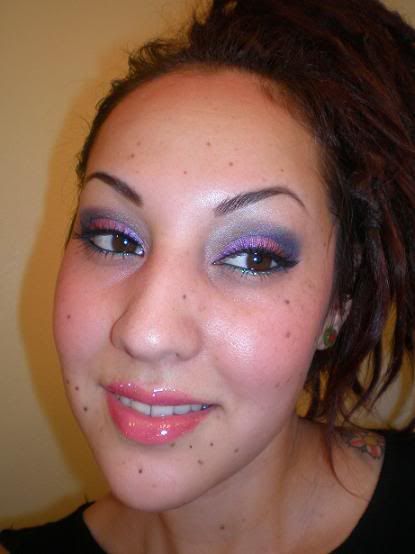
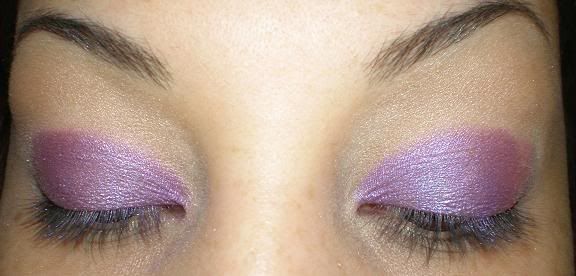
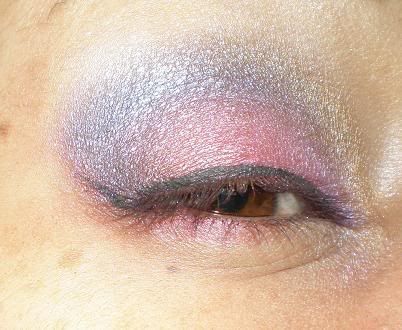
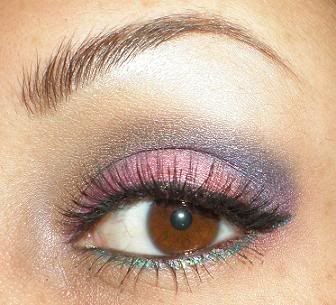
Here’s the look were going for…
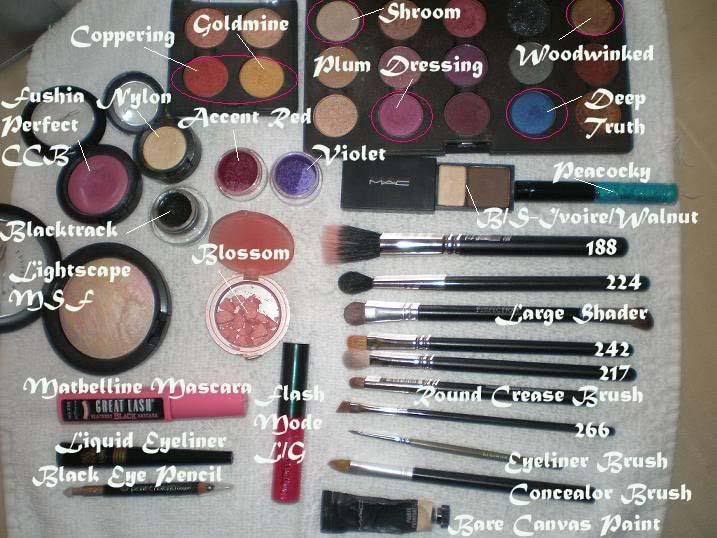
Stuff you’ll need:
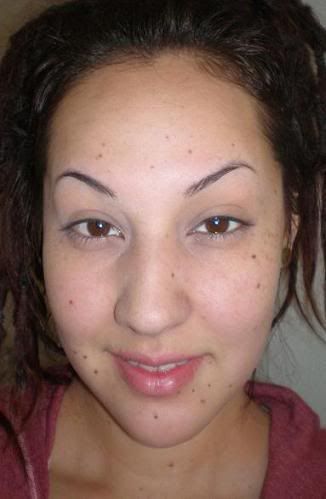
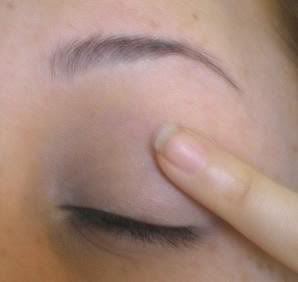
Ahhh, here’s the anticipated bare face, scary! I already have on moisturizer, concealor, and blot powder since I’m assuming you already know how to do that.
First, dab some Bare Canvas Paint onto your concealor brush & spread it all over up to your brow bone. Do it quickly cause it dries pretty fast.
Next, lightly spread it around with ur pinky to make sure u have an even finish.
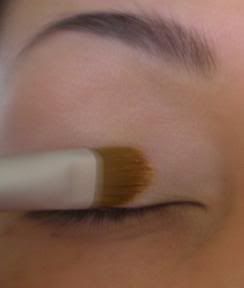
Grab some Shroom with your large shader brush and add it to your brow bone and just above the crease and into your tear duct area.
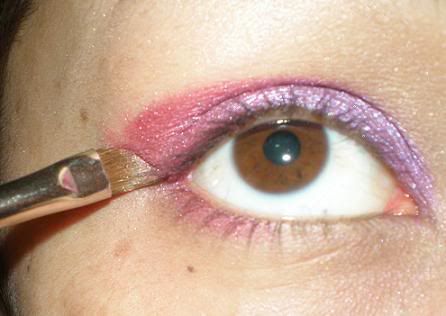
Now were ready for Fushia Perfect CCB. Swipe the pan lightly with your concealor brush.
Add it all over your lid and slightly above the crease.
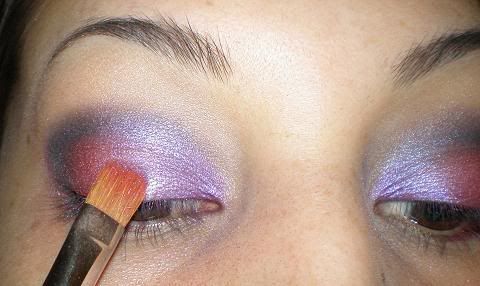
Grab some Violet pigment with your 242 brush and “pat” it onto 2/3’s of your lid just up to the crease.
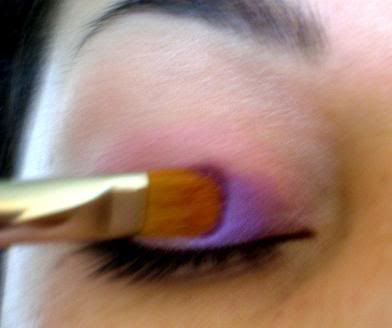
Both eyes should look like this when you’re done.
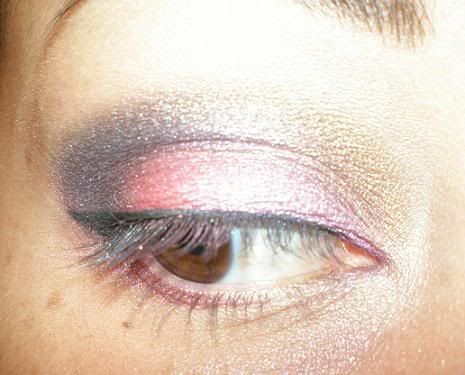
Next, flip your 242 over and grab some Accent Red. Pat it onto the outer 3rd of your lid slightly overlapping the Violet. Again, grab some Violet and pat it slightly overlapping the Accent Red. You’ll want to keep doing this until both colors look well blended.
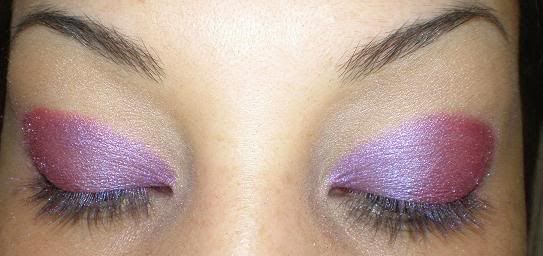
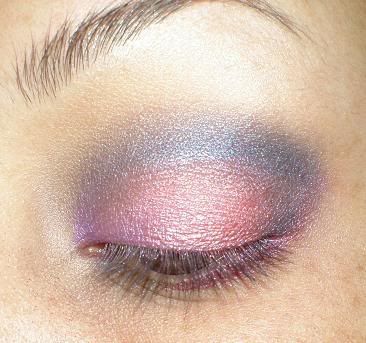
You should now have this.
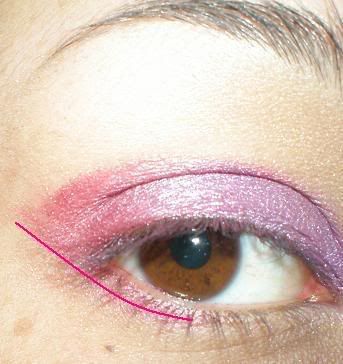
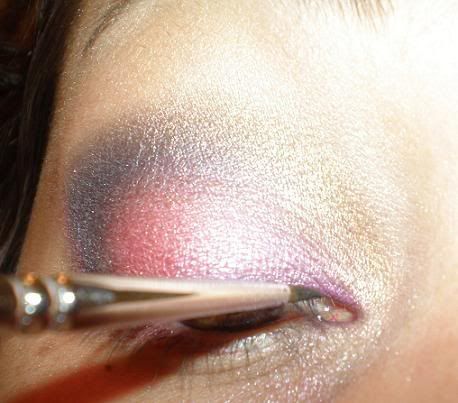
Grab your 266 and pick up some Plum Dressing. Position the brush right at your lower lash line just on the outer 3rd of your lid. Drag the brush upwards fallowing the natural shape of your ere creating a guide for the outer <.
The line should look like this. Fill in the gap with Accent Red and now your ready for the next step.
Grab your round crease brush and put some Deep Truth on that baby. Place the brush in your crease starting at the top of the line you just created from the step above, now were creating the top of the <. Drag the brush into your crease on top on the Accent Red and Violet but only drag the brush 2/3 of your lid, DO NOT drag it across the whole lid.
Grab your 217 and go over the line you just created to create a bolder line by making a wind shield wiper motion. Remember; DO NOT go across the whole lid.
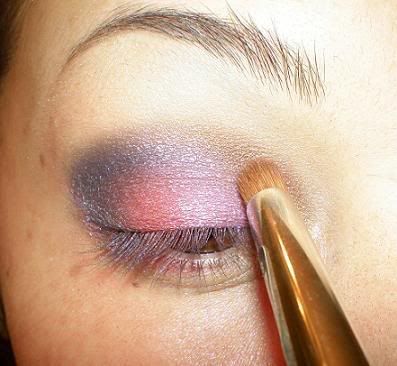
Once you’re done with the crease, grab your round crease brush again and put more of Deep Truth on there. Go over the lover half of the < blending into the Accent Red with little circles. You should have this now.
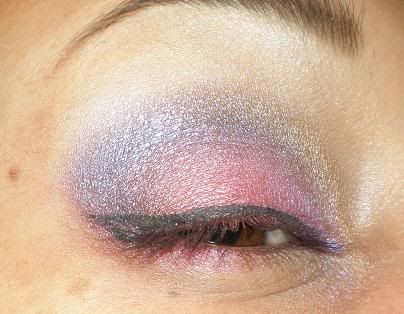
Now get your 224 and blend the < and crease using the wind shield wiper technique & little circles.
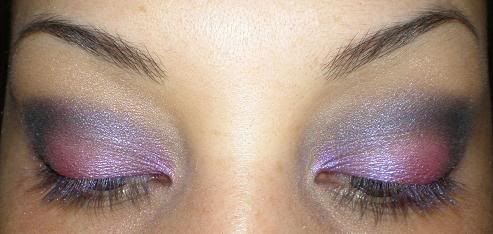
Both eyes should look like this when you’re done.
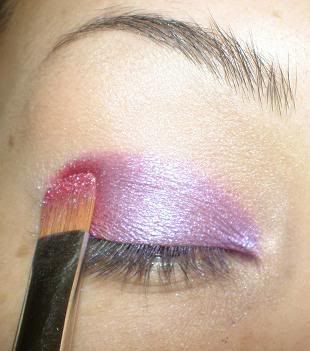
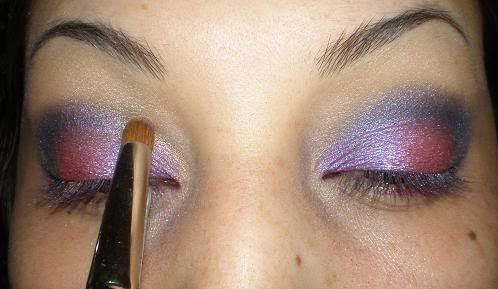
Now grab your 242 again and pick up some Coppering and pat in on top of Accent Red, next to Deep Truth just barley overlapping the lower < like this.
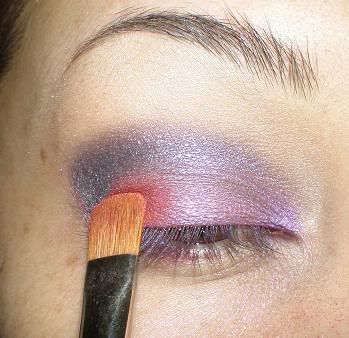
Now flip your 242 and pick up some more Violet and once again, pat the color on your inner lid and slightly over the Coopering but just underneath Deep Truth. Again, you’ll want to keep doing that until the colors look blended.
You should have something like this.
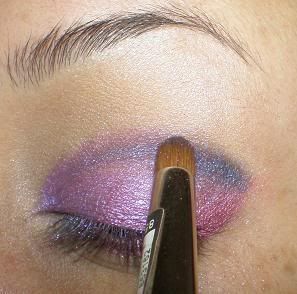
Grab that crease brush again and pick up some Goldmine. Position the brush from the tear duct and drag the brush into the inner crease slightly overlapping Deep Truth blending the two together but making little circles.
With the same crease brush, pick up some Woodwinked and go over the Goldmine and blend into Deep Truth, just like you did above.
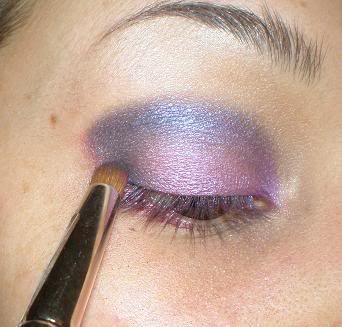
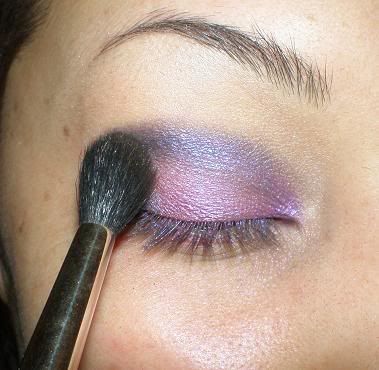
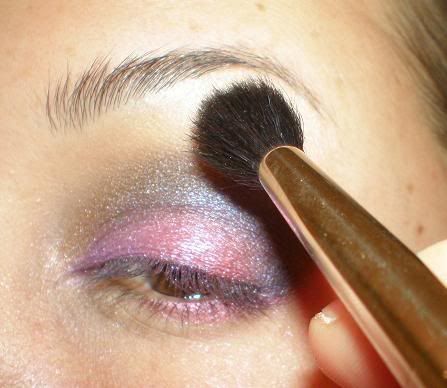
Grab that good ol’ 224 and blend the crease colors again with the wind shield wiper technique & circles. Do this until Deep Truth and the goldish colors look blended. Grab some more Deep Truth and blend the v again to darken the colors and even it out.
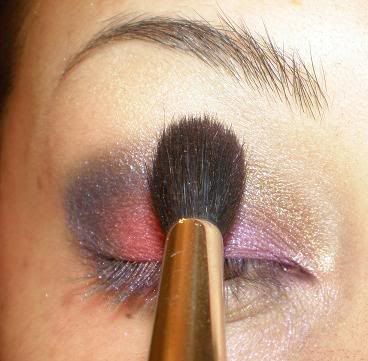
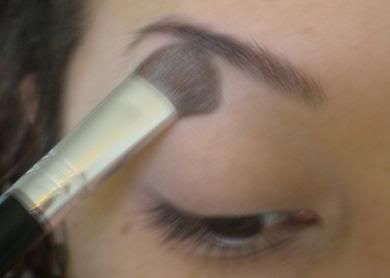
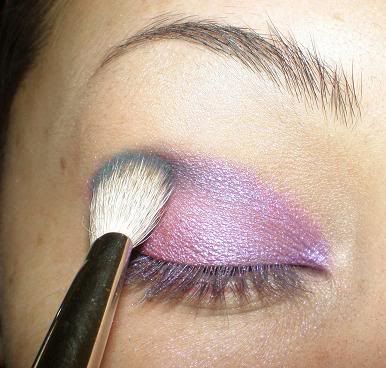
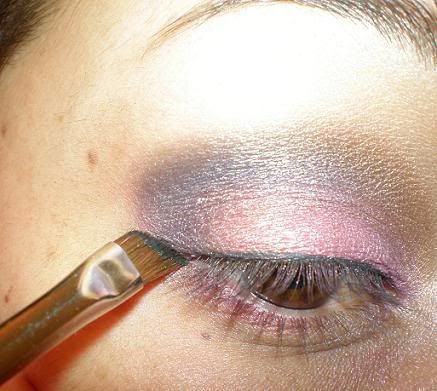
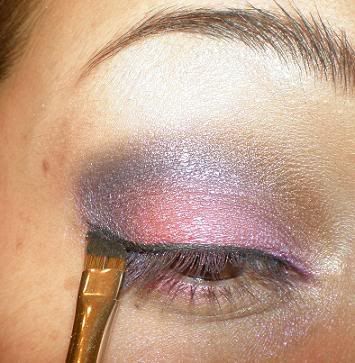
Now brush the 224 off onto a towel of some sort to take off the excess color and grab some Nylon. Brush Nylon across your brow bone and just barley on the seam where the crease colors are, blend down into your tear duct also.
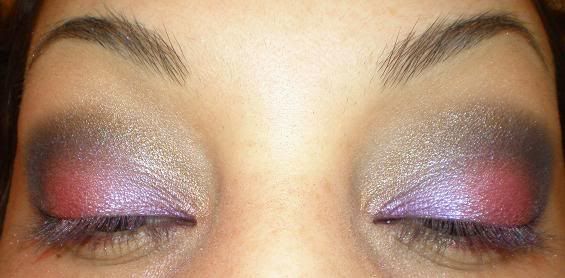
It should look like this now.
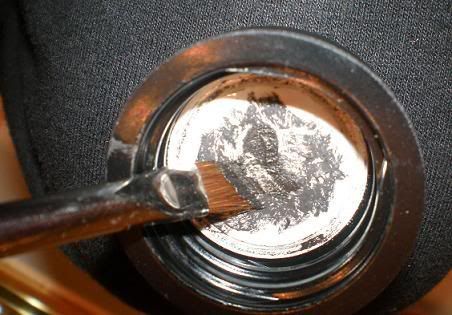
Now for the e/l part, pick up some Blacktrack with your e/l brush and dab the excess off into the lid.
With short strokes, drag the e/l brush across the lash line. Try and make the line as thin as possible.
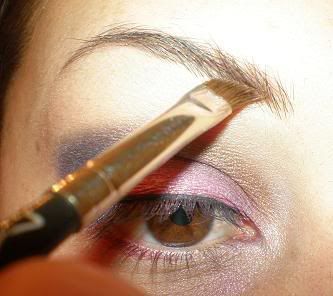
Before I finish the wing part of the liner, I did my brows so I didn’t have the Blacktrack on it. With your 266, grab some Walnut and start at the end of your eyebrow. With short strokes, fill in your eye brow. Once your at the arch area, make one big stroke to help create a nice even arch.
Grab your 266 and dip it into Blacktrack, again, dab it into the lid to take off the excess.
Position the 266 right at the tip of your lash line and gently press the 266 to make a line going upwards.
It should look like this.
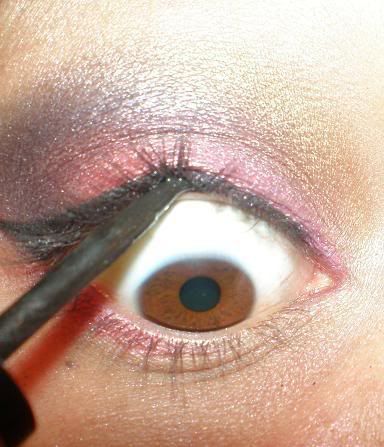
Dab your brush back into the lid and pick up more Blacktrack. Position the brush starting from the tip on the line you previous made and drag slightly to your lash line to meet your old line.
It should look like this.
Do the same steps to get an even line and fill in the gap with your eyeliner brush. It should look like this when you’re done.
 , that hardest part is done! Grab your liquid e/l and line your upper tightline, like so.
Curl those babies!

Add mascara and add your favorite lashes. (This picture is before I put the lashes on obviously)

Almost! Grab your Peacocky g/l, starting from your inner lash line, make a thin line all the way across your lash line and up right underneath the wing of the liner.
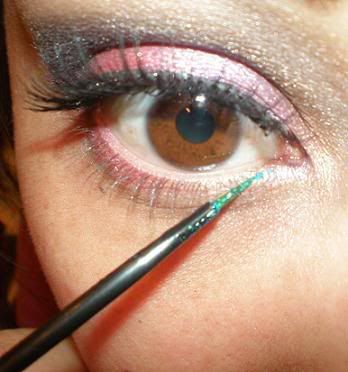
You should have this.
Now grad your black eye pencil and line your waterline.
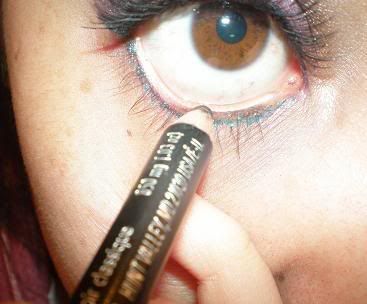
It should look like this.
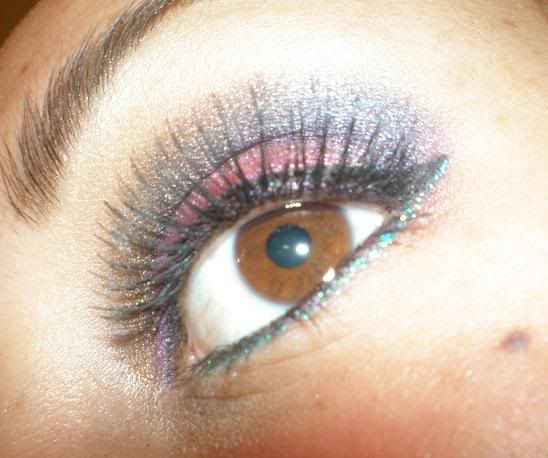
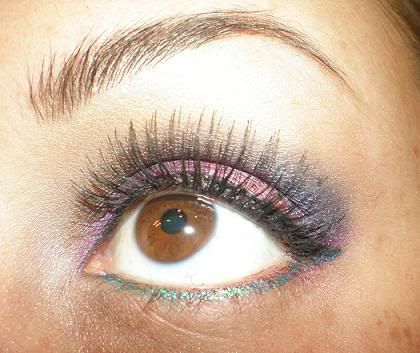
Add some mascara to your lower lashes and you should have this when finished.
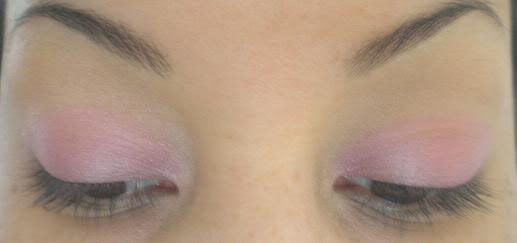
You are now done with your eyes.

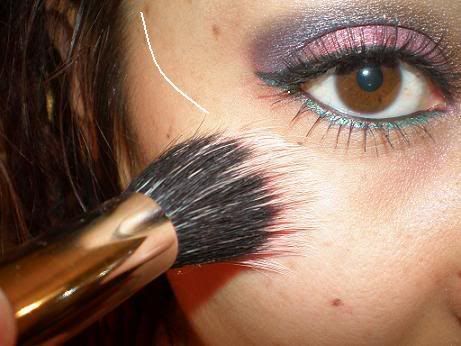
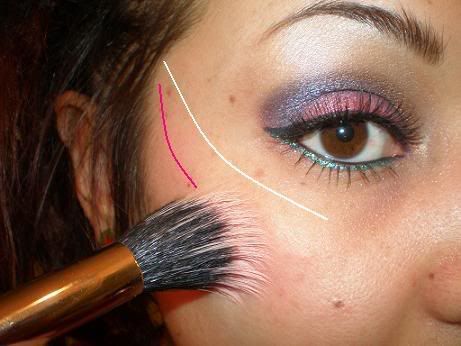
Almost there! Grab your 188, load it up with some Lightscape. Starting from the top of your cheekbones, drag the brush up towards your temple. In this direction.
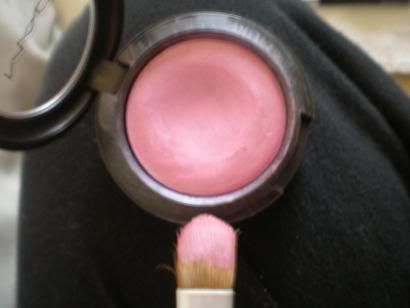
Next, load up your 188 with some Blossom and right underneath the Lightscape, drag the brush in the same direction of the Lightscape up towards your temple.
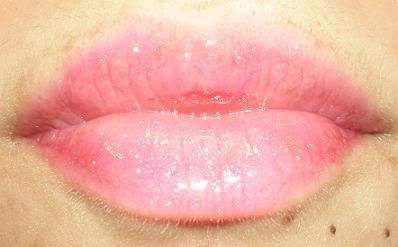
Lastly, add Flash Mode Lustreglass to your lips.
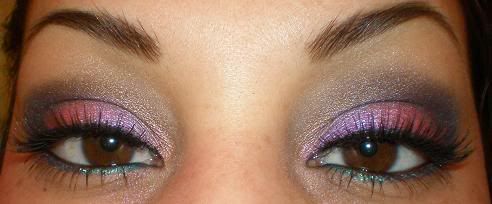
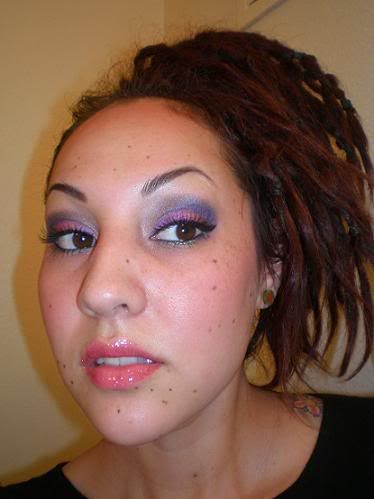
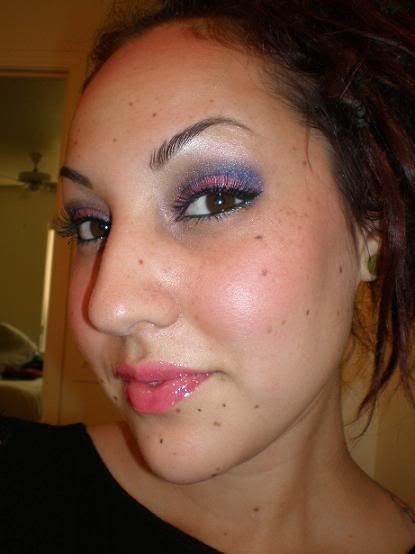
And Walla…you are now finished!:cartwheel: :woohoo:
Hope u like!

This is my very first tut so please bear with me. There are tons of steps with tons of pics so this is NOT dial-up friendly! Oh, and excuse some of the blurry pix, I kept getting a lot of those for some reason.
Here’s the look were going for…
Stuff you’ll need:
Ahhh, here’s the anticipated bare face, scary! I already have on moisturizer, concealor, and blot powder since I’m assuming you already know how to do that.
First, dab some Bare Canvas Paint onto your concealor brush & spread it all over up to your brow bone. Do it quickly cause it dries pretty fast.
Next, lightly spread it around with ur pinky to make sure u have an even finish.
Grab some Shroom with your large shader brush and add it to your brow bone and just above the crease and into your tear duct area.
Now were ready for Fushia Perfect CCB. Swipe the pan lightly with your concealor brush.
Add it all over your lid and slightly above the crease.
Grab some Violet pigment with your 242 brush and “pat” it onto 2/3’s of your lid just up to the crease.
Both eyes should look like this when you’re done.
Next, flip your 242 over and grab some Accent Red. Pat it onto the outer 3rd of your lid slightly overlapping the Violet. Again, grab some Violet and pat it slightly overlapping the Accent Red. You’ll want to keep doing this until both colors look well blended.
You should now have this.
Grab your 266 and pick up some Plum Dressing. Position the brush right at your lower lash line just on the outer 3rd of your lid. Drag the brush upwards fallowing the natural shape of your ere creating a guide for the outer <.
The line should look like this. Fill in the gap with Accent Red and now your ready for the next step.
Grab your round crease brush and put some Deep Truth on that baby. Place the brush in your crease starting at the top of the line you just created from the step above, now were creating the top of the <. Drag the brush into your crease on top on the Accent Red and Violet but only drag the brush 2/3 of your lid, DO NOT drag it across the whole lid.
Grab your 217 and go over the line you just created to create a bolder line by making a wind shield wiper motion. Remember; DO NOT go across the whole lid.
Once you’re done with the crease, grab your round crease brush again and put more of Deep Truth on there. Go over the lover half of the < blending into the Accent Red with little circles. You should have this now.
Now get your 224 and blend the < and crease using the wind shield wiper technique & little circles.
Both eyes should look like this when you’re done.
Now grab your 242 again and pick up some Coppering and pat in on top of Accent Red, next to Deep Truth just barley overlapping the lower < like this.
Now flip your 242 and pick up some more Violet and once again, pat the color on your inner lid and slightly over the Coopering but just underneath Deep Truth. Again, you’ll want to keep doing that until the colors look blended.
You should have something like this.
Grab that crease brush again and pick up some Goldmine. Position the brush from the tear duct and drag the brush into the inner crease slightly overlapping Deep Truth blending the two together but making little circles.
With the same crease brush, pick up some Woodwinked and go over the Goldmine and blend into Deep Truth, just like you did above.
Grab that good ol’ 224 and blend the crease colors again with the wind shield wiper technique & circles. Do this until Deep Truth and the goldish colors look blended. Grab some more Deep Truth and blend the v again to darken the colors and even it out.
Now brush the 224 off onto a towel of some sort to take off the excess color and grab some Nylon. Brush Nylon across your brow bone and just barley on the seam where the crease colors are, blend down into your tear duct also.
It should look like this now.
Now for the e/l part, pick up some Blacktrack with your e/l brush and dab the excess off into the lid.
With short strokes, drag the e/l brush across the lash line. Try and make the line as thin as possible.
Before I finish the wing part of the liner, I did my brows so I didn’t have the Blacktrack on it. With your 266, grab some Walnut and start at the end of your eyebrow. With short strokes, fill in your eye brow. Once your at the arch area, make one big stroke to help create a nice even arch.
Grab your 266 and dip it into Blacktrack, again, dab it into the lid to take off the excess.
Position the 266 right at the tip of your lash line and gently press the 266 to make a line going upwards.
It should look like this.
Dab your brush back into the lid and pick up more Blacktrack. Position the brush starting from the tip on the line you previous made and drag slightly to your lash line to meet your old line.
It should look like this.
Do the same steps to get an even line and fill in the gap with your eyeliner brush. It should look like this when you’re done.
Curl those babies!
Add mascara and add your favorite lashes. (This picture is before I put the lashes on obviously)
Almost! Grab your Peacocky g/l, starting from your inner lash line, make a thin line all the way across your lash line and up right underneath the wing of the liner.
You should have this.
Now grad your black eye pencil and line your waterline.
It should look like this.
Add some mascara to your lower lashes and you should have this when finished.
You are now done with your eyes.
Almost there! Grab your 188, load it up with some Lightscape. Starting from the top of your cheekbones, drag the brush up towards your temple. In this direction.
Next, load up your 188 with some Blossom and right underneath the Lightscape, drag the brush in the same direction of the Lightscape up towards your temple.
Lastly, add Flash Mode Lustreglass to your lips.
And Walla…you are now finished!:cartwheel: :woohoo:
Hope u like!


