BeautyPsycho
Well-known member
Few months ago I did a "challenge" on one of the other forums I go to, the theme was "sex" so I did a smoky eye m/u. I posted it here as a FOTD and got a couple of requests for a tut. I know, I know... it was long time ago, but hey- I did it so that's what counts

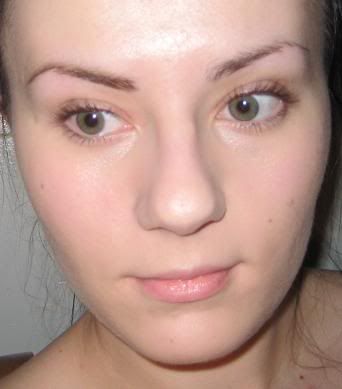
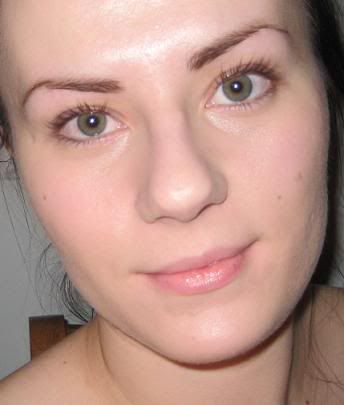
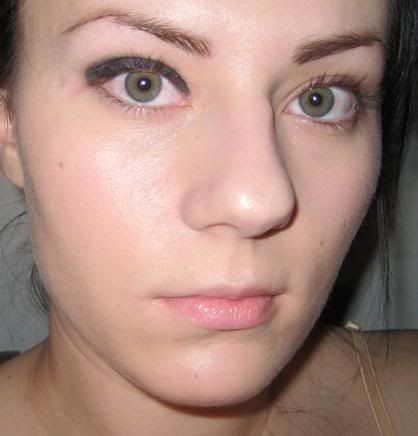
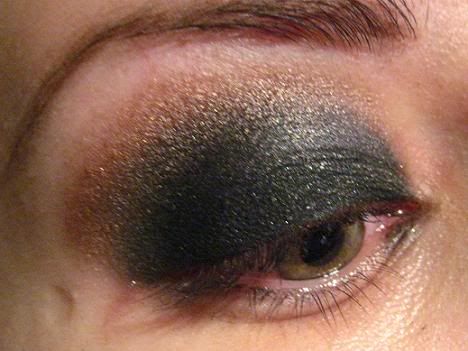
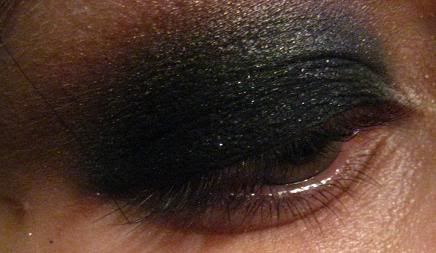
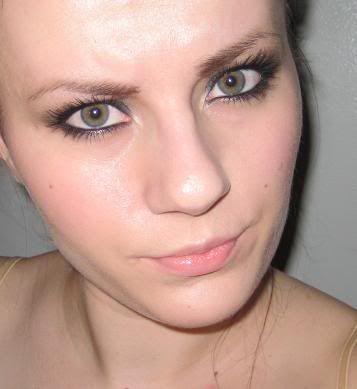
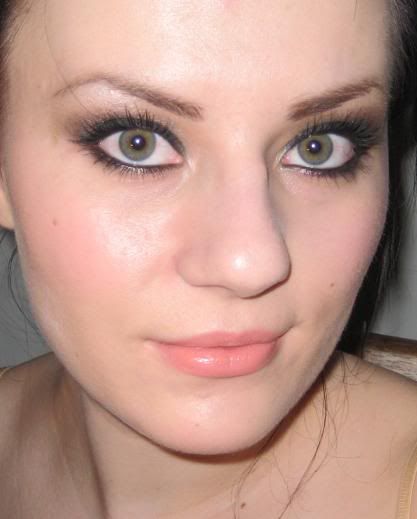
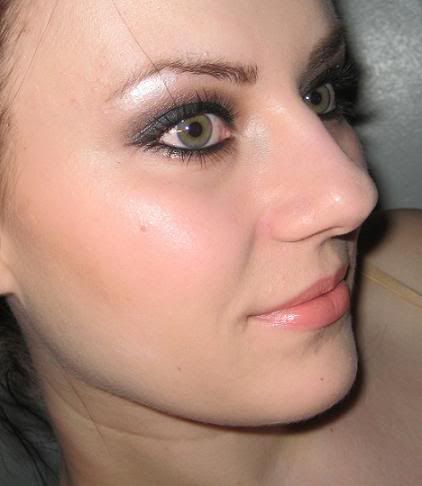
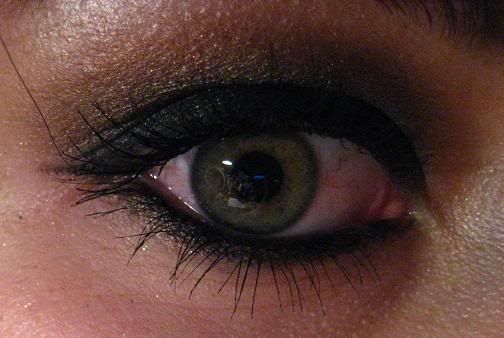
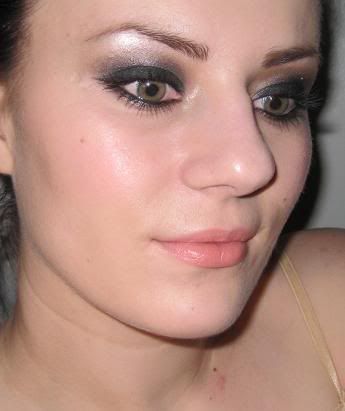
I like this smokey eye because it's not overly dramatic, it's still soft and "natural". It can easily be worn during the day.
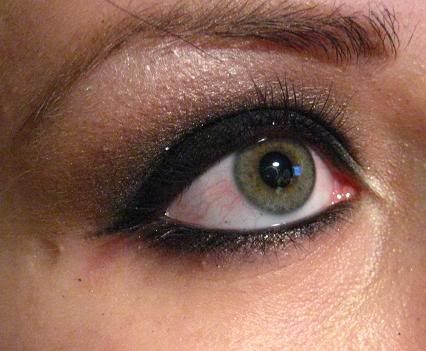
This is the look we are going for (these pics are from that FOTD I was talking about, this tut is not going to look 100% like this, but somewhat similar)
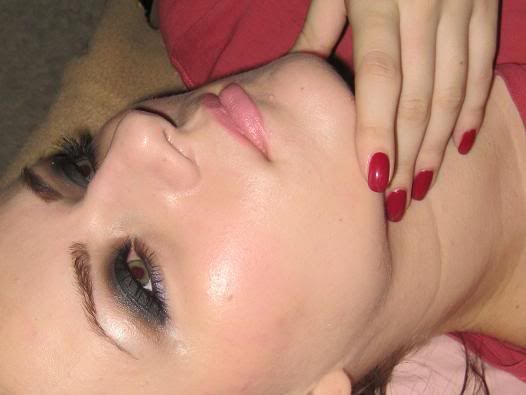
http://i107.photobucket.com/albums/m...D/IMG_0502.jpg
Let's get started-
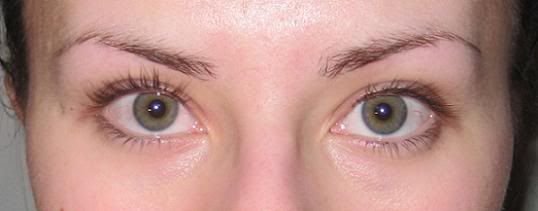
Naked face (eeek, not so sexy now, are we?
 )
)

I always start off by curling my eyelashes. Eyelash curler is my favorite thing EVER! It's the best invention since sliced bread, and if you're not curling your lashes, I dunno what the heck are you waiting for?
Mine is Revlon and I really like it (gold one sucks tho). Don't just crimp your lashes in two, that's going to look weird, rather "walk" the curler up your lashes, from root to tip. Be careful, especially if you're just starting out. NEVER curl your lashes with mascara on!


Don't you see how much better and bigger my eyes and lashes look? (one is curled, the other one is not)
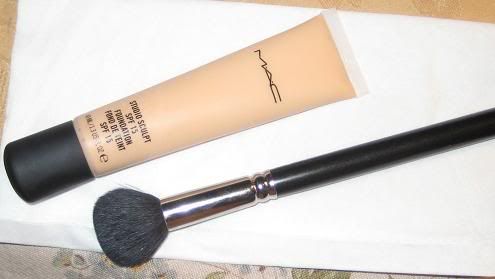
Apply your moisturizer, primer and other lotions and potions you like and wait, allow them to sink into your skin before applying your foundation.
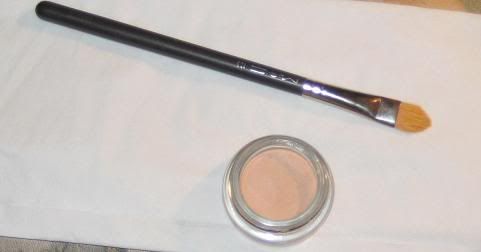
I use MAC Studio sculpt (NC20) and 109 (my new fave brush, it's so lovely... I've heard people say they don't like it because it sheds, but just be gentle with it and it's not going to shed.
 )
)
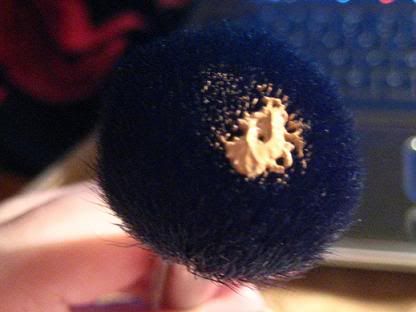
I squirt some foundation onto the back of my hand, like so-
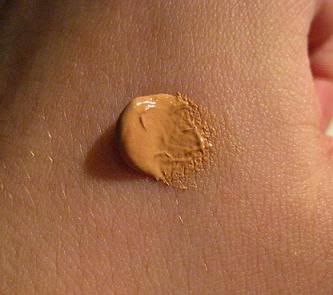
and I pick up some of it with my brush, don't over-do it, it's better to start with a thin layer and add on instead of putting too much on and try to get it off.
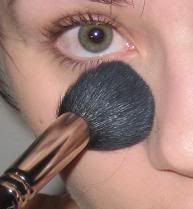
Then I stipple it all over one area of my face (studio sculpt dries fast, so I just do one area at the time)
and blend, blend, blend
 Don't forget your jaw, visible foundation lines are not cool.
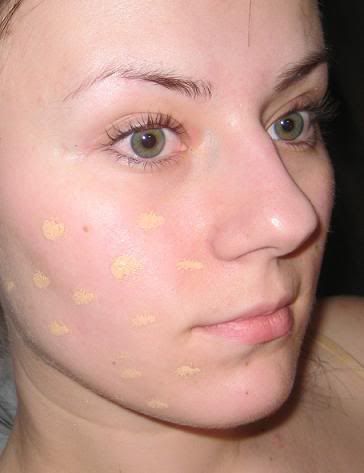
Next, you do your concealer, on dark circles and/or any other blemishes that you have- I just did my under eye area, using studio sculpt concealer, dabbing it on with a concealer brush.
I don't bother to blend with my finger or concealer brush (especially when I'm in a hurry) so I just take my love, 109 and blend in a stroke or two.
Do your eye brows however you like, mine are looking really ugly right now, I have no idea how I did this
I have to let them grow out a bit. And yeah, the pencil color isn't the best choice for me. But we'll pretend they look amazing

Fill 'em in
Put some wax on 'em

both done-
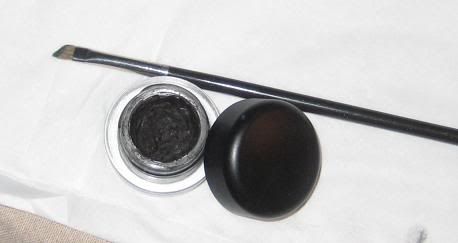
Take your favorite eye primer and a black base- I'm using too faced shadow insurance and MAC shadestick "sharkskin". You can also use any other black base- paint, paintpot, fluidline, pencil etc.
It's easy to use a shadestick because of the way it looks- it's not too thick or too thin, you don't need a brush- just color in the shape you want. Start right at the lashes and move upwards, little bit at the time. Follow your eye shape.
Go into your crease and tiny bit over it (how you're going to do this depends on your eye shape, just take a look at your eyes in the mirror and bring it higher if you think that's going to look better). It's important to see how it looks with your eyes open- looking straight ahead- not half- closed or looking down.
Both eyes-
Use a small brush, q tip or just your finger and smudge the edges, it doesn't have to be perfect, you just don't want to see any sharp edges and lines.
 (weird pic, I know hehe)
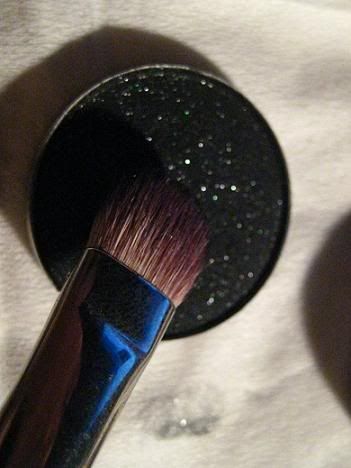
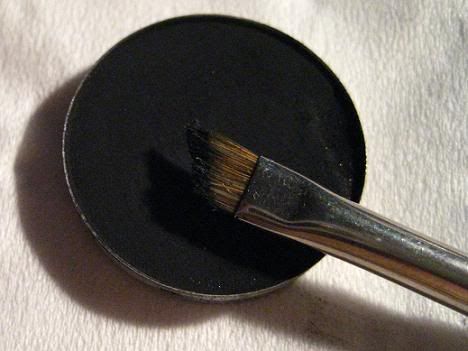
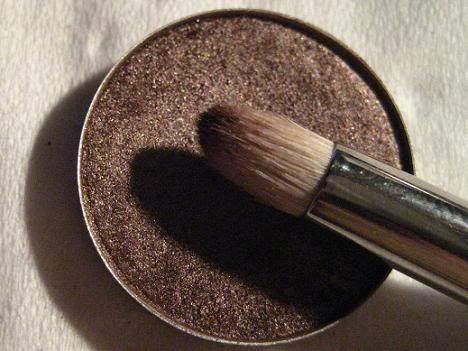
Grab your favorite brush for packing the color onto the lid, that would be MAC 239 for me. Also, matte black eyeshadow/pigment- I used MAC Carbon.
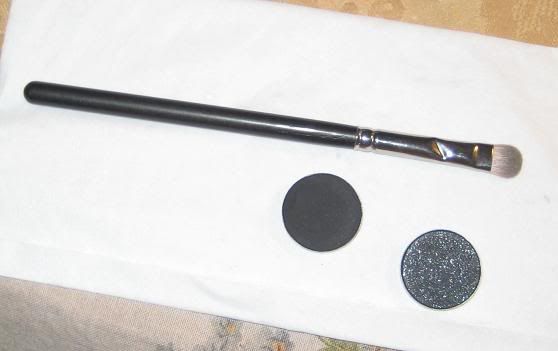 (Black tied is also in the pic, we'll use it later)
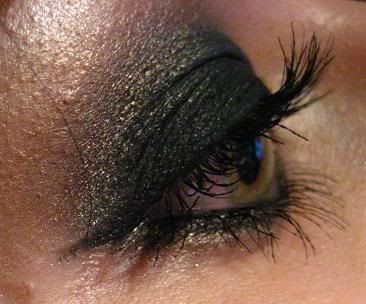
Pack some carbon onto your brush, tap away any excess that you might have and press it over your base, starting in the middle of the lid, right above your lashes (because you want most color there) and move up and out. Don't move your brush left-right like you would when you are blending something, just press the color on. This will minimize fallout (I usually have little to no fallout, and I don't like using the "powder underneath your lashes" trick
 but if you do- you are more than welcome to). Just flick your brush out when you are doing the edges, so they look somewhat blended out.
One eye done-

Use a q-tip to remove any smudges and fix the shape if needed.
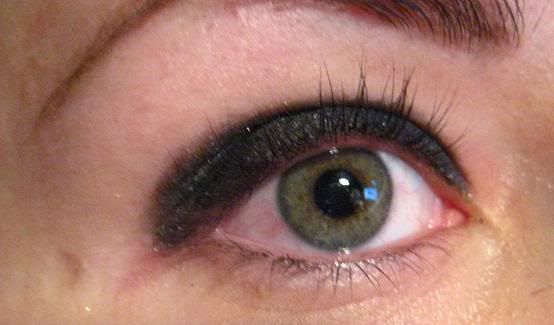
Both eyes done-

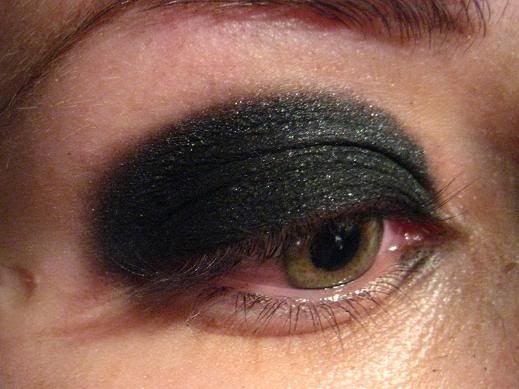
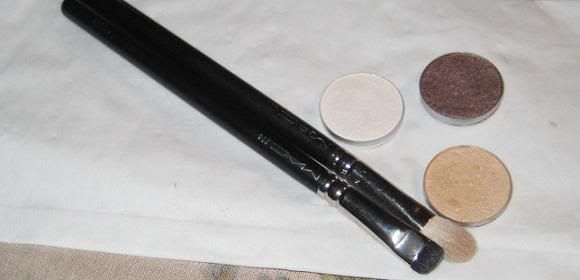
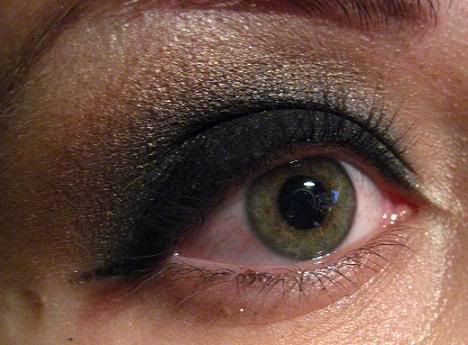
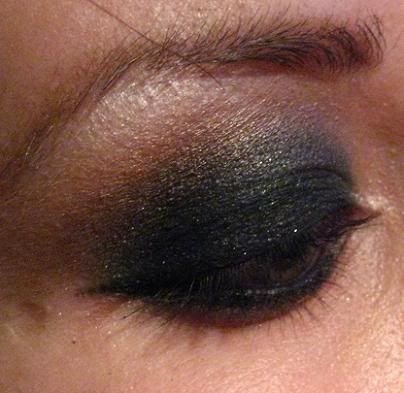
Next, take your 217 (because it's great for applying color, as well as blending it) and "Satin Taupe" e/s
Put it above Carbon, and blend, so it'll go on the edges as well as over them. Just make sure you don't bring it down too low- you still want to have pure black above your lashes.

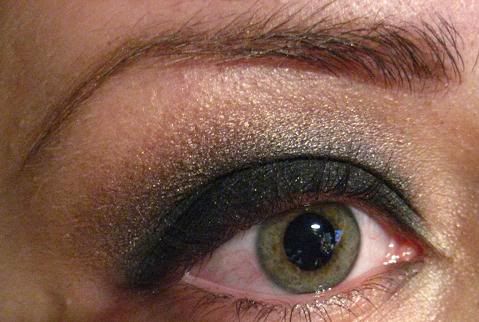
Blend using wiper-shield wiper motion, and it should look somewhat like this-

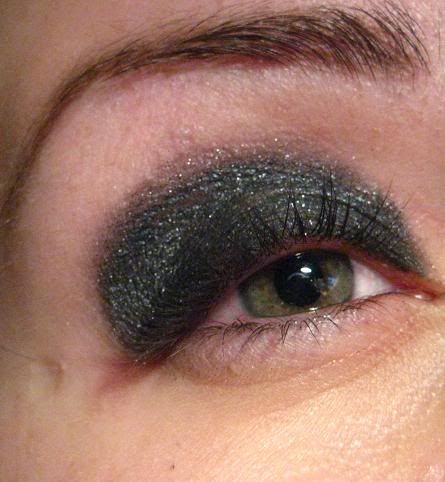
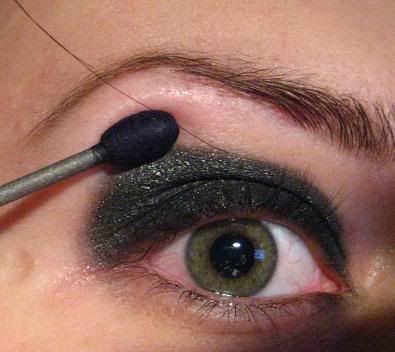
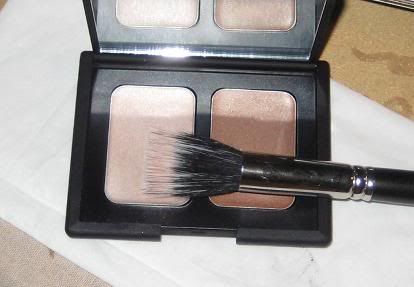
Take a highlighting color that's kind of natural for your skin tone, I used "Ricepaper" and using 217 again (I just wiped mine off) place it above Satin taupe, all the way up to your brows, and also on the inner part of your eyes.
Grab another highlight, this time make sure it's lighter and more frosty/shimmery. I used "Crystal avalanche". Put it on the highest point of your eye- right underneat the brow arch. This will "lift" your eyes and brows.
Also, put some on the inner rim, to open up your eyes
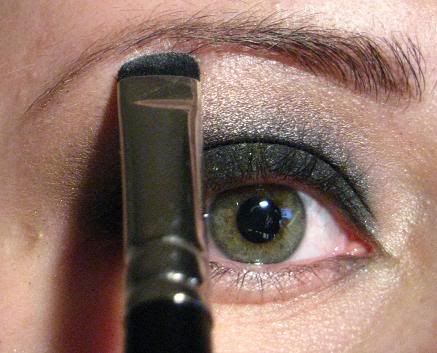
Once again, using a q-tip clean any smudges you might have. You can also use it to define the shape even more.
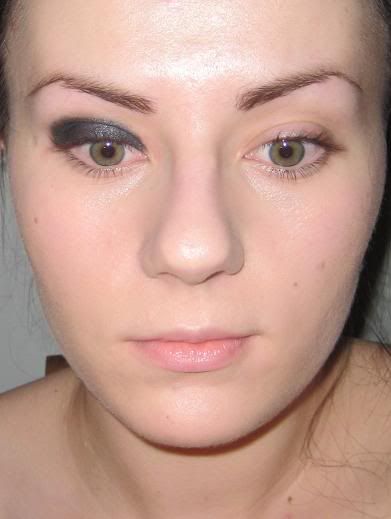
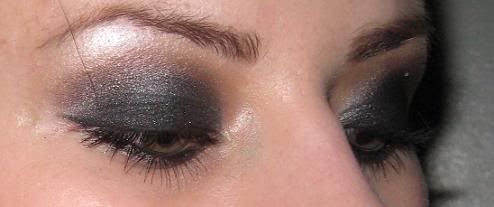
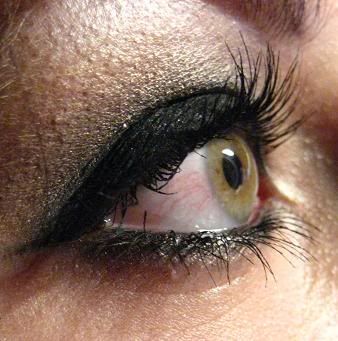
Now you can grab your Black tied e/s and put it just in the middle of the lid, above your lashes (over Carbon), so you have some shimmer there.
It's not really visible in pics, but IRL it's going to give you this nice and subtle shimmer, it'll look like your eyes are glowing/sparkling


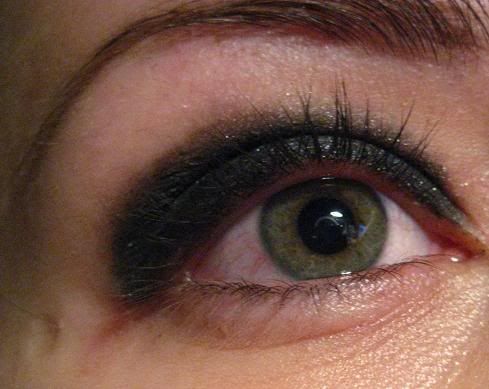
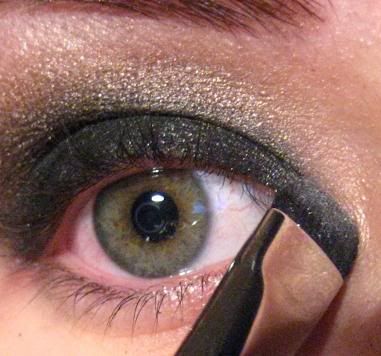
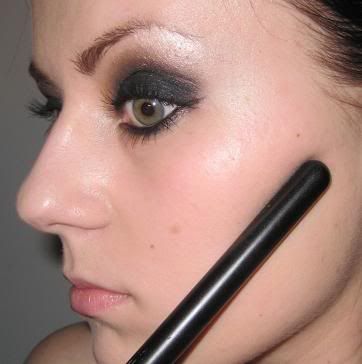
Since we used black e/s it's not really necessary to use an eye liner, because it's not going to be that visible, but I like to do my anyways. It's going to intensify the look, make your lashes fuller and also make the whole look sexier by making slight cat eye.
I used Blacktrack fluidline and 263 brush
Don't overdo it, just wing it slightly.
Take your favorite black pencil, make sure it's soft (you don't want to scratch your eyes).
Urban Decay "Zero" is what I used.
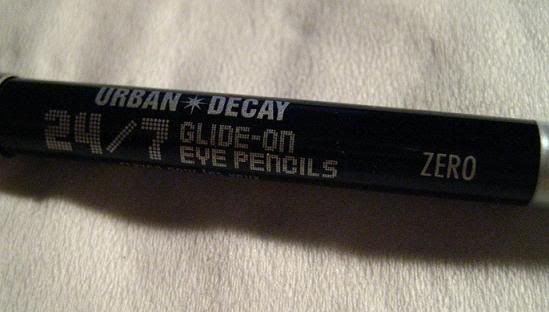
Smudge it on your upper lash line, just do little lines at a time, so your eyes don't start watering-
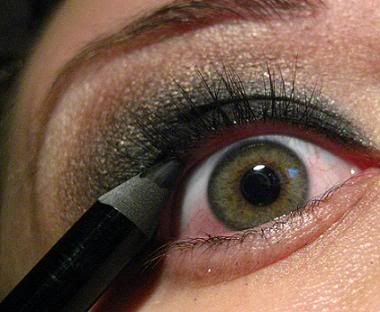 (scary pic hehe)
But the results are amazing-
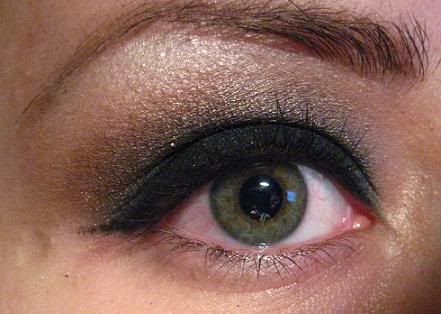 Your lashes will look so much fuller.
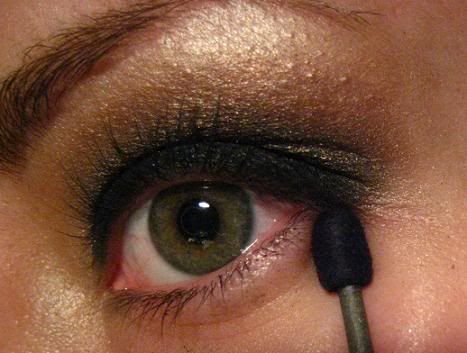
Using 263 and Carbon again
 line underneath your lower lashes
go over that line with Satin taupe, using 219
Also, line your inner rims with black pencil.
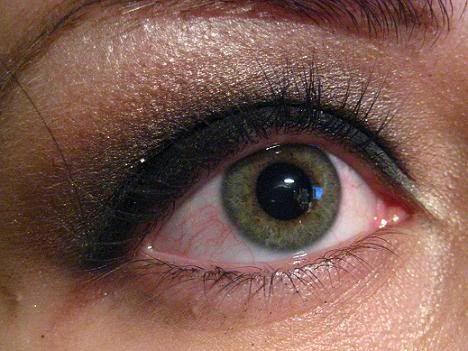
so far so good-
Mascara time-
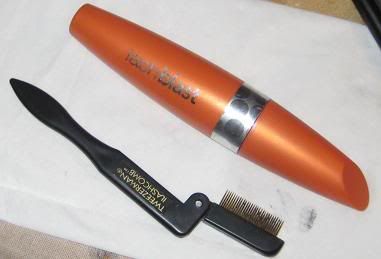 Cover Girl lash blast and tweezerman lash comb. Apply one coat of mascara, comb through before it dries, add another coat..you can add as many as you like, as long as you comb your lashes, they shouldn't clump.

I did a little bit of contouring using MAC sculpt & shape and 109 brush (you can use it for everything, it's so great)
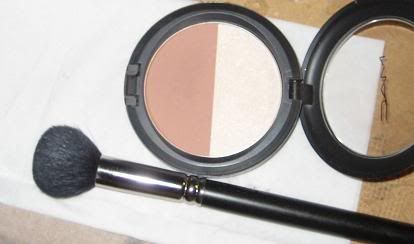
Find your cheekbone and apply your contouring powder right underneath it. Don't put to much on, you shouldn't even be able to see it, it should be natural.
Always start from your hair and move your brush in, using light movement- don't bring it in too much.
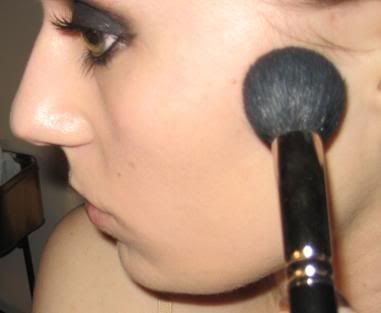
Like I said, make sure it looks like a natural shadow.

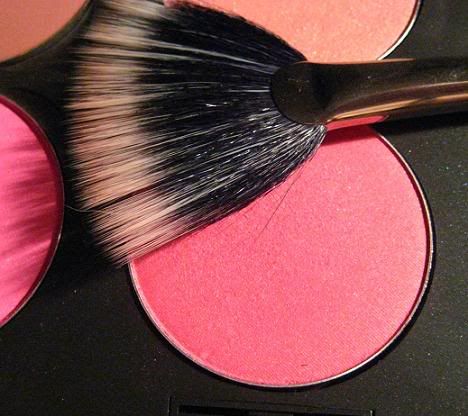
Why are you blushing, baby?
Maybe you don't like to do your blush when you do smokey eye, and that's up to you, but experiment with it, you may even like it! Just do it with a light hand. I wanted to have a natural pinkish flush, so I used Dollymix and MAC 184 brush/any fan brush that you might have (they'll deposit color lightly which is what we want).
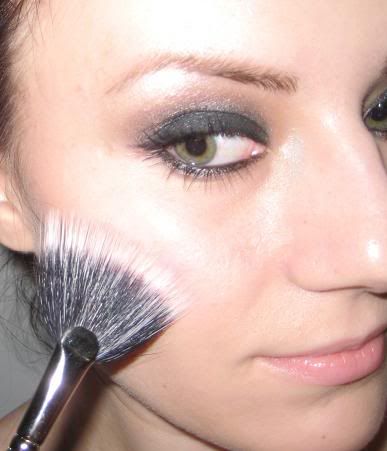
One cheek done, hopefully you can see a difference between the two-
Apply some illuminator/shimmer on top of your cheeks= instant sexiness!
 (188 brush and NARS copacabana)
You can also apply it on your chin, along the bridge of your nose etc. but my face is oily, so I'd rather not

This is my "lets try to kill that oily face" look

Prep&Prime finishing powder and 134 brush.
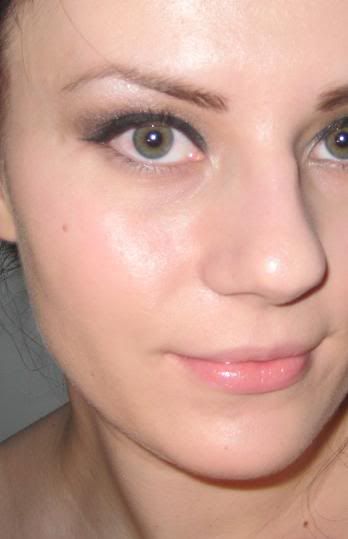
Because the rest of the makeup is so shimmery, glittery and smokey, I decided to go with the natural, matte lip color- MAC Kinda sexy. I applied it over a lip balm because it can be drying, and dry, flakey lips are not sexy.
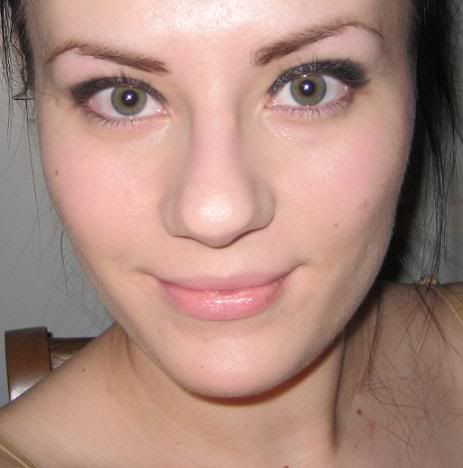
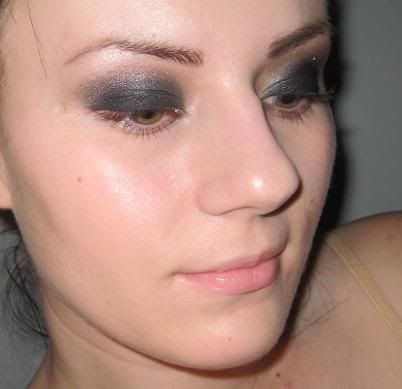
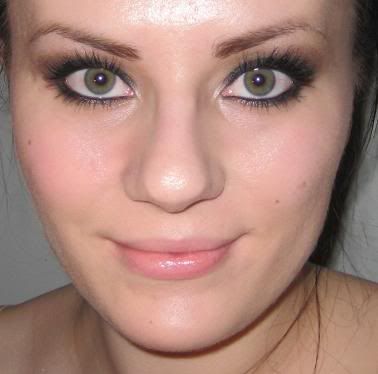
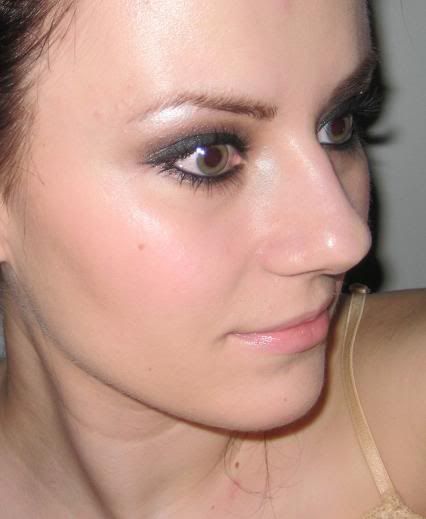
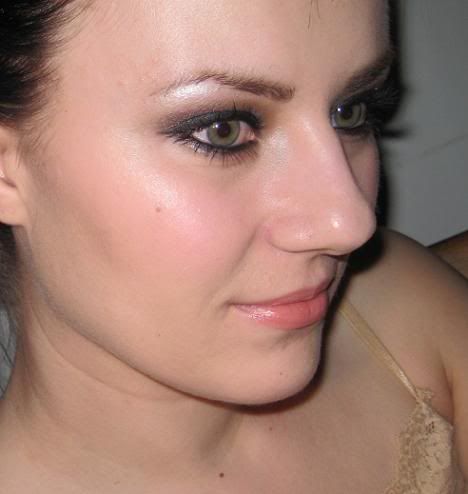
finished look-


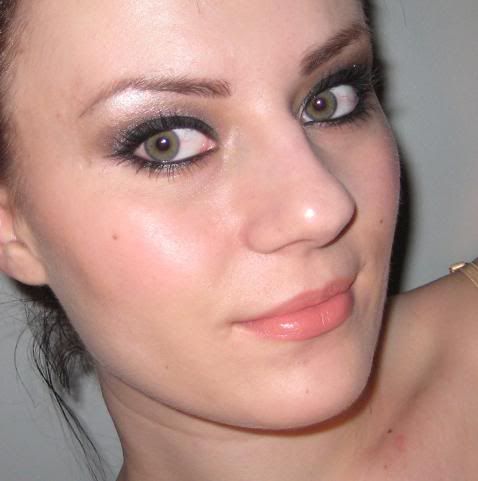

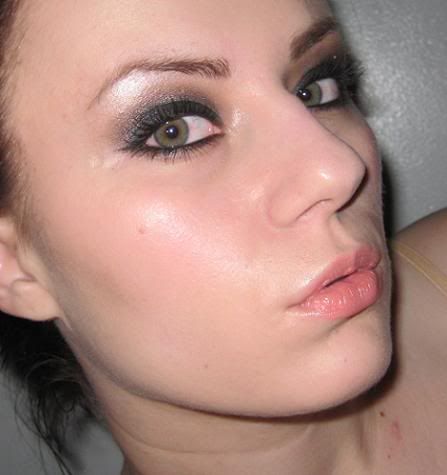
Let me pout my lips, maybe I'll look even sexier :
Pics are not the best, I did this in the middle of the night last night. Hopefully it was easy to follow and you find it helpful.
Thanks for looking!
I like this smokey eye because it's not overly dramatic, it's still soft and "natural". It can easily be worn during the day.
This is the look we are going for (these pics are from that FOTD I was talking about, this tut is not going to look 100% like this, but somewhat similar)
http://i107.photobucket.com/albums/m...D/IMG_0502.jpg
Let's get started-
Naked face (eeek, not so sexy now, are we?
I always start off by curling my eyelashes. Eyelash curler is my favorite thing EVER! It's the best invention since sliced bread, and if you're not curling your lashes, I dunno what the heck are you waiting for?
Don't you see how much better and bigger my eyes and lashes look? (one is curled, the other one is not)
Apply your moisturizer, primer and other lotions and potions you like and wait, allow them to sink into your skin before applying your foundation.
I use MAC Studio sculpt (NC20) and 109 (my new fave brush, it's so lovely... I've heard people say they don't like it because it sheds, but just be gentle with it and it's not going to shed.
I squirt some foundation onto the back of my hand, like so-
and I pick up some of it with my brush, don't over-do it, it's better to start with a thin layer and add on instead of putting too much on and try to get it off.
Then I stipple it all over one area of my face (studio sculpt dries fast, so I just do one area at the time)
and blend, blend, blend
Next, you do your concealer, on dark circles and/or any other blemishes that you have- I just did my under eye area, using studio sculpt concealer, dabbing it on with a concealer brush.
I don't bother to blend with my finger or concealer brush (especially when I'm in a hurry) so I just take my love, 109 and blend in a stroke or two.
Do your eye brows however you like, mine are looking really ugly right now, I have no idea how I did this
Fill 'em in
Put some wax on 'em
both done-
Take your favorite eye primer and a black base- I'm using too faced shadow insurance and MAC shadestick "sharkskin". You can also use any other black base- paint, paintpot, fluidline, pencil etc.
It's easy to use a shadestick because of the way it looks- it's not too thick or too thin, you don't need a brush- just color in the shape you want. Start right at the lashes and move upwards, little bit at the time. Follow your eye shape.
Go into your crease and tiny bit over it (how you're going to do this depends on your eye shape, just take a look at your eyes in the mirror and bring it higher if you think that's going to look better). It's important to see how it looks with your eyes open- looking straight ahead- not half- closed or looking down.
Both eyes-
Use a small brush, q tip or just your finger and smudge the edges, it doesn't have to be perfect, you just don't want to see any sharp edges and lines.
Grab your favorite brush for packing the color onto the lid, that would be MAC 239 for me. Also, matte black eyeshadow/pigment- I used MAC Carbon.
Pack some carbon onto your brush, tap away any excess that you might have and press it over your base, starting in the middle of the lid, right above your lashes (because you want most color there) and move up and out. Don't move your brush left-right like you would when you are blending something, just press the color on. This will minimize fallout (I usually have little to no fallout, and I don't like using the "powder underneath your lashes" trick
One eye done-
Use a q-tip to remove any smudges and fix the shape if needed.
Both eyes done-
Next, take your 217 (because it's great for applying color, as well as blending it) and "Satin Taupe" e/s
Put it above Carbon, and blend, so it'll go on the edges as well as over them. Just make sure you don't bring it down too low- you still want to have pure black above your lashes.
Blend using wiper-shield wiper motion, and it should look somewhat like this-
Take a highlighting color that's kind of natural for your skin tone, I used "Ricepaper" and using 217 again (I just wiped mine off) place it above Satin taupe, all the way up to your brows, and also on the inner part of your eyes.
Grab another highlight, this time make sure it's lighter and more frosty/shimmery. I used "Crystal avalanche". Put it on the highest point of your eye- right underneat the brow arch. This will "lift" your eyes and brows.
Also, put some on the inner rim, to open up your eyes
Once again, using a q-tip clean any smudges you might have. You can also use it to define the shape even more.
Now you can grab your Black tied e/s and put it just in the middle of the lid, above your lashes (over Carbon), so you have some shimmer there.
It's not really visible in pics, but IRL it's going to give you this nice and subtle shimmer, it'll look like your eyes are glowing/sparkling
Since we used black e/s it's not really necessary to use an eye liner, because it's not going to be that visible, but I like to do my anyways. It's going to intensify the look, make your lashes fuller and also make the whole look sexier by making slight cat eye.
I used Blacktrack fluidline and 263 brush
Don't overdo it, just wing it slightly.
Take your favorite black pencil, make sure it's soft (you don't want to scratch your eyes).
Urban Decay "Zero" is what I used.
Smudge it on your upper lash line, just do little lines at a time, so your eyes don't start watering-
But the results are amazing-
Using 263 and Carbon again
go over that line with Satin taupe, using 219
Also, line your inner rims with black pencil.
so far so good-
Mascara time-
I did a little bit of contouring using MAC sculpt & shape and 109 brush (you can use it for everything, it's so great)
Find your cheekbone and apply your contouring powder right underneath it. Don't put to much on, you shouldn't even be able to see it, it should be natural.
Always start from your hair and move your brush in, using light movement- don't bring it in too much.
Like I said, make sure it looks like a natural shadow.
Why are you blushing, baby?
One cheek done, hopefully you can see a difference between the two-
Apply some illuminator/shimmer on top of your cheeks= instant sexiness!
You can also apply it on your chin, along the bridge of your nose etc. but my face is oily, so I'd rather not
This is my "lets try to kill that oily face" look
Prep&Prime finishing powder and 134 brush.
Because the rest of the makeup is so shimmery, glittery and smokey, I decided to go with the natural, matte lip color- MAC Kinda sexy. I applied it over a lip balm because it can be drying, and dry, flakey lips are not sexy.
finished look-
Let me pout my lips, maybe I'll look even sexier :
Pics are not the best, I did this in the middle of the night last night. Hopefully it was easy to follow and you find it helpful.
Thanks for looking!

